Raspberry Pi и программирование на Go
Go orили GoLang is- aкомпилируемый compiledязык programmingпрограммирования language developed byразработанный Google.
Go isшироко widelyиспользуется usedдля forweb Webразработки Developmentи andна itсегодня isэто oneсамый ofбыстро theрастущий fastestязык. growingВ programmingотличии languages today. Unlikeот Java whichкоторый isзапускается runsв in a JVM (Java Virtual Machine) ,JVM, Go compilesсобирается directlyпрямо toв Windows, OS X or Linux executableисполняемые files.файлы.
InВ thisэтой blogстатье weмы willвзглянем lookна atсоздание creatingдвух twoпрограм, Goкоторые programsразговаривают that talk toс Raspberry Pi GPIO. TheПервая firstбудет willпросто beклавиатурный aввод simpleпрограммы, keyboardа inputвторая programбудет and the second will be a standalone Goотдельным web appприложением toуправляюищим controlпинами GPIO pins.GPIO.
Installation
To install go enter:
$ sudo apt-get install golang
To test that the install is working you can check the Go version number:
$ go version
go version go1.7.4 linux/arm
A “Hello World” example (hello.go) is:
package main

import "fmt"

func main() {

  fmt.Println("Hello World");

}
The hello.go code is compiled and ran by:
$ go build hello.go  # compile the go code

$ ./hello   # run the go code

Hello World
Raspberry Pi GPIO
ThereЕсть areможество aразличных numberспособов ofпроизводить differentподключение waysк toGPIO. haveДля Goнашего connectпримера toмы theсобираемся Piпосмотреть Generalна Purpose Inputs and Outputs (GPIO). For this example I am going to look at shelling out to theвывод gpio commandтерминальной lineутилиты, utility,так butже thereбудем areиспользовать also go go-rpi libaries that can be used.библиотеку.
ForДля testingтестирования Iмне likeнравится to use theиспользовать gpio utilityутилиту becauseтак itкак offersона aпредлагает goodхороший selectionвыбор ofкоманд commandsи andя Iмогу canв manuallyручном testрежиме andпротестировать verifyи theпроверить commandкоманды, beforeпрежде, Iчем useя themбуду inиспользовать myих Goв code.коде. ForДля helpпомощи onможно gpioвоспользоваться useключем the -h. option.
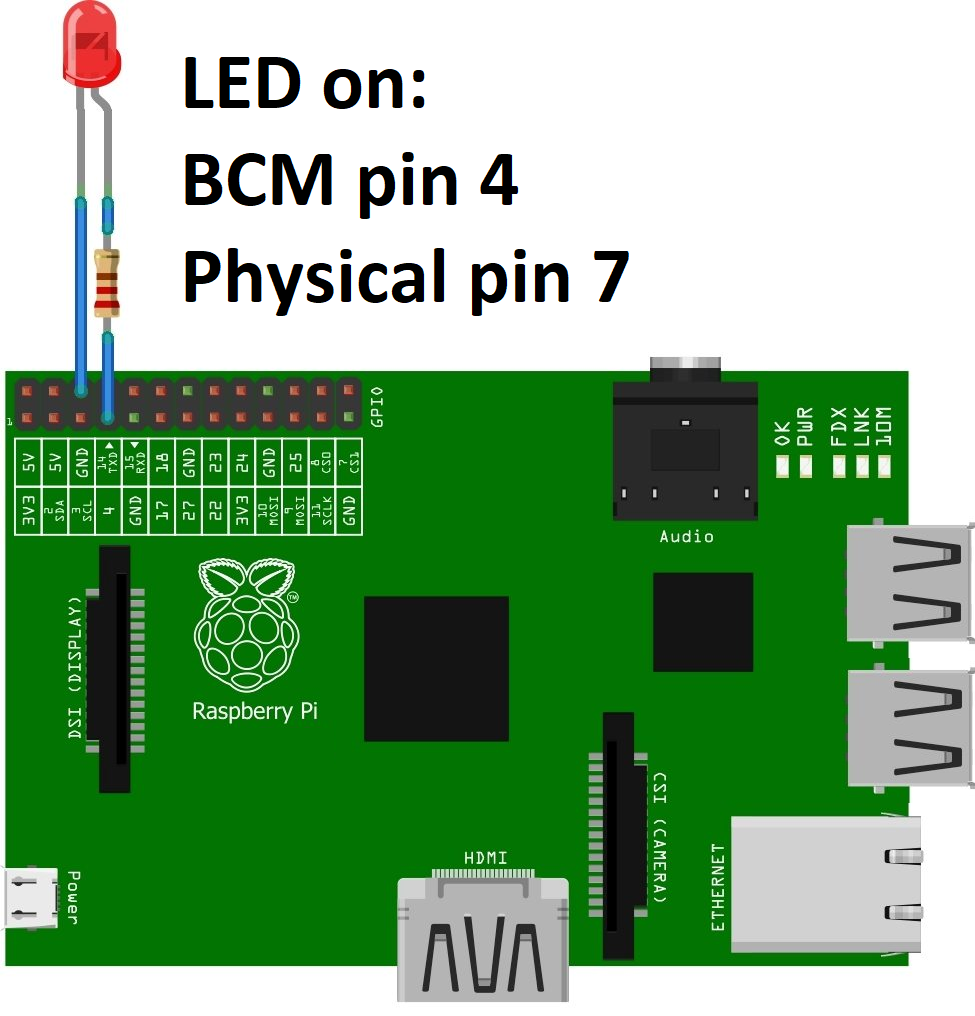
TheАппаратное обеспечение Raspberry PiPI hardwareнастраивается setupиспользуя usedрезистор anна LEDфизическом withпине a resistor on physical pin 7 (7(BCM pinпин 4).
OurНаша firstпервая go program (программа(keyin.go) willбудет readчитать keyboardввод inputклавиатуры andи thenзатем toнаправлять shellв outgpio twiceдважды, toпервый gpio,раз, firstчтобы timeзаписать toзначение, writeвторой aраз valueчтобы andпрочитать theзначение second time to read the value back.обратно.
package main

import (
    "bufio"
    "fmt"
    "os/exec"
    "os"
)

func main() {
    // Get keyboard input
    reader := bufio.NewReader(os.Stdin)
    fmt.Print("Enter value for GPIO pin 7 : ")
    pinval, _ := reader.ReadString('\n')

    // Write to GPIO pin 7 using keyboard input
    testCmd := exec.Command("gpio","write", "7", pinval)
    testOut, err := testCmd.Output()
    if err != nil {
        println(err)
    }
    // Read back the GPIO pin 7 status
    testCmd = exec.Command("gpio","read", "7")
    testOut, err = testCmd.Output()
    if err != nil {
        println(err)
    } else {
      fmt.Print("GPIO Pin 4 value : ")
      fmt.Println(string(testOut))
    }
}
ToСкомпилируем compileи and run theзапустим keyin.go program:программу:
 $ go build keyin.go
 $ ./keyin
Enter value for GPIO pin 7 : 1
GPIO Pin 4 value : 1
SimpleПростое Go Web Applicationвеб-приложение
ForДля aначального startingпримера exampleмы we’llсделаем make a go web application (веб-приложение(web_static.go) showкоторое aпоказывает webстраничку page called web_static..html.html
The web_static.html fileвыглядит willследующим be :образом:
<html>
  <head>
    <title>GO PI Static Page</title>
  </head>
  <body>
    <h1>GO PI Static Page</h1>
    <hr>
    This is a static test page
  </body>
</html>
The web_static.go programпрограмме willнеобходимо needимпортировать tonet/http importбиблиотеку. the “net/http” library. A http.HandleFunc callвызов isиспользуется usedдля toстандартного look for the default addressадреса “/” andи serveраздачи upс ourпомощью сервера нашего web_static.html file.файла. The http.ListenAndServe functionфукнция listens forслушает web requestsзапросы onна portпорту 8081.
package main

import (
    "log"
    "net/http"
)

func main() {
    // Create default web handler, and call a starting web page
    http.HandleFunc("/", func(w http.ResponseWriter, r *http.Request) {
        http.ServeFile(w, r, "web_static.html")
        println("Default Web Page")
    })
    // start a listening on port 8081
    log.Fatal(http.ListenAndServe("8081", nil))

}
The Go codeкод canможет beбыть compiledскомпилирован andи run by:запущен.
$ go build web_static.go
$ ./web_static
Default Web Page
From aИз web browseбразуера pointedуказывающего at theна Raspberry Pi onи portпорт 8081,наше ourприложение webбудет pageвыглядит will show as:так:

Go Web Appприложение withс Pi GPIO
TheСледующий nextшаг step- isсоздание toweb createстраницы aкоторая Webможет Pageпередавать thatпараметры. canДля passэтогоп someриложения parameters.мы For this application we’ll turn aпереключим GPIO outputвывод с on andна off.off.
A newНовая web page (страница(go_buttons.html) isсоздается createdс withдвумя twoкнопками. buttons.Html HTMLякорь anchorиспользуется tagsдля areпередачи used to pass /on andи /off parametersпараметров toв ourнаше Webweb app.приложение.
A CACHE-CONTROL metaтег tagустанавливается setв to NO-CACHE isдля neededтого, toчтобы ensureмы thatточно theзнали, webчто pageстраница alwaysперезагружается. refreshes.Я Iтак alsoже includedвключил anEXPIRES EXPIRESтег metaравным tagнулю, (=чтобы 0)браузер soвсегда thatвидел theстраничку browser always see the page as expired "испорченной". IfЕсли youвы don’tне includeвключаете metaих tagsто theстраница webможет pageбыт mayзагружена onlyтолько updateодин once.раз.
<html>
  <head>
    <title>GO PI GPIO</title>
    <META HTTP-EQUIV="CACHE-CONTROL" CONTENT="NO-CACHE">
    <META HTTP-EQUIV="EXPIRES" CONTENT="0">
  </head>
  <body>
    <h1>Go Raspberry Pi GPIO Test</h1>
    <a href="/on"><button>Set LED ON</button></a><br>
    <a href="/off"><button>Set LED OFF</button></a>
  </body>
</html>
OurНаше newновое Goweb Web app (приложение(go_buttons.go) nowтеперь includesвключает twoеще moreдве http.HandleFunc handlerфункции functions,обработчика, oneодну forдля /on andи forодну для /. off.offTheseЭти handlerобработчики functionsвызывают callфункцию aкоторая newвызывает functiongpio, calledчто gpioиспользуется thatдля isнаписания usedвывода toи writeчтения aобратно outputsстатуса andввода.
Наш
Our newly created gpio function shells out twice to the gpio command line utility, first time to write a value and the second time to read the value back.
package main

import (
	"log"
	"net/http"
	"os/exec"
)
func gpio( pinval string) {
    testCmd := exec.Command("gpio","write", "7", pinval)
    testOut, err := testCmd.Output()
    if err != nil {
        println(err)
    }
    testCmd = exec.Command("gpio","read", "7")
    testOut, err = testCmd.Output()
    if err != nil {
        println(err)
    } else {
      print("GPIO Pin 4 value : ")
      println(string(testOut))
    }
}

func main() {

	http.HandleFunc("/", func(w http.ResponseWriter, r *http.Request) {
		http.ServeFile(w, r, "go_buttons.html")
		println("Default Web Page")
	})

	http.HandleFunc("/on", func(w http.ResponseWriter, r *http.Request) {
                 http.ServeFile(w, r, "go_buttons.html")
		 println("Web Page sent : ON")
		 gpio("1")

	})

	http.HandleFunc("/off", func(w http.ResponseWriter, r *http.Request) {
                 http.ServeFile(w, r, "go_buttons.html")
		 println("Web Page sent : OFF")
		 gpio("0")
	})

	log.Fatal(http.ListenAndServe(":8081", nil))

}
To compile and run of web app go_buttons:
$ go build go_buttons.go
$ ./go_buttons


Default Web Page
Web Page sent : ON
GPIO Pin 4 value : 1

Default Web Page
Web Page sent : OFF
GPIO Pin 4 value : 0
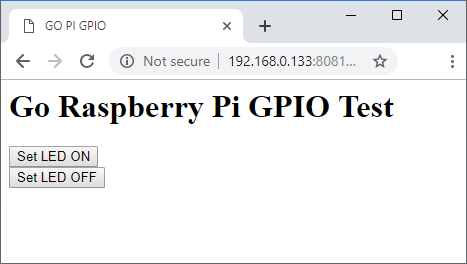
The web page should look something like:
Summary
For a polished application I would rather use a native Go library for GPIO calls, but for prototyping I found that the gpio command line utility to be easier for trouble-shooting.
After getting a basic web page working for anchor tags for /on and /off, the next step will be to use some Javascript with AJAX to show dynamic values.