Go — Raspberry Pi GPIO "Привет мир" руководство
ForДля aотносительно relativelyнового newязыка, language,к которым относится Go. Я использовать его с тех годов, по нескольким причинам, так как он полон сюрпризов.
Поэтому недавно, я купил новую pi3 и в основном использовал C для прошлой pi2. Однако, отметим, множество руководств использует питон, а я не большой фанат этого языка. Поэтому я случайным образом поискал библиотеке Go isи veryразличные reliable.руководства Iдля havePi beenGPIO, usingи itпоигрался sinceчуток lastс yearпроводульками forу severalменя reason, since this one is full of surprise.дома.
SoВ recently,этой Iстатье boughtмы aсобираемся newпостроить piочень 3, and I mostly used C language for my previous pi 2. However, I notice many tutorial uses Python at the moment, and I am not a big fan of it. So I randomly searched some go libraries and tutorial for Raspberry Pi’s GPIO and play it a bit with some leftovers wires in my home.
In this article we are going to build a very simpleпростую LED toggleпереключалку usingиспользуя Raspberry Pi andи язык Golang.
Мы можем установить целое Go Language.
It is possible to install the whole go environment inside theвнутри Raspberry Pi.Pi, However,однако, itэто willзаймет takesмного lotресурсов ofвнутри resourcesмаленькой insideмашинки. thisПоэтому, smallя machine.предпочитаю Then,разрабатывать Iи preferстроить toпрограмму developудаленно theс programмоего andрабочего build it remotely from my workspace.места.
1. Setup Raspberry Pi SSH
Since we are going to develop it remotely, first of all, we need to plug the Raspberry Pi and enter to the OS. Also make sure the Pi is connected through net using the WIFI, or LAN. Then, Open the UNIX terminal, and type:
sudo raspi-config
Your terminal will prompt the configuration window for various purpose. Then, select 5. Interfacing Options > P2 SSH Then, select Enable to enable the SSH.

Alternatively, we can use systemctl to enable and start the service, such as:
sudo systemctl enable ssh then, sudo systemctl startssh
2. Accessing Rasperry PI using SSH
Once, your Pi is connected to the net and accessible using SSH. From your workspace, access the Pi using ssh command:
ssh pi@[raspberry pi host address]
For instance ssh pi@192.168.xx.xx
By default, the username should be pi, and after that, the terminal will ask you to enter the password. For the information, the usual default Raspberry Pi password is raspberry.
3. UsingИспользуем GPIO
WeМы areсобираемся goingсоздать toочень createпростую aмерцающую veryпрограмму, simpleкоторую blinkусстановим LEDи programзапустим and will install it to theна Raspberry Pi.PI. SoПоэтому. beforeперед that,этим, weнужно needпонять toбазу, understandкак aработать bit about a basic info ofс GPIO.
InСамый easyпростой wayспособ Raspberry Pi’sсчитать GPIO (Generalинтерфейсом, Purposeкоторый Inputлежит /между Output)системой willPi actи asвнешней anсистемой. interfaceIO betweenмодуль theбудет Pi’s system and outside system. I/O module will useиспользовать GPIO pinsпины, soтаким Raspberryобразом, canчтобы readraspberry theмогла inputчитать orввод showили theпоказывать outputвывод fromот deviceдевайса andили sensors.сенсора.

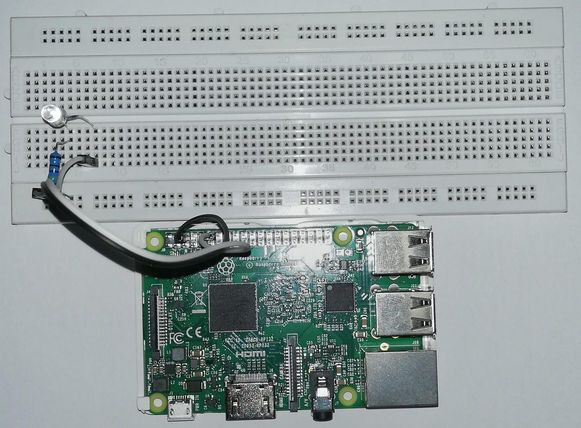
AsКак itпоказано showsна onрисунке, theустройство image,имеет theнесколько deviceтипов hasпинов, severalтакие types of pin such as:как GPIO, Ground,земля, 3.3v,3 andвольтовые 5vи pins.5 Forвольтовые thisпины. tutorial,Для weнашей areинструкции goingмы toсобираемся playиграться a bit usingс GPIO pin18 18,пином andи the ground pin.землей.
WeМы canтак alsoже accessможем theполучить доступ к GPIO pinsинформации informationчерез fromтермина theисопльзуются terminal using UNIX terminal command:команду pinout .
4.2. AssemblingСобираем LED Deviceустройство
ForДля thisэтой tutorial,инструкции, weмы needсобираемся toподготовить prepareнесколько several items such as:вещей:
- USB
cableкабельandиchargerзарядникforдляpower up theпитания Raspberry PI, - 2
shortкороткихjumperпереключателяwires,проводов, Breadboard,Макет,- LED, and
- 330Ω
resistorрезистор
IЯ amне notбуду goingрассказывать toглубого explainпроцесс inустановки, depthтак aboutкак theэто installationлегко process,можно sinceнайти itв is widely discussed on several raspberry tutorial on internet (please see the references section for Pi-LED assembling tutorial).интернете.
5.3. Developing theРазработка Go Codeкода
Finally,Наконец, weмы areсобираемся goingразработать toкод develop the code usingиспользуя Go. FirstПерво-наперво, ofмы first,будем weиспользовать willдоступный useтакой theпакет availableв packageинтернете, on the internet such as:как:
https://github.com/stianeikeland/go-rpio, and http://gobot.io/documentation/platforms/raspi/
Go-rpio supportподдерживает theоперации basic operation forдля GPIO usingиспользуя GolangGolang, soпоэтому Iя believeверю, itчто isон quiteдостаточно adequateподходит toдля beнаших usedцелей. onВ thisто tutorial.время Whilstкак Gobot,Gobot provideпредоставялет more sophisticatedцелую SDK libraryбиблиотеку forдля доступа к GPIO pinsпинам accessи andспецифические specificдрайвера GPIO drivers such as:как: LED, motor,мотор, relay,реле, servo,сервопривод andи etc.т.д.
InВ thisэтом case,случае, Iя willсобираюсь going to useиспользовать Go-rpio forдля a basicбазового LED helloпримера, worldтак tutorial,как sinceмы weне areсобираемся notиспользовать goingэти toдравйвера useна thoseданный drivers at the moment:момент.
AsКак Iя mentionупоминал onв theсамом firstначале, section,мы weсобираемся areразрабатывать goingудалеенно. toПоэтому developсперва, theскачаем codeпакет remotely.который Soбудем first of all, lets go get the package first so we can use it.использовать.
go get github.com/stianeikeland/go-rpio
ThisЭто isпример theкода sampleдля codeсоздания toмерцающего createприложения a blink application usingиспользуя Go inна raspberry pi:
package main

import (
	"fmt"
	"time"

	"github.com/stianeikeland/go-rpio"
)

func main() {
	fmt.Println("opening gpio")
	err := rpio.Open()
	if err != nil {
		panic(fmt.Sprint("unable to open gpio", err.Error()))
	}

	defer rpio.Close()

	pin := rpio.Pin(18)
	pin.Output()

	for x := 0; x < 20; x++ {
		pin.Toggle()
		time.Sleep(time.Second / 5)
	}
}
Explanation:Объяснение:
ThisЭтот codeкод will try to open aоткрывает GPIO andи setустанавливает theрежим listenприема pinна for pinпине 18. TheПин pinбудет willнастроен beдля setвывода(Ввода forдля theчтения, Outputтипа (Inputсенсора forи reading, i.e: sensor, etc)т.д.). For 20 times,переключит itрежим will toggle the pin (пина(Low > High > Low) andи setустановит the delay toзадержку 200ms. OnceКак theтолько operationоперация done,выполнится, theпрограмма programбудет will be finished.завершена.
6.4. BuildСборка andи Uploadзагрузка the Programпрограммы.
ToДля buildтого, theчтобы programбезопасно safelyсобрать weпрограмму canмы useбудем thisиспользовать command:команду:
env GOOS=linux GOARCH=arm GOARM=5 go build
TheКоманда aboveвыше commandговорит willкомпилятору. tellчто theмы compilerсобираем thatпрограмму we’re building forдля Linux and theи ARM architecture.архитектуру. NowНа thereданный areмомент, severalесть поддержка нескольких версий ARM versionsкомпилятором supportedGo, byно theмы Goищем compiler, but we’re looking for versionверсию 5.
Then,Затем weмы areсобираемся goingзагрузитьь to\ uploadскопировать /файл copyна the file to the connectedподключенную raspberry pi. ForДля thisэтой purpose,цели, weмы areсобираемся going to useиспользовать scp command to upload the file.команду.
scp [go binary] pi@192.168.43.208:[remote dir]
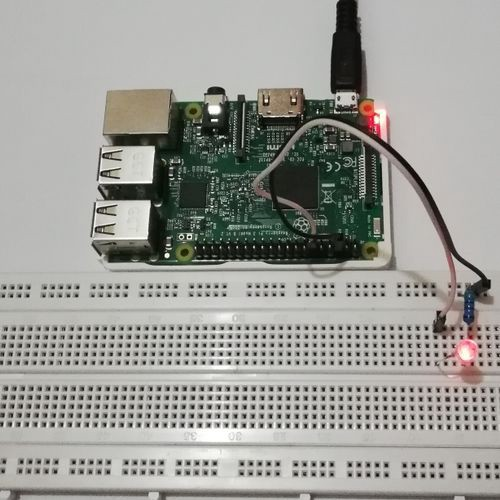
7.5. RunningЗапуск the Programпрограммы
OnceКак theтолько goбинарник binaryбыл hasзагружен(для beenпримера, uploadedмы (forзагрузили instance,его weпо uploaded it toпути /home/pi/gogo/gopio), andто theчтобы binaryего nameзапустить isнужно gopio)thenвыполнить what we need to do is to execute it using:команду:
./gopio
IfЕсли theпрограмма componentверно isсобрана, assembledи correctly,нет andошибок thereв is not error in the code, theкоде, LED willбудет blink,мерцать andи itостановится will stop blinking afterпосле 20 times.переключений.
8.6. ConclusionВыводы
WeМожно can useиспользовать Raspberry-Pi toдля developразработки aпрограмм program inside aвнутри Raspberry-Pi. InВ thisэтой tutorial,статье, Iя showпоказал youвам aпростой veryпример, simpleкак exampleсоздать on how to create a blinkingмерцающий LED usingиспользуя Raspberry Pi, withна Golangязыке program.Golang.
9.7. Image Link and Resources
https://thepihut.com/blogs/raspberry-pi-tutorials/27968772-