Изучение всех рисований на canvas в Android
Если вы хотите создать свой view с нуля в Android, то вам бдует полезано знать функции доступные в canvas. В этом блоге, я перечислю все досупные для рисования функции в Android Canvas: 23 шутки. Вы узнаете то что раньше не знали(Я был удивлен их наличием) Ниже я их разделилп по категориям:
- Геометрический рисование
- Текстовое рисование
- Цветное рисование
- Рисование из картинки.
На случай если у вас нет опыта создания своего view, вы можете ссылаться на мануал под названием:
- Building Custom Component with Kotlin - Предположим вы хотите создать страницу которая состоит из повторяющихся общих view. И вам возможно не захочется их повторять.
- Custom Touchable Animated View in Kotlin - Если вы хотите нарисовать свою собственную view, и так же рисовать анимацию,ну и конечно на котлине... Это должно помочь.Android: draw a custom view
- Android: draw a custom canvas
Introduction
Геометрицеское рисование
Множество людей использует Canvas для рисования геометрических объектов.
1. drawLine
Просто рисует линию
canvas.drawLine(startX, startY, endX, endY, paint)

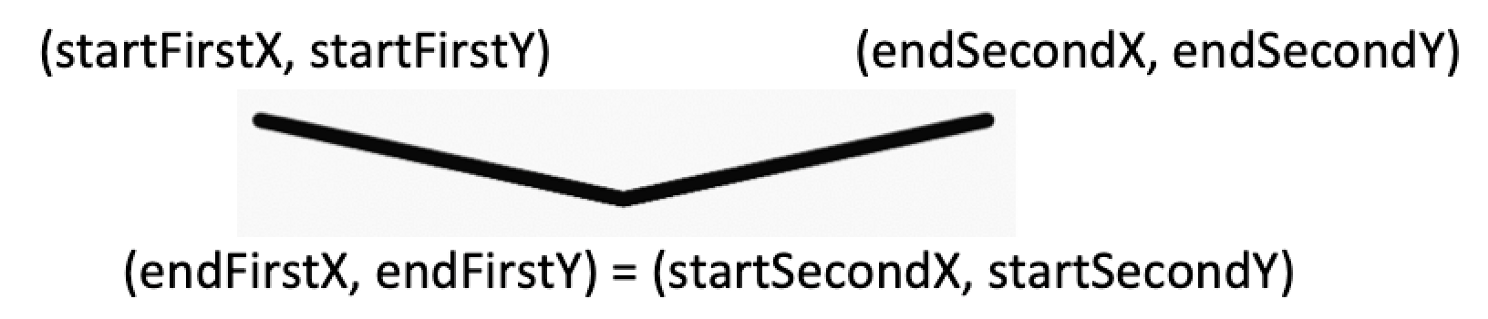
2. drawLines
Если мы рисуем больше чем одну линию, взамен вызова drawLine много раз, мы можем использовать drawLines. Нам нужно предоставить плоский массив значений координат как показано ниже.
canvas.drawLines(
    floatArrayOf(
        startFirstX, startFirstY, endFirstX, endFirstY,
        startSecondX, startSecondY, endSecondX, endSecondY),
    paint)
3. drawPoint
Пока вы можете нарисовать точку с помощью линии с тем же началом и концом координат, то это можно считать хаком. Поэтому drawPoint функция существует.
canvas.drawPoint(coordinateX, coordinateY, paint)
4. drawPoints
Как в случае с линиями, вы можете нарисовать множество точек с помощью массива координат.
canvas.drawPoints(
    floatArrayOf(
        startX, startY,
        startSecondX, startSecondY),
    paint)
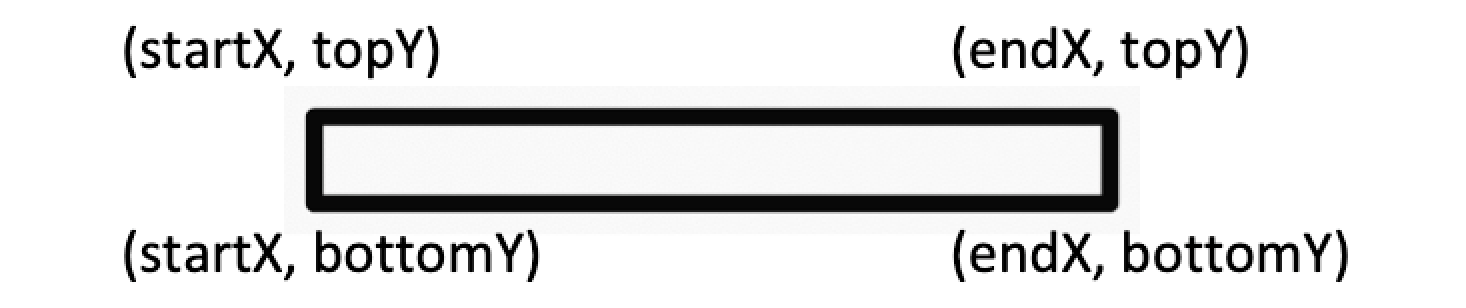
5. drawRect
Рисование угла использя координаты или класс Rect.
canvas.drawRect(
    Rect(startX, topY, endX, bottomY),
    paint)
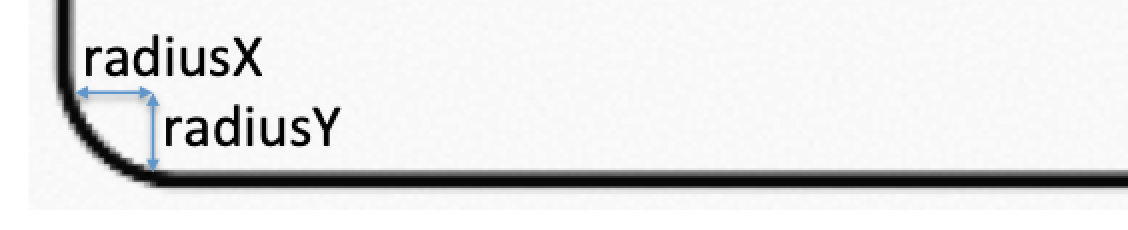
6. drawRoundRect
Если вы хотите угол с круглыми углалми, используйте drawRoundedRect. Это похоже на drawRect но с дополнительными radiusX и radiusY, для определения кривизны круглого угла.
canvas.drawRoundRect(rect, radiusX, radiusY, projectResources.paint)
Функция рисует равномерно круглый угол, если radiusX и radiusY равны.
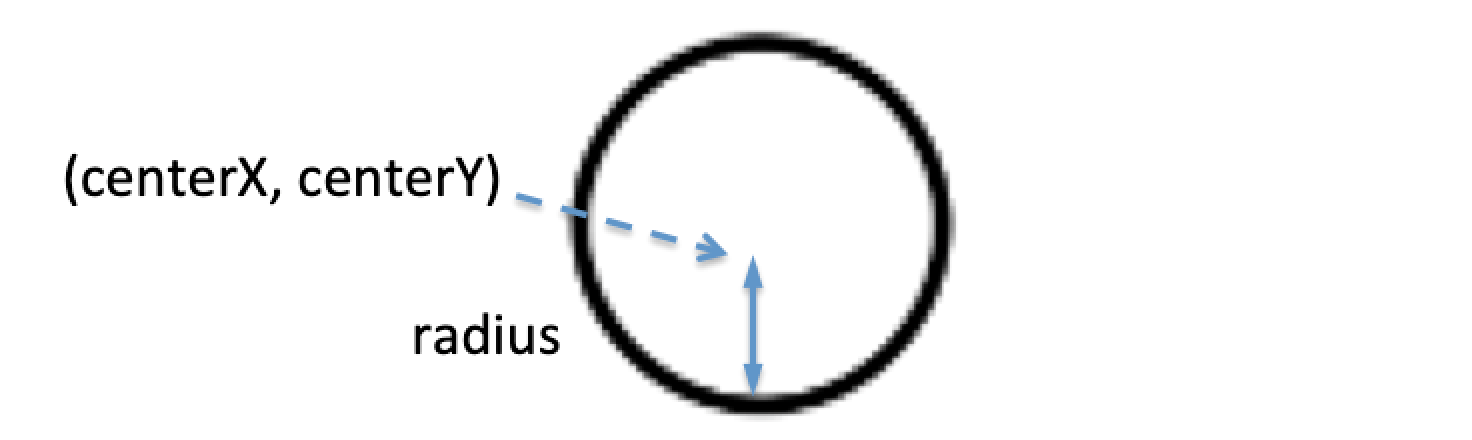
7. drawCircle
drawCircle простой. Ему требуются только центр координат и радиус.
canvas.drawCircle(
    centerCoordinateX, centerCoordinateY,
    radius,
    paint)
8. drawOval
В отличии от рисования круга, мы не предоставляем радиус. Вместо этого мы указываем прямоугольник, и овал будет нарисован соотвественно.
canvas.drawOval(rect, paint)

9. drawArc
Рисование дуги использует то что и овал: класс Rect. И имеет дополнительные параметры, то есть startAngle, sweepAngle и useCenter.
canvas.drawArc(rect, startAngle, sweepAngle, useCenter, paint)
Для startAngle, почитаем середину конца и прямоугольник как начало, то есть 90° поворот по часовой стрелке. Отсюда начальный угол считается нулём. sweepAngle расчитывается от startAngle. Оба используют значения градусов угла.
useCenter это булева переменная для определения связана арка с центром.

useCenter=false

useCenter=true
10. drawPath
Иногда мы хотим нарисовать то что не отображается обычной геометрической фигурной линией. В этом случае мы пользуем drawPath, где Path это объект который состоит из пути который мы хотим нарисовать. Он состоит из функций таких как moveTo и lineTo, как карандаш рисует и двигается.
Ниже пример где мы длелаем крестик с помощью drawPath.
val path = Path()
path.moveTo(startX, topY)
path.lineTo(endX, bottomY)
path.moveTo(startX, bottomY)
path.lineTo(endX, topY)
canvas.drawPath(path, paint)
drawPath очень полезная функция. Много кто использует её для создания нарисованных приложений.

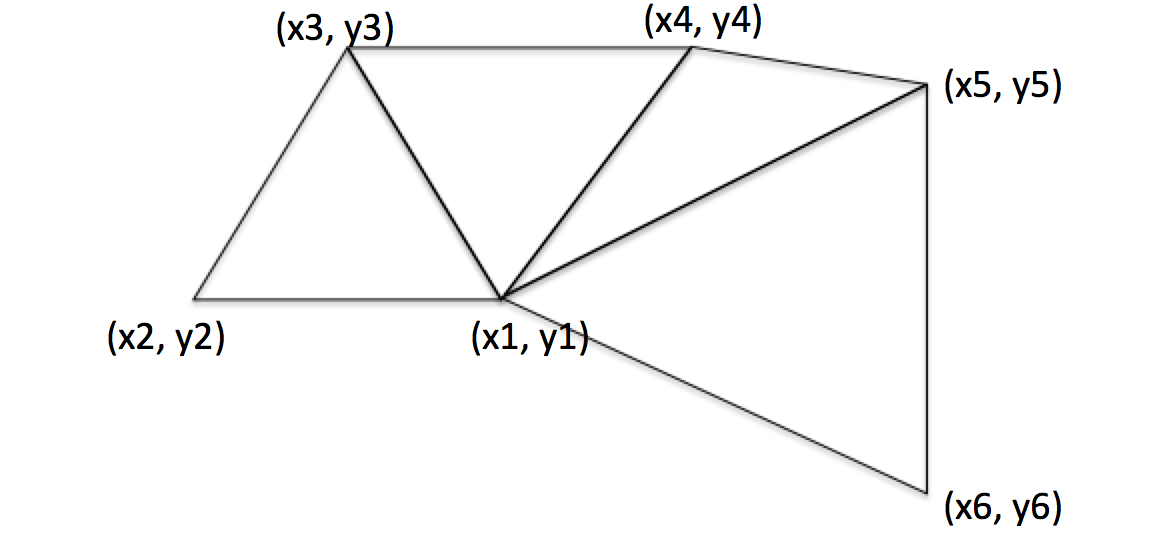
11. drawVertices
Это относительно сложная функция, которая рисует треугольники или вершины с маленькими точками. Для примера, с 6 координатами, можно нарисовать 4 треугольника.
При повторении, можно использовать для сложного 3д моделирования. Картинка ниже это 3d роза, нарисованная с помощью drawVertices.
Вот детальное объяснение его функций.
Рисование текста
Если нам нужно нарисовать текст самостоятельно, это будет довольно легко. Благодаря тому, что мы имеем несколько прекрасный функций.
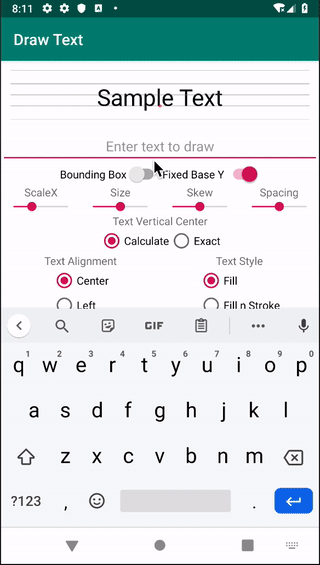
12. drawText
На андроиде, мы обычно испозуем TextView для всех наших текстов. Однако, если мы хотели бы лучший контроль текста, такие как динамическое изменения, точное положение. и т.п., то нам поможет drawText.
Функция принимает text, coordinateX, coordinateY и paint:
canvas.drawText(text, coordinateX, coordinateY, paintText)
Довольна интересная функция чтобы поиграться с ней.
13. Рисование StaticLayout
У drawText есть ограничения. Он не переносит слова на вторую строку. Так же не обрабатывает \n знак.
Поэтому нам нужен StaticLayout чтобы нарисовать текст который может переносить длинные слова на вторую линию.
StaticLayout не совсем функция рисования на canvas, но взамен врисовывает себя в canvas. Ниже пример отрисовки:
val staticLayout =
    StaticLayout.Builder.obtain(
        TEXT, 0, TEXT.length, textPaint, width
    ).build()

canvas.save()
canvas.translate(coordinateX, coordinateY)
staticLayout.draw(canvas)
canvas.restore()

14. drawPosText
drawPosText позволяет помещать знак на определенном позиции. Ниже слово fly написано на разных позициях Y.
val posArray = listOf(x1, y1, x2, y2, x3, y3 ...).toFloatArray()
canvas.drawPosText(TEXT, startIndex, endIndex, posArray, paint)
Приведенные координаты точек должны быть как минимум какие же как буквы чтобы нарисовать, иначе они упадут.

15. drawTextOnPath
Спаренные с путем, мы можем указывать наш текст вдоль приведенного пути.
x и y позиции относительно позиции данного пути.
canvas.drawTextOnPath(TEXT, path, x, y, paint)

16. drawTextRun
This is a little more complicated, as it is generally not used with English words. It only applies to language with letters that are drawn differently depending on the visibility of surrounding letters. For example, the image below has two lines of two letters. The two letters in both lines are the same. However, they are written differently. In the first line, they are part of a larger word, while the second line states the two letters individually. Image for post To understand better, refer to this blog.
Color Drawing
Coloring is useful for the foreground and background of the canvas we’re drawing on. Check it out, as there’s a fancy one…
17. drawRGB
This is just drawing a color over the canvas. This is useful for setting a background color. canvas.drawRGB(red, green, blue) // Each is between 0 and 255, where 0 is not there, and 255 is full. // When alpha is 255, it is opaque, and 0 is transparent.
18. drawARGB
Similar to drawRGB, this adds the ability to make the color semi-transparent. canvas.drawARGB(alpha, red, green, blue) // When alpha is 255, it is opaque, and 0 is transparent. This is useful to set the front color and dim the item behind. Image for post Original Image Image for post Semi transparent red dimming the image
19. drawColor
In case we’d like to use a resource’s color instead of setting our own ARGB color, we can use this API. canvas.drawColor(context.getColor(R.color.colorPrimary))
20. drawPaint
Sometimes, we like to paint fancier colors. Instead of using ARGB or a resource color, we could create a Paint object. Below is an example:
val gradientPaint by lazy {
    Paint().apply {
        shader = RadialGradient(
            width/2f,
            height/2f,
            height/2f,
            Color.GREEN,
            Color.RED,
            Shader.TileMode.MIRROR
        )
    }
canvas.drawPaint(gradientPaint)
Image for post
Image Drawing
Without the ability to load images to draw and manipulate them, canvas drawing would be incomplete. So let’s explore what we have…
21. drawBitmap
Given a bitmap, we can draw it into the canvas.
private val bitmap by lazy {
    BitmapFactory.decodeResource(resources, R.drawable.image)
}
canvas.drawBitmap(bitmap, sourceRect, destRect, paint)
The required parameters are bitmap and destRect. The bitmap can be extracted from resources. destRect is the rectangle area of the canvas to be drawn onto. The optional ones (could be null) are sourceRect and paint. sourceRect is a rectangle representing which subset of the picture to draw. When it is null, the entire picture is taken. (Note: this is very useful for some animation, when a picture of the entire animated drawing is added, and only a subset is shown at a time, as seen here.) paint could be set to null, and the Bitmap will still be drawn as usual. paint is useful if we plan to mask it out with another image. An example is shown in this StackOverflow.
22. drawPicture
If you have a combination of things to draw, and this happens multiple times, and you don’t want the processing to be slow and have to redraw them each tim, you could put your entire drawing into Picture. Below is a simple example where we store our drawing into a Picture:
private val picture by lazy {
    val picture = Picture()
    val pCanvas = picture.beginRecording(width, height)
    pCanvas.drawBitmap(bitmap, null, rect, null)
    picture.endRecording()
    picture
}
When needed, just perform this: canvas.drawPicture(picture) This would speed up your entire process of drawing for things that need to be drawn over and over again.
23. drawBitmapMesh
This is to manipulate the bitmap image drawn. Given an image, we could set coordinates within the image, and translate a point to another position, hence transforming the image of it. E.g. the below image with the center X, Y is shown in the white line cross-section. Image for post However, using drawBitmapMesh, we could shift the coordinate and transform the image accordingly. Image for post Refer to this blog for more information. You can find all these code examples of Canvas drawing here. Have fun with Android Canvas Drawing!