Архив
- Искусственный Интеллект
- Архив
- Streaming Data with Postgres + Kafka + Debezium: Part 2
- Beautiful Load Testing With K6 and Docker Compose
- Анализ производительности Docker контейнеров с помощью встроенных инструментов
- Gitlab Ci Dynamic Child Pipelines : a New Hope
- Bottled Water: Real-time integration of PostgreSQL and Kafka
- Android
- Kafka
- Kotlin
- Как я сделал RAG для своей компании
- tracim - Unified platform for seamless collaboration.
- Tinode Instant Messaging Server
Искусственный Интеллект
Термин ИИ
Определение: свойство интеллектуальных систем выполнять творческие функции, которые традиционно считаются прерогативой человека
Первые исследования в области ИИ, стартовавшие в 50-х годах прошлого века, были направлены на решение проблем и разработку систем символьных вычислений.
Термин «искусственный интеллект» появился в 1956 году, но настоящей популярности технология ИИ достигла лишь сегодня на фоне увеличения объемов данных, усовершенствования алгоритмов, оптимизации вычислительных мощностей и средств хранения данных. Сегодня мы видим рассвет этой технологии
Немного истории
В 1950 году
Алан Тьюринг публикует в научном издании анализ интеллектуальной шахматной игры. В 1958 году появляется первый язык программирования искусственного интеллекта – Лисп.
В 1965 году
В 1965 году разработали Элизу – первого робота-помощника, который мог говорить на английском языке.
к 70-м годам
Так Министерство обороны США уже к 70-м годам запустило проект виртуальных уличных карт – прототип GPS.
В 1969 году
ученые Стэнфордского университета создали Шеки – робота с ИИ, способного самостоятельно перемещаться, воспринимать некоторые данные и решать несложные задачи.
В СССР искусственный интеллект также развивался стремительно. Академики А.И. Берг и Г.С.Поспелов в 1954-64 годах
создают программу «АЛПЕВ ЛОМИ», которая автоматически доказывает теоремы. В эти же годы советскими учеными был разработан алгоритм «Кора», который моделирует деятельность человеческого мозга при распознавании образов. В 1968 году Турчиным В.Ф создается символьный язык обработки данных РЕФАЛ.
80-е годы XX века
стали прорывными для ИИ. Учеными были разработаны обучающие машины – интеллектуальные консультанты, которые предлагали варианты решений, умели самообучаться на начальном уровне, общались с человеком на ограниченном, но уже естественном языке.
В 1997 году
создали известную шахматную программу – компьютер «Дип Блю», который обыграл чемпиона мира по шахматам Гарри Каспарова.
ИИ в научной фантастике.
Хотя в научно-фантастических фильмах и романах ИИ зачастую изображают в виде человекоподобных роботов, захватывающих власть над миром, на данном этапе развития технологии ИИ совсем не такие страшные и далеко не такие умные. Напротив, развитие искусственного интеллекта позволяет этим технологиям приносить реальную пользу во всех отраслях.
Проблемы ИИ
Технологии искусственного интеллекта способны изменить любые отрасли, но их возможности не безграничны.
На основе данных
Главное ограничение ИИ заключается в том, что обучение возможно только на основе данных, другими способами - невозможно. Это означает, что любые неточности в данных отразятся на результатах. А новые уровни прогнозирования или анализа необходимо добавлять отдельно.
Выполняет только четко определенные задачи
Современные системы ИИ заточены под выполнение четко определенных задач. Система, предназначенная для игры в покер, не сможет раскладывать пасьянсы или играть в шахматы. Система, настроенная на выявление мошенничества, не сможет водить машину или предоставлять правовую помощь. Более того, система ИИ, предназначенная для выявления мошенничества в сфере здравоохранения, не сможет с той же степенью точности выявлять махинации с налогами или претензиями по гарантиям.
Другими словами, эти системы характеризуются очень узкой специализацией. Они предназначены для выполнения одной конкретной задачи, и им далеко до многозадачности человека.
Не являются автономными.
Кроме того, самообучающиеся системы не являются автономными. Образы технологий ИИ, которые мы видим на экранах телевизоров и кинотеатров, по-прежнему являются элементами фантастики. Тем не менее компьютеры, способные анализировать сложные данные для освоения и совершенствования конкретных навыков, уже не редкость.
Принцип работы искусственного интеллекта
Принцип работы ИИ заключается в сочетании большого объема данных с возможностями быстрой, итеративной обработки и интеллектуальными алгоритмами, что позволяет программам автоматически обучаться на базе закономерностей и признаков, содержащихся в данных. ИИ представляет собой комплексную дисциплину со множеством теорий, методик и технологий.
Ее главными направлениями являются следующие:
Машинное обучение
область знаний, исследующая алгоритмы, которые обучаются на данных с целью найти закономерности. В нем используются методы нейросетей, статистики, исследования операций и т.п. для выявления скрытой полезной информации в данных; при этом явно не программируются инструкции, указывающие, где искать данные и как делать выводы.
Нейросеть
один из методов машинного обучения. Это математическая модель, а также её программное или аппаратное воплощение, построенная по принципу организации и функционирования биологических нейронных сетей — сетей нервных клеток живого организма.
В глубоком обучении
используются сложные нейросети со множеством нейронов и слоев. Для обучения этих глубоких нейросетей, а также для обнаружения сложных закономерностей в огромных массивах данных используются повышенные вычислительные мощности и усовершенствованные методики. Распространенные области применения: распознавание изображений и речи.
Когнитивные вычисления
направление ИИ, задачей которого является обеспечение процесса естественного взаимодействия человека с компьютером, аналогичного взаимодействию между людьми. Конечная цель ИИ и когнитивных вычислений — имитация когнитивных процессов человека компьютером благодаря интерпретации изображений и речи с выдачей соответствующей ответной реакции.
Компьютерное зрение
опирается на распознавание шаблонов и на глубокое обучение для распознавания изображений и видео. Машины уже умеют обрабатывать, анализировать и понимать изображения, а также снимать фото или видео и интерпретировать окружающую обстановку.
Обработка естественного языка
это способность компьютеров анализировать, понимать и синтезировать человеческий язык, включая устную речь. Сейчас мы уже можем управлять компьютерами с помощью обычного языка, используемого в повседневном обиходе. Например, используя Siri или Google assistant.
Архив
Streaming Data with Postgres + Kafka + Debezium: Part 2
By the end of this guide, we will have a functioning Streams app that will take input from a topic that Debezium feeds into, make a simple arithmetic operation on one of the columns, then output the result into a new topic.
Intro
This is a multi-part series introducing how we can use Kafka, Postgres, and Debezium to stream data stored in a relational database into Kafka. If you haven't read the first part of this series, you may do so here.
At the end of Part 1, we successfully demonstrated inserting a record into one of our tables and watching it stream into a Kafka topic. Now that we have the basics of data streaming set up, it's time to write a Kafka Streams app to do some custom data processing.
The source code for this example project is available here. What is a Streams App?
A Kafka Streams app allows you to transform data within the framework of Streams, Tables, and more. Think of it as an ultra-flexible data plumbing toolkit. You can receive data (as Kafka records) from topics, send data to topics, split data across topics, route data to external services or APIs, enrich data with data from outside sources (or even from data within Kafka, like a JOIN). The possibilities are endless.
This is a primarily hands-on guide, and it may be helpful to read up on the basics of the Streams framework here. Schema Design (CREATE TABLE)
We left off Part 1 with a simple database schema only meant to test our configuration. Let's generate some more SQL schema so we can begin building our app.
Ultimately, this app is going to provide an API that allows us to make a request and store financial trades. We provide the API with a ticker symbol, price, and quantity, and it will store our trade.
create table trade ( id serial primary key, insert_time timestamp default NOW(), ticker varchar, price int, quantity int default 1 );
One of the things I've learned working with and creating schemas involving money is that it's often best to avoid using floating points. Since this is just a pedagogical example, we're going to only support precision to the USD cent. Something that is valued at $10.99 will be stored as an 1099 (an integer). If we were to support alternative currencies, we could create a join table that stores metadata on what the price column actually represents. In this case, it would be a "cent".
With this basic schema we can model our financial trades. If we want to look through time and see when we traded what, this could be achieved with a pretty basic SELECT statement. However, if we want to provide materialized data that is calculated based on these rows it would be cumbersome to do so in SQL. This is a where Kafka's ability to generate data in real-time really shines. Building and Connecting a Streams App Setting up Java (Hello World!)
The canonical way to build a Kafka Streams app is through the official libraries, which are JVM and are easiest used with Java or Scala. In this tutorial we will use Java.
I'm not always a fan of using IDEs, especially big ones, but when working with Java I like to use IntelliJ. JetBrains provides a free community version that you can download.
Let's get to a basic Hello World Java app.
First, let's create a new Gradle-based project. Gradle is a package manager for JVM languages, and as an Android developer it happens to be the one with which I'm most familiar. Create a new Gradle project Create a new Gradle project
I created this project in the same directory as the Docker files we used in part one. Wait a short time after creating the project and you will see something like the following in the project sidebar. Create a new Java ClassFile Create a new Java Class/File
Our source code will go inside the java folder. Java loves namespacing, so let's first create a package. Right click on the java folder, and create a new package. I named mine com.arctype. Once the package is created, right click on it, and create a new Java class. I called mine MyStream. Inside of MyStream we will initiate all of the streams of our app. Open the class and add the following code to get to the Hello World stage.
package com.arctype;
public class MyStream { public static void main(String[] args) throws Exception { System.out.println("Hello World."); } }
The fast and easy-to-use SQL client for developers and teams
By default, this Java project has no runnable configurations. Let's add a runnable configuration that runs our MyStream class. Near the top right of the IDE you can press Add Configuration Create a run configuration Create a run configuration
With the configuration box open press the plus sign and select Application. Then link this runnable to our MyStream class by setting com.arctype.MyStream as the main class. You also need to set the classpath of module to arctype-kafka-streams.main. Select the main class for this configuration
Now that we have a run configuration, you can press the green Play button to build and execute our basic Java app. Press Play to run Press Play to run!
You should see an output similar to this:
12:40:15 PM: Executing task 'MyStream.main()'...
Task :compileJava Task :processResources NO-SOURCE Task :classes
Task :MyStream.main() Hello World.
BUILD SUCCESSFUL in 0s 2 actionable tasks: 2 executed 12:40:16 PM: Task execution finished 'MyStream.main()'.
Kafka Dependencies
Let's continue building the Streams app. We will need a few dependencies from the official Apache Kafka repositories. Open the build.gradle file and under the dependencies section add the following lines inside the dependencies section. The last line is a Java logging library.
compile 'org.apache.kafka:kafka-streams:2.2.0'
compile 'org.slf4j:slf4j-simple:1.7.21'
You may need to "sync" Gradle before you are able to reference these dependencies in your source code. Streams Configuration
Now, return to our MyStream class.
There are 3 major steps we will need to complete to have a running Streams app. We need to set various configuration parameters, build a topology by registering each of our streams, then create and run the Streams app.
- Key/Value Configuration The Streams app needs to know where it can find Kafka. Like the console consumer tool we used in Part 1, you provide it with a reachable bootstrap server and from there the Kafka broker handles the rest.
To provide Streams with configuration, we use the Java Properties class which allows you to set key/value pairs. Here we will set the bootstrap server, the application id (multiple instances of the same application should share an ID so that Kafka knows how to coordinate them), and a few other defaults.
I created a configuration builder function within MyStream that returns a Java Properties object with the following configuration:
private final static String BOOTSTRAP_SERVERS = "localhost:29092"; private final static String APPLICATION_ID = "arctype-stream";
private static Properties makeProps() { final Properties props = new Properties();
    props.put(StreamsConfig.BOOTSTRAP_SERVERS_CONFIG, BOOTSTRAP_SERVERS);
    props.put(StreamsConfig.APPLICATION_ID_CONFIG, APPLICATION_ID);

    // You will learn more about SerDe's soon!
    props.put(StreamsConfig.DEFAULT_KEY_SERDE_CLASS_CONFIG, Serdes.String().getClass());
    props.put(StreamsConfig.DEFAULT_VALUE_SERDE_CLASS_CONFIG, Serdes.String().getClass());

    props.put(StreamsConfig.DEFAULT_DESERIALIZATION_EXCEPTION_HANDLER_CLASS_CONFIG, LogAndContinueExceptionHandler.class);
    props.put(StreamsConfig.POLL_MS_CONFIG, 100);
    props.put(StreamsConfig.RETRIES_CONFIG, 100);
    return props;
}
- Topology The other object we need to build is what is called a Topology. When you build a Topology, Kafka infers how data flows between topics and your consumers and producers. Each Stream you write will need to be added here.
As with the configuration builder, I created a function that builds a Topology object. Since we have yet to build our stream for processing our trades, I commented out what will soon be valid code. I also added a System.out.println that dumps out the description of the Topology that Kafka infers, simply because it is really interesting to see once you have a few streams set up.
private static Topology createTopology(Properties props) {
    StreamsBuilder builder = new StreamsBuilder();
    // Add your streams here.
    // TradeStream.build(builder);
    final Topology topology = builder.build();
    System.out.println(topology.describe());
    return topology;
}
-
Stream We're ready to build the actual KafkaStreams object. In our main() function, let's call the functions we just created to build a properties, topology, and streams object.
 final Properties props = makeProps();
 final Topology topology = createTopology(props);
 final KafkaStreams streams = new KafkaStreams(topology, props);
Now we need to start our stream. Below is the entire body of the main() function. Below the first 3 lines of object creation, the key line is streams.start();, which starts the streams app. The countdown hook ensures the Streams app closes gracefully.
public static void main(String[] args) throws Exception { final Properties props = makeProps(); final Topology topology = createTopology(props); final KafkaStreams streams = new KafkaStreams(topology, props);
    final CountDownLatch latch = new CountDownLatch(1);
    Runtime.getRuntime().addShutdownHook(new Thread("streams-shutdown-hook") {
        @Override
        public void run(){
            streams.close();
            latch.countDown();
        }
    });

    try {
        streams.start();
        latch.await();
    } catch (Throwable e) {
        System.exit(1);
    }
    System.exit(0);
}
We technically have working Streams app now! It won't do anything, since we have not added any streams to its topology. However, now is a good time to test that it can connect to our Kafka cluster. After running docker-compose up on the project we defined in Part 1, go ahead and press the green Play button to compile and run our Streams app.
Kafka output is very verbose; keep an eye our for a line looking like this:
INFO org.apache.kafka.streams.KafkaStreams - stream-client [arctype-stream-9b8159f4-1983-49e4-9d6b-d4b1de20482b] State transition from REBALANCING to RUNNING
You'll see several log lines indicating that the state of the app has transitioned. If the app is able to connect and is working properly, the last state you'll see it transition to is RUNNING.
If you check the logs of the Docker Kafka cluster, you'll see various lines referencing our Streams app. I named mine arctype-stream, so that's what will show up as the cluster prepares to run the streams app.
INFO [executor-Rebalance:Logging@66] - [GroupCoordinator 1]: Stabilized group arctype-stream generation 1 (__consumer_offsets-29)
Building our First Stream
Let's build our first Stream component. As a rudimentary example, let's produce a stream that duplicates all of our trades but doubles the price. SerDe (Serialization/Deserialization)
Serialization and deserialization are key components to building a Stream. Each message in a topic has a key and a value. When consuming or producing a Stream, we will need to provide SerDe's.
For example, we will first want to consume the topic that stores our data from the trade table. We will write a key deserializer that takes the JSON blob provided by Debezium and plucks the id (which is the primary key in our table) from the JSON and returns it as a key of type String. We will write a value deserializer that takes the entire JSON blog and maps it to a Java object (a Model). The Collaborative SQL Editor
The serializers we write will work in reverse fashion. Our value serializer, for instance, will take our Java model, convert it into JSON, and return it as value of type String.
First, let's create a Java model to represent our trade SQL table.
// TradeModel.java
@JsonIgnoreProperties(ignoreUnknown = true) public class TradeModel { public Integer id; public String ticker; public Integer price; public Integer quantity; }
Key SerDe
Since our Key SerDe's are only focused on the id field, they are simpler and using a Factory pattern isn't necessary. It also provides us with a more direct look into what the serializers and deserializers are actually doing.
Deserializer We'll begin with a new class called IdDeserializer. To make a Deserializer we will implement, or conform to, Kafka's Deserializer interface. Once your class implements this interface, there are 3 methods you'll need to override: configure, deserialize, and close. We don't be doing any operations that need configuration or cleanup, so we'll leave all but deserialize empty.
public class IdDeserializer implements Deserializer { private ObjectMapper objectMapper = new ObjectMapper();
@Override
public void configure(Map<String, ?> props, boolean isKey) { }

@Override
public void close() { }

@Override
public String deserialize(String topic, byte[] bytes) {
    if (bytes == null)
        return null;

    String id;
    try {
        Map payload = objectMapper.readValue(new String(bytes), Map.class);
        id = String.valueOf(payload.get("id"));
    } catch (Exception e) {
        throw new SerializationException(e);
    }
    return id;
}
}
bytes contains the data coming in from Debezium. We know this to be JSON since that's what we set Debezium to output. ObjectMapper is a utility from Jackson, which is a Java library for handling XML and JSON.
The code inside deserialize attempts to parse the JSON into an Map object, looks for the id key, and returns its value as a String. Now our Kafka record has a key!
Serializer For the purpose of this app, we know that all of our keys will be String's containing primary keys from Debezium. When the id is serialized (this will happen when you output records to a new topic), we can just pass the String through. This part gets trickier if you are, for example, outputting 2 records for every 1 input record. In some situations, like building a KTable, only the latest record of the same key will be present.
Since the full source code for this project is available to download, I'll just show the important part of the serializer. Its implementation looks similar to the Deserializer.
@Override public byte[] serialize(String topic, String data) { return data.getBytes(); }
Value SerDe
SerDe's for our messages' values are more complex. They will convert JSON blobs to Java objects (models) and vice-versa. Since in a real app you will have many tables (and thus many models), it's best to write a factory that takes in a Java object, like this model, and returns a SerDe for the model. Factory
SerdeFactory is a generic factory that accept a Class and return SerDe's for it.
public class SerdeFactory { public static Serde createSerdeFor(Class clazz, boolean isKey) { Map<String, Object> serdeProps = new HashMap<>(); serdeProps.put("Class", clazz);
    Serializer<T> ser = new JsonSerializer<>();
    ser.configure(serdeProps, isKey);

    Deserializer<T> de = new JsonDeserializer<>();
    de.configure(serdeProps, isKey);

    return Serdes.serdeFrom(ser, de);
}
}
You may recall that the signature of Kafka's Deserializer initialization function looks like this:
public void configure(Map<String, ?> props, boolean isKey) { }
To pass in arbitrary configuration options, you build a key-value Map and pass it in. In this case, we'll pass in the Class of the model we receive when the factory is called. The factory then passes the Class to both the deserializer and serializer. Deserializer
Our generic JSON deserializer looks like this:
public class JsonDeserializer implements Deserializer { private ObjectMapper objectMapper = new ObjectMapper(); private Class clazz;
@SuppressWarnings("unchecked")
@Override
public void configure(Map<String, ?> props, boolean isKey) {
    clazz = (Class<T>) props.get("Class");
}

@Override
public void close() { }

@Override
public T deserialize(String topic, byte[] bytes) {
    if (bytes == null)
        return null;

    T data;
    Map payload;
    try {
        payload = objectMapper.readValue(new String(bytes), Map.class);
        // Debezium updates will contain a key "after" with the latest row contents.
        Map afterMap = (Map) payload.get("after");
        if (afterMap == null) {
             // Non-Debezium payloads
            data = objectMapper.readValue(objectMapper.writeValueAsBytes(payload), clazz);
        } else {
             // Incoming from Debezium
            data = objectMapper.readValue(objectMapper.writeValueAsBytes(afterMap), clazz);
        }

    } catch (Exception e) {
        throw new SerializationException(e);
    }
    return data;
}
}
On configure, we check the props bundle for the Class then store it in a private variable within the object called clazz. That way the JSON parser knows what Class to create and fill with data.
In the deserialize function, we first parse the JSON to a generic Map, and check if there is an after key. Incoming Debezium data will have an after key whose value is the most up-to-date information about the database row. If the JSON lacks an after key, we just attempt to deserialize the base JSON object into whatever Class this SerDe was instantiated with. It's an easy way to be able to use this SerDe with JSON data that isn't from Debezium. I would warn against using a SerDe this arbitrary in Production. KStream Operations
To capture the records from a Kafka topic, you can build a KStream. This will require the name of the topic and a SerDe as mentioned above. Once you have KStream you can begin transforming and routing data. Finally, we'll create our TradeStream class.
public class TradeStream { private final static String TRADE_TOPIC = "ARCTYPE.public.trade";
public static void build(StreamsBuilder builder) {
    final Serde<TradeModel> tradeModelSerde = SerdeFactory.createSerdeFor(TradeModel.class, true);
    final Serde<String> idSerde = Serdes.serdeFrom(new IdSerializer(), new IdDeserializer());

    KStream<String, TradeModel> tradeModelKStream =
            builder.stream(TRADE_TOPIC, Consumed.with(idSerde, tradeModelSerde));

    tradeModelKStream.peek((key, value) -> {
        System.out.println(key.toString());
        System.out.println(value.toString());
    });
    tradeModelKStream.map((id, trade) -> {
        TradeModel tradeDoubled = new TradeModel();
        tradeDoubled.price = trade.price * 2;
        tradeDoubled.quantity = trade.quantity;
        tradeDoubled.ticker = trade.ticker;
        return new KeyValue<>(id, tradeDoubled);
    }).to("ARCTYPE.doubled-trades", Produced.with(idSerde, tradeModelSerde));
}
}
First, we build SerDe's using the objects we created in the previous section. Next, we build a KStream based on the topic ID that we know Debezium has created.
Lastly, we perform 2 operations. The .peek operation is great for debugging and getting some visibility into your Stream. It simply allows you to take a peek at the records that flow through. For testing, we'll print the key and value of all records to the console.
The .map operation allows you to elegantly map each record to some new object. Here we are going to map each Trade row to a new Trade row, but with the price multiplied by 2. After the object is created and returned, we will use .to to stream the data to a new topic (ARCTYPE.doubled-trades). Conclusion
Now, consuming topic ARCTYPE.doubled-trades will show the following output when you insert a record.
postgres=# insert into trade (ticker, price, quantity) values ('AAPL', 42069, 1);
Kafka Topic Output:
{"id":null,"ticker":"AAPL","price":84138,"quantity":1}
Stay tuned for the last part of this series where we will dive further into more Kafka Streams operations and the power of KStream, KGlobalTable, and KTable.
Beautiful Load Testing With K6 and Docker Compose
Something that always makes me smile is the phrase “it worked on my machine”. My machine is, for the most part, a warm and cozy place for code to execute. The real world often turns out to be harsher than anticipated. Load testing is a means of bringing the harsh reality a little closer. Load test often, and early, iterating to improve on the outcome. It will give your code a better chance at success in the real world. Good visualization of a load test is not just a nice-to-have. It is often the only way to truly understand the underlying issues. The pairing of K6 for load testing and Grafana for visualization is awesome. It is the best platform I’ve found for running and visualizing load tests. Docker Compose is an awesome technology to bring them together. You can get started load testing with K6 and Grafana using this starter project: git clone https://github.com/luketn/docker-k6-grafana-influxdb.git cd docker-k6-grafana-influxdb docker-compose up -d influxdb grafana docker-compose run k6 run /scripts/ewoks.js You can get Docker Compose here if you don’t have it yet. Open a browser to http://localhost:3000/d/k6/k6-load-testing-results and you’ll have an incredibly clear view of your load test streaming across the page in real-time: A Grafana user interface in a browser showing the results of a load test being performed by K6. Modify the script to suit your own back end and you can be load testing your own services in moments! Breaking it Down
K6 is an awesome open-source load testing framework written in Go. It is highly efficient and capable of generating high loads with hundreds of concurrent connections. K6 can be used independently as a command-line tool to run load tests, or combined with other tools for different visualisations and analysis. Adding InfluxDB and Grafana, K6 gives a very powerful visualisation of the load test as it runs. Running a load test requires that the InfluxDB and Grafana services are already running in the background. You can use docker-compose ‘up’ command to start them: docker-compose up -d influxdb grafana The docker images will be downloaded, configured and executed as detached (-d) background processes. Then you can run docker-compose to perform a K6 run on a load test script: docker-compose run k6 run /scripts/ewoks.js A command prompt shows the output from running K6 using docker compose. InfluxDB is a fast time-series database, also written in Go, which is supported by K6 as an output target for realtime monitoring of a test. Whilst K6 is running the load test, it will stream statistics about the run to InfluxDB. Grafana is a beautiful browser UI for data visualisation, which supports InfluxDB as a data source. Using a live updating set of graphs it will display the details of the run. Docker is a platform for containers, commonly used by open source projects to publish their software in an easily consumable self-contained system. Docker Compose adds the ability to bundle multiple containers together into complex integrated applications. I’ve based this example heavily on the K6 documentation and examples here: https://k6.io/docs/results-visualization/influxdb-+-grafana#using-our-docker-compose-setup I’ve made a few small adjustments to make it easier to get started. Diving Deeper Here is a deeper dive into all of the configuration files used in this example and what they do: docker-compose.yml The docker-compose configuration file defines three servers and two networks, combining them together into a solution comprising a visualisation web server, database and load test client: Runs Grafana web server for visualisation in the background on port 3000 Runs InfluxDB database in the background on port 8086 Runs K6 on an ad-hoc basis to execute a load test script
The external files referenced in the docker-compose file are: grafana-datasource.yaml Configures Grafana to use InfluxDB as a data source, using the hostname configured in docker-compose ‘influxdb’ to connect to the database over the local docker network on port 8086.
grafana-dashboard.yaml Configures Grafana to load a K6 dashboard from the /var/lib/grafana/dashboards directory:
Note that the K6 dashboard file dashboards/k6-load-testing-results_rev3.json, the grafana-datasource.yaml and grafana-dashboard.yaml are all mounted into the Grafana docker container using the ‘volumes’ property in docker-compose.yml. dashboards/k6-load-testing-results_rev3.json This is a JSON configuration of a K6/InfluxDB dashboard based on this dashboard from the Grafana community dashboard library: https://grafana.com/grafana/dashboards/2587 There are only two small modifications: The data source is configured to use the docker created InfluxDB data source. The time period is set to ‘now-5m’, which I feel is a better view for most tests. scripts/ewoks.js An example K6 script to invoke a remote service. For fun this uses the query for the Ewok Wicket Systri Warrick from the Star Wars API:
The configuration tells K6 to ramp-up to 5 concurrent users over a period of 5 seconds, holds there for 10 seconds and then gradually ramps back down to 0 concurrent users over 5 seconds. A detailed reference to configuring K6 can be found in their excellent docs: https://k6.io/docs/ It’s worth noting that although the config and load function are JavaScript based, it is not NodeJS. K6 uses an embedded EcmaScript 5.1 JavaScript engine (a pure Go implementation ‘goja’) to define the test script. Each ‘virtual user’ has a separate instance of the goja engine loaded as its context and runs the exported ‘default’ function continuously for the defined timeframe. TIP — Debugging Docker Compose Configuration with a Shell If you want to play around with the docker-compose configuration settings, it is often helpful to run a shell inside one of the containers. Using the shell you can explore the files and local network to see what effect your changes had. For example, to check that the InfluxDB network connection is working from inside the K6 container, you can add the following entrypoint and user in the docker-compose.yml: k6: image: loadimpact/k6:latest entrypoint: /bin/sh user: root ... Then enter a shell inside the K6 container like this: docker-compose run k6 Once you have a shell you can use utilities like nslookup and curl to check out the local network: / $ nslookup influxdb Server: 127.0.0.11 Address: 127.0.0.11:53 Non-authoritative answer: Non-authoritative answer: Name: influxdb Address: 172.19.0.2 Note that the entrypoint used /bin/sh in all three images, but this is a symbolic link to the slightly different shells used in each image. For InfluxDB the shell is dash. For K6 and Grafana the shell is busybox. Local Load Testing — What is it good for? Running load tests locally is great for a finger-in-the-air test. Good for small ad-hoc tests and an approximate measurement of performance at low scale. It’s not good as a benchmark however, due to the inconsistency of the environment. Limited CPU, disk I/O and memory means contention on resources between the service under test and the load test client. With that said I think it’s incredibly important to get a sense of how your code performs when executed by many users concurrently. You can start with a load test built locally and then scale it up to a larger load test later on using the same scripts and tools. Thanks for diving into load testing with Docker Compose, K6, InfluxDB and Grafana with me. I hope you have an awesome experience using these tools and gain as much valuable insight into your code under load as I have. If you give it a try, let me know how you get on! References: K6 documentation: https://k6.io/docs/ K6 documentation —Docker Compose example: https://k6.io/docs/results-visualization/influxdb-+-grafana#using-our-docker-compose-setup Article source code: https://github.com/luketn/docker-k6-grafana-influxdb Images are all by the author.
Анализ производительности Docker контейнеров с помощью встроенных инструментов
Контейнеризация меняет организацю развертывания и использвания програмного обеспечения. Вы можете развертывать почти любое ПО надежно всего с помощью одной команды. И с помощью платформы окрестрации вроде Kubernetes и DC/OS, даже производственное развертывание становится простым.
Возможно вы уже игрались с Docker, и запускали несколько контейнеров. Но одна вещь которую вы не встречали, это то как Docker ведет себя в зависимости от различных нагрузок.
Снаружи Docker контейнеры могут выглядить как черные ящики, но поянтно, что большинство людей хотят получать с них метрики и производить анализ.
В этой статье, мы настроим маленький CrateDB кластер, с Docker и затем пройдемся по полезным командам Docker, которые позволят нам взглянуть на производительность.
Начнем с небольшого вступления для CreateDB.
Настроим Docker кластер для CrateDB
CrateDB это открытая, распределенная SQL база данных которая упрощает хранение и анализ массивного количества данных машин в реальном времени. Она масштабируема горизонтально, высокодоступная и запускается в отказоустойчивых кластерах, которая работает очень хорошо в виртуальных и контейнеризированных окружениях.
У вас уже может быть Docker кластер с CrateDB который вы можете использовать. Или даже, запускать любые контейнеры.
Если вы хотите настроить маленький кластер CrateDB для экспериментов с с метриками производительности, вы можете следовать инструкции от CrateDB.
Docker метрики
Главные параметры производительности контейнеров, который нас интересует в этой статье это загрузка ЦПУ, память, блокировка I/O, и сеть.
Docker предоставляет различные возможности для получения этих метрик:
- Использовать команду
docker stats - Использование REST API выставленную Docker демоном
- Чтение cgroups для превдо файлов.
Однако, метрики покрывают эти механизмы, не одинаково.
Для примера, docker stats предоставляет верхнеуровневую картинку ресурсов, которую достаточно для большинства пользователей. В то время, как псевдо файлы cgroup предоставляют детальную аналитику которая может полезна для глубокого анализа производительности контейнера.
Мы обсудим эти три возможности.
Начнем с докер команд:
docker stats
Эта команда показывает живые денные всех запущенных контейнеров.
Отметим, что если вы указажет остановленный контейнер, команда выполнится успешно, но не будет никакого вывода.
Чтобы ограничить данные для одного или несколких контейнеров, вы можете указать список имен контейнеров или ID разделенные пробелом.
Для трех нодного кластера, вывод может выглядеть следующийм образом:
$ docker stats
CONTAINER       CPU %    MEM USAGE / LIMIT        MEM %     NET I/O              BLOCK I/O           PIDS
2f2697df4b79    0.21%    336.2 MiB / 1.952 GiB    16.82%    21.7 MB / 8.51 MB    2.57 MB / 119 kB    48
9f71cde6529e    0.16%    295.1 MiB / 1.952 GiB    14.76%    42.9 kB / 3.81 kB    0 B / 119 kB        45
75b161da6562    0.21%    351.8 MiB / 1.952 GiB    17.60%    44.5 kB / 3.81 kB    59.4 MB / 119 kB    45
Давайте подробнее разеберм эти столбцы:
-
CONTAINER - колонка отображает ID контейнера.
-
CPU - отображает возможности хоста. Для примера если у вас есть два контейреа, оба будут использовать один и тот же процессор, и каждый будет использовать по максимуму,
docker statsкоманда для каждого контейнера будет отображать "50%" использования. Однако с точки зрения самого контейнера он использует его на всю мощь. -
MEM USAGE / LIMIT и MEM % колонка отражает количество памяти используемое конейнером,
The MEM USAGE / LIMIT and MEM % columns display the amount of memory used by the container, along with the container memory limit, and the corresponding container utilization percentage.If there is no explicit memory limit set for the container, the memory usage limit will be the memory limit of the host machine.Note that like the CPU % column, these columns report on host utilization. The NET I/O column displays the total bytes received and transmitted over the network by the corresponding container.For example, in the above output, container 2f2697df4b79 received 21.7 MB and sent 8.51 MB of data. The BLOCK I/O section displays the total bytes written and read to the container file system. The PIDS column displays the number of kernel process IDs running inside the corresponding container.
Next, let's take a look at the REST APIs exposed by Docker daemon. REST API
The Docker daemon listens on unix:///var/run/docker.sock, which only allows local connections by the root user. When you launch Docker, however, you can bind it to a different port or socket.
Like docker stats, the REST API continuously reports a live stream of CPU, memory, and I/O data. However, the API provides longer, live-streaming chunks of JSON, with metrics about the container.
To see this yourself, access the API like so:
$ curl -v --unix-socket /var/run/docker.sock
http://localhost/containers/CONTAINER_ID/stats
Here, replace CONTAINER_ID with the ID of the container you want to inspect.
You should receive a JSON stream.
Here's what it looks like:
Analyzing Docker Container Performance: JSON stream
This is a bit of a mess. So let's run it through a JSON pretty printer and take a closer look.
There are several fields in the JSON data. For this post, we're only going to look at performance specific data.
First, the cpu_stats object:
"cpu_stats": { "cpu_usage": { "total_usage": 20902022446, "percpu_usage": [9406810955, 11495211491], "usage_in_kernelmode": 5040000000, "usage_in_usermode": 14470000000 }, "system_cpu_usage": 139558680000000, "online_cpus": 2, "throttling_data": { "periods":0, "throttled_periods":0, "throttled_time":0 } }
Let's look at its keys, one by one.
The cpu_usage contains an object with the following keys:
total_usage Total CPU usage in nanoseconds. percpu_usage Per core CPU usage in nanoseconds. A sum total of all the usage stats in this object. usage_in_kernelmode System CPU usage in nanoseconds. usage_in_usermode User CPU usage in nanoseconds.
Next up is system_cpu_usage. This value represents the host's cumulative CPU usage in nanoseconds. This includes user, system, and idle.
The online_cpus value represents the number of CPU core on the host machine.
CPU utilization is one of the key factors needed to judge the overall load on the system and as you can see above, the Docker daemon REST API provides comprehensive CPU usage stats, so you can monitor and adjust your deployment as needed.
Now, let's move on to to the memory_stats object:
"memory_stats": { "usage": 310312960, "max_usage": 328871936, "stats":{ "active_anon": 305885184, "active_file": 954368, "cache": 2039808, "dirty": 16384, "hierarchical_memory_limit": 9223372036854771712, "hierarchical_memsw_limit": 9223372036854771712, "inactive_anon": 0, "inactive_file": 1081344, "mapped_file": 139264, "pgfault": 154346, "pgmajfault": 0, "pgpgin": 152351, "pgpgout": 77175, "rss": 305881088, "rss_huge": 0, "swap": 0, "total_active_anon": 305885184, "total_active_file": 954368, "total_cache": 2039808, "total_dirty": 16384, "total_inactive_anon": 0, "total_inactive_file": 1081344, "total_mapped_file": 139264, "total_pgfault": 154346, "total_pgmajfault": 0, "total_pgpgin": 152351, "total_pgpgout": 77175, "total_rss": 305881088, "total_rss_huge": 0, "total_swap": 0, "total_unevictable": 0, "total_writeback": 0, "unevictable": 0, "writeback": 0 }, "limit": 2096177152 }
There's a lot of data here, and we don't need to know what all of it means.
Here are the most important bits for getting started:
The cache value is the memory being used by the container that can be directly mapped to block devices. In simpler terms, this as a measure of file operations (open, read, write, and so on) being performed against the container file system.
The rss value is memory that doesn't correspond to anything mapped to the container file system. That includes stacks, heaps, and anonymous memory maps.
The mapped_file value is the memory mapped by the processes inside the container. Files are sometimes mapped to a segment of virtual memory to improve I/O performance.
The swap value is the amount of swap currently used by processes inside the container. Swap, as you may know, is file system based memory that is used when the physical memory (RAM) has run out.
Next up is the blkio_stats object:
"blkio_stats": { "io_service_bytes_recursive": [ { "major": 259, "minor": 0, "op": "Read", "value": 16039936 }, { "major": 259, "minor": 0, "op": "Write", "value": 122880 }, { "major": 259, "minor": 0, "op": "Sync", "value": 16052224 } ] }
This object displays block I/O operations performed inside the container.
The io_service_bytes_recursive section contains the number of objects representing the bytes transferred to and from the container file system by the container, grouped by operation type.
Within each object, the first two fields specify the major and minor number of the device, the third field specifies the operation type (read, write, sync, or async), and the fourth field specifies the number of bytes. cgroups Pseudo Files
cgroups pseudo files are the fastest way to read metrics from Docker containers.
cgroups pseudo files do not require root access by default, so you can simply write tools around these files without any extra fuss.
Also, if you are monitoring many containers per host, cgroups pseudo files are usually the best approach because of their lightweight resource footprint.
The location of cgroups pseudo files varies based on the host operating system. On Linux machines, they are generally under /sys/fs/cgroup. In some systems, they may be under /cgroup instead.
To access cgroups pseudo files, you need to include the long ID of your container in the access path.
You can set the $CONTAINER_ID environment variable to the long ID of the container you are monitoring, like so:
export CONTAINER_ID=$(docker inspect --format="{{.Id}}" CONTAINER_NAME)
Here, replace CONTAINER_NAME with the name of your container.
Alternatively, you can set $CONTAINER_ID manually running docker ps --no-trunc and copying the long ID from the command output.
Check it worked, like so:
$ echo $CONTAINER_ID 3d4569e14470937cfeaeb8b32fd3f4e6fa47bbd83e397b3c44ba860854752692
Now we have that environment variable set, let's explore few of the pseudo files to see what's there.
We can start with memory metrics.
You can find the memory metrics in the memory.stat file, located in a directory that looks like this:
/sys/fs/cgroup/memory/docker/$CONTAINER_ID
So, for example:
$ cd /sys/fs/cgroup/memory/docker/$CONTAINER_ID $ cat memory.stat cache 13742080 rss 581595136 rss_huge 109051904 mapped_file 2072576 dirty 16384 writeback 0 pgpgin 386351 pgpgout 267577 pgfault 374820 pgmajfault 93 inactive_anon 40546304 active_anon 541061120 inactive_file 6836224 active_file 6893568 unevictable 0 hierarchical_memory_limit 9223372036854771712 total_cache 13742080 total_rss 581595136 total_rss_huge 109051904 total_mapped_file 2072576 total_dirty 16384 total_writeback 0 total_pgpgin 386351 total_pgpgout 267577 total_pgfault 374820 total_pgmajfault 93 total_inactive_anon 40546304 total_active_anon 541061120 total_inactive_file 6836224 total_active_file 6893568 total_unevictable 0
The first half of the file has the statistics for processes in the container.
The second half of the file (entries starting with total_) has stats for all processes running in the container, including sub-cgroups within the container.
Entries in this file fall into two broad categories: gauges and counters.
Entries like cache are gauges, meaning they can increase or decrease indicating the current value. Other entries, like pgfault, are counters and can only increase.
Next, let's take a look at CPU metrics.
CPU metrics are contained in the cpuacct.stat file, which is located in the following directory:
/sys/fs/cgroup/cpuacct/docker/$CONTAINER_ID
Let's take a look:
$ cd /sys/fs/cgroup/cpuacct/docker/$CONTAINER_ID $ cat cpuacct.stat user 6696 system 850
This file shows us CPU usage, accumulated by the processes of the container. This is broken down into user and system time.
User time (user) corresponds to time during which the processes were in direct control of the CPU, i.e. executing process code. Whereas system time (system) corresponds to the time during which the CPU was executing system calls on behalf of those processes.
Next, let's explore the I/O stats in cgroup files.
I/O metrics are present in blkio.throttle.io_service_bytes and blkio.throttle.io_serviced files present in this directory:
/sys/fs/cgroup/blkio/docker/$CONTAINER_ID
Change into the directory:
$ cd /sys/fs/cgroup/blkio/docker/$CONTAINER_ID
Then:
$ cat blkio.throttle.io_serviced 259:0 Read 3 259:0 Write 1 259:0 Sync 4 259:0 Async 0 259:0 Total 4 Total 4
This shows total count of I/O operations performed by the container under analysis.
$ cat blkio.throttle.io_service_bytes 259:0 Read 32768 259:0 Write 4096 259:0 Sync 36864 259:0 Async 0 259:0 Total 36864 Total 36864
This shows the total bytes transferred during all the I/O operations performed by the container.
Finally, let's look at how to extract network metrics from pseudo files. This is important as network metrics are not directly exposed by control groups. Instead, Docker provides per-interface metrics.
Since each container has a virtual ethernet interface, Docker lets you directly check the TX (transmit) and RX (receive) counters for this interface from inside the container.
Lets see how to do that.
First, fetch the PID of the process running inside the container:
$ export CONTAINER_PID=docker inspect -f '{{ .State.Pid }}' $CONTAINER_ID
Then read the file:
$ cat /proc/$CONTAINER_PID/net/dev
This should give you something like:
Inter-| Receive | Transmit face |bytes packets errs drop fifo frame compressed multicast|bytes packets errs drop fifo colls carrier compressed eth0: 44602 271 0 0 0 0 0 0 5742 83 0 0 0 0 0 0
This shows you the data transfer details for the container's virtual interface eth0. Wrap Up
In this post we took a look at the docker stats command, the Docker REST API, and cgroups pseudo files.
We learnt that there are multiple ways to get statistics from a Docker container. Which method you use will depend on your setup.
The docker stats command is good for small scale use, with a few containers running on a single host.
The Docker REST API is good when you have multiple containers running on multiple hosts, and you'd like to retrieve the stats remotely.
The cgroups pseudo files are the fastest and most efficient way to get stats, and are suitable for for large setups where performance is important.
While all these options are useful if you're planning to build your own tooling around Docker monitoring, there are several pre-built solutions, including Prometheus, cAdvisor, Scout, DataDog. We'll take a closer look at Docker health monitoring tools in the future.
Gitlab Ci Dynamic Child Pipelines : a New Hope
The Dark Ages Gitlab CI pipelines are cool. They’re easy to understand, well-integrated with the Gitlab UI and can run on Kubernetes. One thing is missing, though, for them to be a killer feature : the ability to dynamically create jobs. Indeed, suppose we have to execute several similar jobs (a set of tests would be a good example). Well, we need one entry in our .gitlab-ci.yml for each job we want to execute ! That’s a lot of copy-pasting… We can use yaml aliases, but we’re still left with too much boilerplate.
test_template: &test script: echo "Testing $SOMETHING" stage: test
test_A: variables: SOMETHING: A <<: *test
test_B: variables: SOMETHING: B <<: *test
test_C: variables: SOMETHING: C <<: *test
test_D: variables: SOMETHING: D <<: *test You can see where this leads, don’t you ?
Now, that is annoying, but you can overcome it, either with the simple aforementioned copy pasting, or with clever usage of the include feature, which allows you to include file from an external source.
What you cannot do though, is defining jobs dynamically 1. For instance, I have a tests directory, under which lives all my tests (not original, but most projects have that kind of layout), as shell scripts.
tests ├── test_A ├── test_B ├── test_C ├── test_D ├── test_E ├── test_F ├── test_G ├── test_H ├── test_I ├── test_J ├── test_K ├── test_L ├── test_M ├── test_N ├── test_O ├── test_P ├── test_Q ├── test_R ├── test_S ├── test_T ├── test_U ├── test_V ├── test_W ├── test_X ├── test_Y └── test_Z
Let’s say we want to launch them each in their own job 2, We could reuse our earlier approach :
test_template: &test script: tests/test_$SOMETHING stage: test
test_A: variables: SOMETHING: A <<: *test
test_B: variables: SOMETHING: B <<: *test
...
and so on
Besides copy pasting, there is one problem with that configuration : repeating yourself. What if we add a test_XY.sh ? Or remove test_A.sh. Well, you will have either a test not executed, or a spurious error, or you have to edit your .gitlab-ci.yml file.
Not ideal.
A New Hope In it’s 12.7 release, Gitlab announced Parent Child Pipelines. They allow to define jobs whose purpose is to trigger another pipeline in the same project.
job_1: trigger: include: - local: path/to/pipeline.yml This jobs creates a new pipelines in the same project, defined in path/to/pipeline.yml. The include is the same that for a top-level include.
By default, that job will be considered successful and will not wait for the created pipeline to finish. If we want to change that, we need to use strategy: depend in the job definition. It will then “depends” on the pipeline.
How does that help us for dynamic jobs ? Well, it does not, yet. But in the 12.9 release, they enhanced the trigger syntax we just saw with one little thing : it allows a new type of include, artifact, which allow to include a yaml file from a previously generated artifact.
And that is exactly what we need.
Let’s apply that to our case.
First, we’ll create a template for our dynamic pipeline. We’ll use a shell script for simplicity but you could use anything, like Jinja templating, for instance :
#!/bin/sh
for test in tests/* do cat <<EOF job_${test##*/}: stage: test script: ./$test
EOF done In our main .gitlab-ci.yml, we create the generator job:
generator: stage: generate image: ubuntu script:
- ./generate-pipeline.sh > generated-pipeline.yml
artifacts:
paths:
- generated-pipeline.yml And finally, we include the generated yaml and trigger a child pipeline:
child-pipeline: stage: trigger trigger: include: - artifact: generated-pipeline.yml job: generator strategy: depend And the result is :
Gitlab UI avec représentation des différents jobs générés
So, as of now, we can dynamically generate pipelines configuration for Gitlab CI, which means we are no longer restricted by the expressiveness of the .gitlab-ci.yml syntax, and can enjoy the power of our favorite language.
Of course, this comes with more complexity. A simple pipeline definition is easier to understand than a pipeline generating others. But complexity does not go away, and does not appear out of thin air. What this new feature gives us is a tool to manage the complexity.
1 Well, you could generate an appropriate yaml file using the remote option of include and encoding parameters in the url. But if you’re using Gitlab CI, the point is to have integration, not more moving pieces. 2 Because of course, you could just have a simple job with a command for test in tests/*; do ./$test; done if you don’t care about the separation.
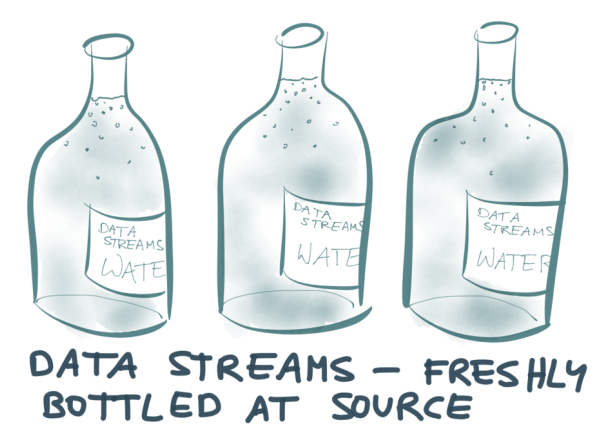
Bottled Water: Real-time integration of PostgreSQL and Kafka
Summary: Confluent is starting to explore the integration of databases with event streams. As part of the first step in this exploration, Martin Kleppmann has made a new open source tool called Bottled Water. It lets you transform your PostgreSQL database into a stream of structured Kafka events. This is tremendously useful for data integration.
Writing to a database is easy, but getting the data out again is surprisingly hard.
Of course, if you just want to query the database and get some results, that’s fine. But what if you want a copy of your database contents in some other system — for example, to make it searchable in Elasticsearch, or to pre-fill caches so that they’re nice and fast, or to load it into a data warehouse for analytics, or if you want to migrate to a different database technology?
If your data never changed, it would be easy. You could just take a snapshot of the database (a full dump, e.g. a backup), copy it over, and load it into the other system. The problem is that the data in the database is constantly changing, and so the snapshot is already out-of-date by the time you’ve loaded it. Even if you take a snapshot once a day, you still have one-day-old data in the downstream system, and on a large database those snapshots and bulk loads can become very expensive. Not really great.
So what do you do if you want a copy of your data in several different systems?
One option is for your application to do so-called “dual writes”. That is, every time your application code writes to the database, it also updates/invalidates the appropriate cache entries, reindexes the data in your search engine, sends it to your analytics system, and so on:
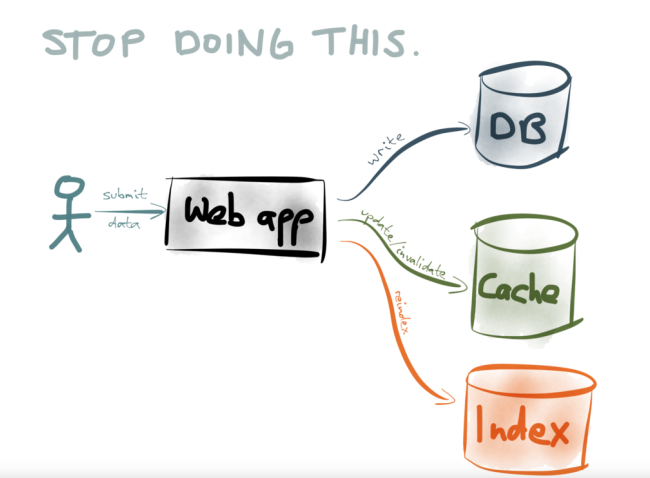
Application-managed dual writesHowever, as I explain in one of my talks, the dual-writes approach is really problematic. It suffers from race conditions and reliability problems. If slightly different data gets written to two different datastores (perhaps due to a bug or a race condition), the contents of the datastores will gradually drift apart — they will become more and more inconsistent over time. Recovering from such gradual data corruption is difficult.
If you rebuild a cache or index from a snapshot of a database, that has the advantage that any inconsistencies get blown away when you rebuild from a new database dump. However, on a large database, it’s slow and inefficient to process the entire database dump once a day (or more frequently). How could we make it fast?
Typically, only a small part of the database changes between one snapshot and the next. What if you could process only a “diff” of what changed in the database since the last snapshot? That would also be a smaller amount of data, so you could take such diffs more frequently. What if you could take such a “diff” every minute? Every second? 100 times a second?
When you take it to the extreme, the changes to a database become a stream. Every time someone writes to the database, that is a message in the stream. If you apply those messages to a database in exactly the same order as the original database committed them, you end up with an exact copy of the database. And if you think about it, this is exactly how database replication works.
The replication approach to data synchronization works much better than dual writes. First, you write all your data to one database (which is probably what you’re already doing anyway). Next, you extract two things from that database:
a consistent snapshot at one point in time, and
a real-time stream of changes from that point onwards.
You can load the snapshot into the other systems (for example your search indexes or caches), and then apply the real-time changes on an ongoing basis. If this pipeline is well tuned, you can probably get a latency of less than a second, so your downstream systems remain very almost up-to-date. And since the stream of changes provides ordering of writes, race conditions are much less of a problem.
This approach to building systems is sometimes called Change Data Capture (CDC), though the tools for doing it are currently not very good. However, at some companies, CDC has become a key building block for applications — for example, LinkedIn built Databus and Facebook built Wormhole for this purpose.
I am excited about change capture because it allows you to unlock the value in the data you already have. You can feed the data into a central hub of data streams, where it can readily be combined with event streams and data from other databases in real-time. This approach makes it much easier to experiment with new kinds of analysis or data format, it allows gradual migration from one system to another with minimal risk, and it is much more robust to data corruption: if something goes wrong, you can always rebuild a datastore from the snapshot and the stream.
Getting the real-time stream of changes
Getting a consistent snapshot of a database is a common feature, because you need it in order to take backups. But getting a real-time stream of changes has traditionally been an overlooked feature of databases. Oracle GoldenGate, the MySQL binlog, the MongoDB oplog or the CouchDB changes feed do something like this, but they’re not exactly easy to use correctly. More recently, a few databases such as RethinkDB or Firebase have oriented themselves towards real-time change streams.
However, today we will talk about PostgreSQL. It’s an old-school database, but it’s good. It is very stable, has good performance, and is surprisingly full-featured.
Until recently, if you wanted to get a stream of changes from Postgres, you had to use triggers. This is possible (see below), but it is fiddly, requires schema changes and doesn’t perform very well. However, Postgres 9.4 (released in December 2014) introduced a new feature that changes everything: logical decoding (which I explain in more detail below).
With logical decoding, change data capture for Postgres suddenly becomes much more appealing. So, when this feature was released, I set out to build a change data capture tool for Postgres that would take advantage of the new facilities. Confluent sponsored me to work on it (thank you Confluent!), and today we are releasing an alpha version of this tool as open source. It is called Bottled Water.Bottled Water:
Introducing Bottled Water
Logical decoding takes the database’s write-ahead log (WAL), and gives us access to row-level change events: every time a row in a table is inserted, updated or deleted, that’s an event. Those events are grouped by transaction, and appear in the order in which they were committed to the database. Aborted/rolled-back transactions do not appear in the stream. Thus, if you apply the change events in the same order, you end up with an exact, transactionally consistent copy of the database.
The Postgres logical decoding is well designed: it even creates a consistent snapshot that is coordinated with the change stream. You can use this snapshot to make a point-in-time copy of the entire database (without locking — you can continue writing to the database while the copy is being made), and then use the change stream to get all writes that happened since the snapshot.
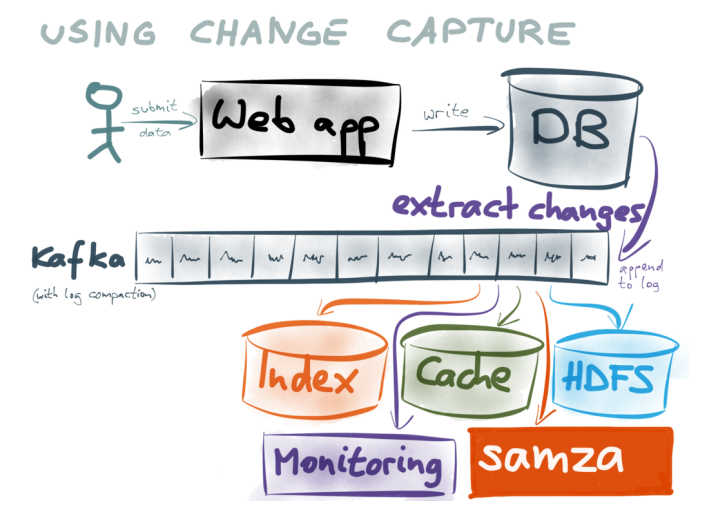
Bottled Water uses these features to copy all the data in a database, and encodes it in the efficient binary Avro format. The encoded data is sent to Kafka — each table in the database becomes a Kafka topic, and each row in the database becomes a message in Kafka.
Once the data is in Kafka, you can easily write a Kafka consumer that does whatever you need: send it to Elasticsearch, or populate a cache, or process it in a Samza job, or load it into HDFS with Camus… the possibilities are endless.
Why Kafka?
Kafka is a messaging system, best known for transporting high-volume activity events, such as web server logs and user click events. In Kafka, such events are typically retained for a certain time period and then discarded. Is Kafka really a good fit for database change events? We don’t want database data to be discarded!
In fact, Kafka is a perfect fit — the key is Kafka’s log compaction feature, which was designed precisely for this purpose. If you enable log compaction, there is no time-based expiry of data. Instead, every message has a key, and Kafka retains the latest message for a given key indefinitely. Earlier messages for a given key are eventually garbage-collected. This is quite similar to new values overwriting old values in a key-value store.
Bottled Water identifies the primary key (or replica identity) of each table in Postgres, and uses that as the key of the messages sent to Kafka. The value of the message depends on the kind of event:
For inserts and updates, the message value contains all of the row’s fields, encoded as Avro.
For deletes, the message value is set to null. This causes Kafka to remove the message during log compaction, so its disk space is freed up.
With log compaction, you don’t need one system to store the snapshot of the entire database and another system for the real-time messages — they can live perfectly well within the same system. Bottled Water writes the initial snapshot to Kafka by turning every single row in the database into a message, keyed by primary key, and sending them all to the Kafka brokers. When the snapshot is done, every row that is inserted, updated or deleted similarly turns into a message.
If a row frequently gets updated, there will be many messages with the same key (because each update turns into a message). Fortunately, Kafka’s log compaction will sort this out, and garbage-collect the old values, so that we don’t waste disk space. On the other hand, if a row never gets updated or deleted, it just stays unchanged in Kafka forever — it never gets garbage-collected.
Having the full database dump and the real-time stream in the same system is tremendously powerful. If you want to rebuild a downstream database from scratch, you can start with an empty database, start consuming the Kafka topic from the beginning, and scan through the whole topic, writing each message to your database. When you reach the end, you have an up-to-date copy of the entire database. What’s more, you can continue keeping it up-to-date by simply continuing to consume the stream. Building alternative views onto your data was never easier!
The idea maintaining a copy of your database in Kafka surprises people who are more familiar with traditional enterprise messaging and its limitations. Actually, this use case is exactly why Kafka is built around a replicated log abstraction: it makes this kind of large-scale data retention and distribution possible. Downstream systems can reload and re-process data at will, without impacting the performance of the upstream database that is serving low-latency queries.
Why Avro?
The data extracted from Postgres could be encoded as JSON, or Protobuf, or Thrift, or any number of formats. However, I believe Avro is the best choice. Gwen Shapira has written about the advantages of Avro for schema management, and I’ve got a blog post comparing it to Protobuf and Thrift. The Confluent stream data platform guide gives some more reasons why Avro is good for data integration.
Bottled Water inspects the schema of your database tables, and automatically generates an Avro schema for each table. The schemas are automatically registered with Confluent’s schema registry, and the schema version is embedded in the messages sent to Kafka. This means it “just works” with the stream data platform’s serializers: you can work with the data from Postgres as meaningful application objects and rich datatypes, without writing a lot of tedious parsing code.
The translation of Postgres datatypes into Avro is already fairly comprehensive, covering all the common datatypes, and providing a lossless and sensibly typed conversion. I intend to extend it to support all of Postgres’ built-in datatypes (of which there are many!) — it’s some effort, but it’s worth it, because good schemas for your data are tremendously important.Inside the bottle factory
The logical decoding output plugin
An interesting property of Postgres’ logical decoding feature is that it does not define a wire format in which change data is sent over the network to a consumer. Instead, it defines an output plugin API, which receives a function call for every insert, update or delete. Bottled Water uses this API to read data in the database’s internal format, and serializes it to Avro.
The output plugin must be written in C using the Postgres extension mechanism, and loaded into the database server as a shared library. This requires superuser privileges and filesystem access on the database server, so it’s not something to be undertaken lightly. I understand that many a database administrator will be scared by the prospect of running custom code inside the database server. Unfortunately, this is the only way logical decoding can currently be used.
At the moment, the logical decoding plugin must be installed on the leader database. In principle, it would be possible to have it run on a separate follower, so that it cannot impact other clients, but the current implementation in Postgres does not allow this. This limitation will hopefully be lifted in future versions of Postgres.Bottled water client daemon
The client daemon
Besides the plugin (which runs inside the database server), Bottled Water consists of a client program which you can run anywhere. It connects to the Postgres server and to the Kafka brokers, receives the Avro-encoded data from the database, and forwards it to Kafka.
The client is also written in C, because it’s easiest to use the Postgres client libraries that way, and because some code is shared between the plugin and the client. It’s fairly lightweight and doesn’t need to write to disk.
What happens if the client crashes, or gets disconnected from either Postgres or Kafka? No problem. It keeps track of which messages have been published and acknowledged by the Kafka brokers. When the client restarts after an error, it replays all messages that haven’t been acknowledged. Thus, some messages could appear twice in Kafka, but no data should be lost.
Various other people are working on similar problems:
Decoderbufs is an experimental Postgres plugin by Xavier Stevens that decodes the change stream into a Protocol Buffers format. It only provides the logical decoding plugin part of the story — it doesn’t have the consistent snapshot or client parts (Xavier mentions he has written a client which reads from Postgres and writes to Kafka, but it’s not open source).
pg_kafka (also from Xavier) is a Kafka producer client in a Postgres function, so you could potentially produce to Kafka from a trigger.
PGQ is a Postgres-based queue implementation, and Skytools Londiste (developed at Skype) uses it to provide trigger-based replication. Bucardo is another trigger-based replicator. I get the impression that trigger-based replication is somewhat of a hack, requiring schema changes and fiddly configuration, and incurring significant overhead. Also, none of these projects seems to be endorsed by the PostgreSQL core team, whereas logical decoding is fully supported.
Sqoop recently added support for writing to Kafka. To my knowledge, Sqoop can only take full snapshots of a database, and not capture an ongoing stream of changes. Also, I’m unsure about the transactional consistency of its snapshots.
For those using MySQL, James Cheng has put together a list of change capture projects that get data from MySQL into Kafka. AFAIK, they all focus on the binlog parsing piece and don’t do the consistent snapshot piece.
Status of Bottled Water
At present, Bottled Water is alpha-quality software. It’s more than a proof of concept — quite a bit of care has gone into its design and implementation — but it hasn’t yet been tested in any real-world scenarios. It’s definitely not ready for production use right now, but with some testing and tweaking it will hopefully become production-ready in future.
We’re releasing it as open source now in the hope of getting feedback from the community. Also, a few people who heard I was working on this have been bugging me to release it 🙂
The README has more information on how to get started. Please let us know how you get on! Also, I’ll be talking more about Bottled Water at Berlin Buzzwords in June — hope to see you there.
Android
Изучение всех рисований на canvas в Android
Если вы хотите создать свой view с нуля в Android, то вам бдует полезано знать функции доступные в canvas. В этом блоге, я перечислю все досупные для рисования функции в Android Canvas: 23 шутки. Вы узнаете то что раньше не знали(Я был удивлен их наличием) Ниже я их разделилп по категориям:
- Геометрический рисование
- Текстовое рисование
- Цветное рисование
- Рисование из картинки.
На случай если у вас нет опыта создания своего view, вы можете ссылаться на мануал под названием:
- Building Custom Component with Kotlin - Предположим вы хотите создать страницу которая состоит из повторяющихся общих view. И вам возможно не захочется их повторять.
- Custom Touchable Animated View in Kotlin - Если вы хотите нарисовать свою собственную view, и так же рисовать анимацию,ну и конечно на котлине... Это должно помочь.Android: draw a custom view
- Android: draw a custom canvas
Introduction
Геометрицеское рисование
Множество людей использует Canvas для рисования геометрических объектов.
1. drawLine
Просто рисует линию
canvas.drawLine(startX, startY, endX, endY, paint)

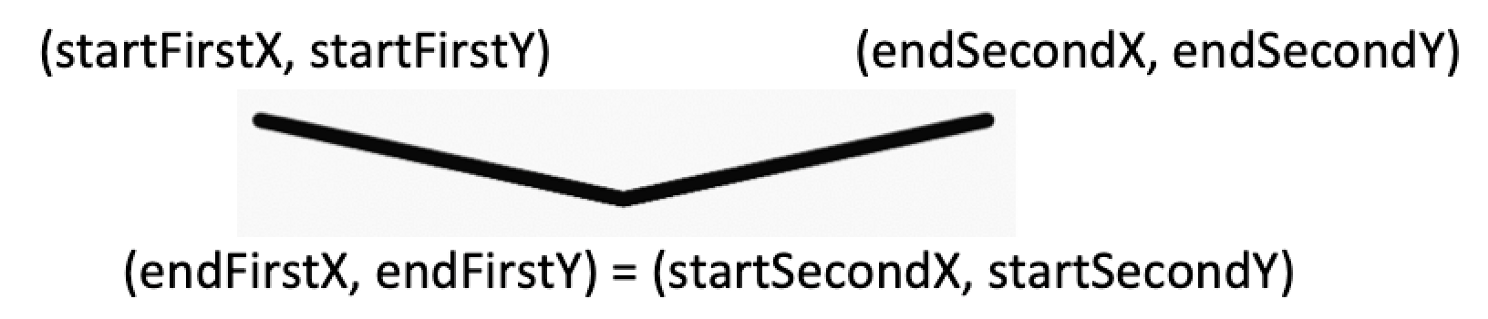
2. drawLines
Если мы рисуем больше чем одну линию, взамен вызова drawLine много раз, мы можем использовать drawLines. Нам нужно предоставить плоский массив значений координат как показано ниже.
canvas.drawLines(
    floatArrayOf(
        startFirstX, startFirstY, endFirstX, endFirstY,
        startSecondX, startSecondY, endSecondX, endSecondY),
    paint)
3. drawPoint
Пока вы можете нарисовать точку с помощью линии с тем же началом и концом координат, то это можно считать хаком. Поэтому drawPoint функция существует.
canvas.drawPoint(coordinateX, coordinateY, paint)
4. drawPoints
Как в случае с линиями, вы можете нарисовать множество точек с помощью массива координат.
canvas.drawPoints(
    floatArrayOf(
        startX, startY,
        startSecondX, startSecondY),
    paint)
5. drawRect
Рисование угла использя координаты или класс Rect.
canvas.drawRect(
    Rect(startX, topY, endX, bottomY),
    paint)
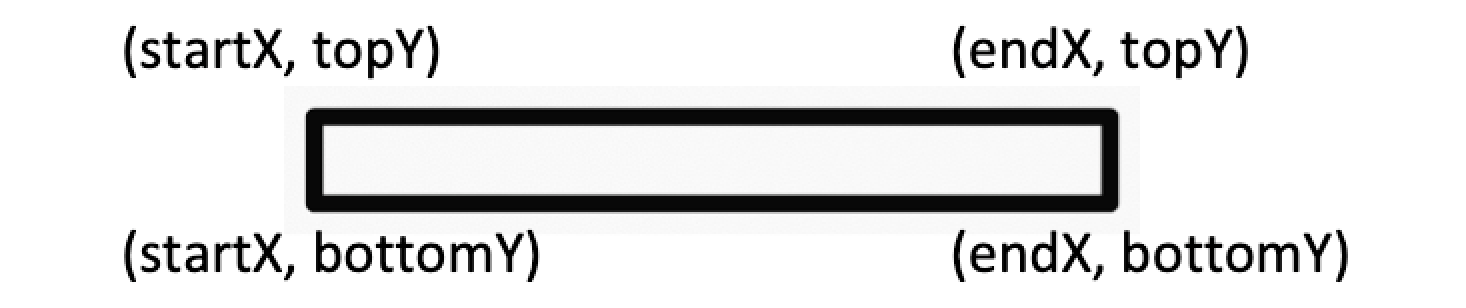
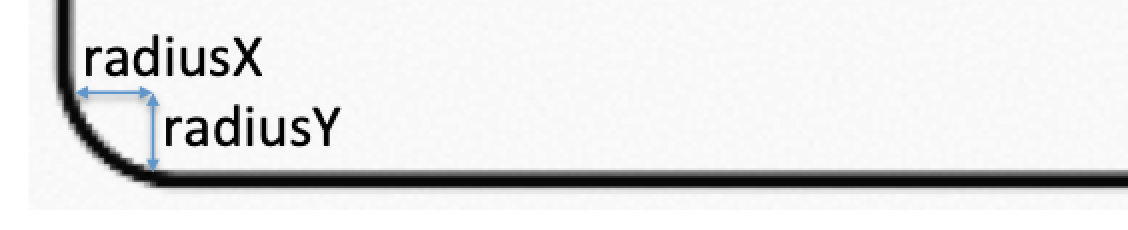
6. drawRoundRect
Если вы хотите угол с круглыми углалми, используйте drawRoundedRect. Это похоже на drawRect но с дополнительными radiusX и radiusY, для определения кривизны круглого угла.
canvas.drawRoundRect(rect, radiusX, radiusY, projectResources.paint)
Функция рисует равномерно круглый угол, если radiusX и radiusY равны.
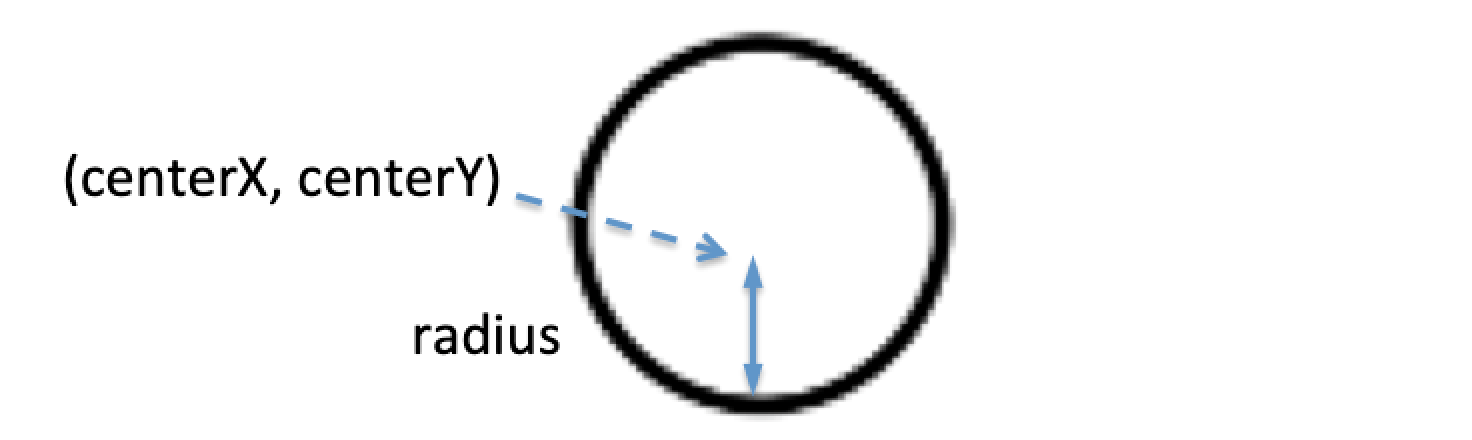
7. drawCircle
drawCircle простой. Ему требуются только центр координат и радиус.
canvas.drawCircle(
    centerCoordinateX, centerCoordinateY,
    radius,
    paint)
8. drawOval
В отличии от рисования круга, мы не предоставляем радиус. Вместо этого мы указываем прямоугольник, и овал будет нарисован соотвественно.
canvas.drawOval(rect, paint)

9. drawArc
Рисование дуги использует то что и овал: класс Rect. И имеет дополнительные параметры, то есть startAngle, sweepAngle и useCenter.
canvas.drawArc(rect, startAngle, sweepAngle, useCenter, paint)
Для startAngle, почитаем середину конца и прямоугольник как начало, то есть 90° поворот по часовой стрелке. Отсюда начальный угол считается нулём. sweepAngle расчитывается от startAngle. Оба используют значения градусов угла.
useCenter это булева переменная для определения связана арка с центром.

useCenter=false

useCenter=true
10. drawPath
Иногда мы хотим нарисовать то что не отображается обычной геометрической фигурной линией. В этом случае мы пользуем drawPath, где Path это объект который состоит из пути который мы хотим нарисовать. Он состоит из функций таких как moveTo и lineTo, как карандаш рисует и двигается.
Ниже пример где мы длелаем крестик с помощью drawPath.
val path = Path()
path.moveTo(startX, topY)
path.lineTo(endX, bottomY)
path.moveTo(startX, bottomY)
path.lineTo(endX, topY)
canvas.drawPath(path, paint)
drawPath очень полезная функция. Много кто использует её для создания нарисованных приложений.

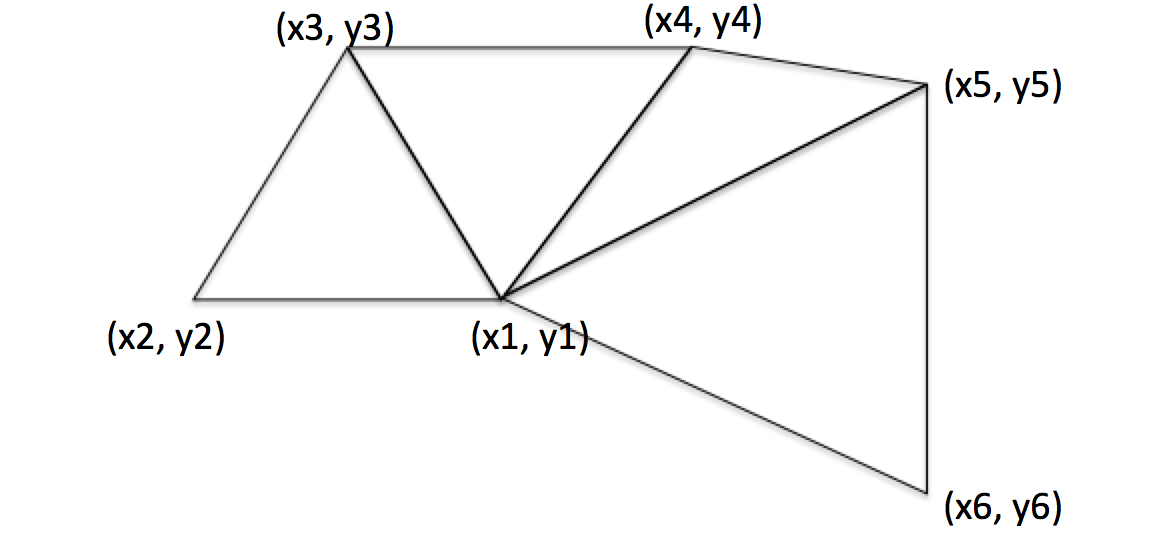
11. drawVertices
Это относительно сложная функция, которая рисует треугольники или вершины с маленькими точками. Для примера, с 6 координатами, можно нарисовать 4 треугольника.
При повторении, можно использовать для сложного 3д моделирования. Картинка ниже это 3d роза, нарисованная с помощью drawVertices.
Вот детальное объяснение его функций.
Рисование текста
Если нам нужно нарисовать текст самостоятельно, это будет довольно легко. Благодаря тому, что мы имеем несколько прекрасный функций.
12. drawText
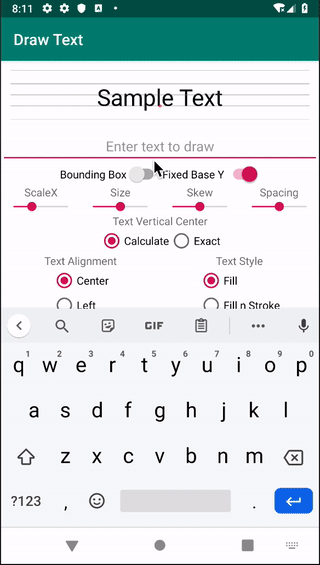
На андроиде, мы обычно испозуем TextView для всех наших текстов. Однако, если мы хотели бы лучший контроль текста, такие как динамическое изменения, точное положение. и т.п., то нам поможет drawText.
Функция принимает text, coordinateX, coordinateY и paint:
canvas.drawText(text, coordinateX, coordinateY, paintText)
Довольна интересная функция чтобы поиграться с ней.
13. Рисование StaticLayout
У drawText есть ограничения. Он не переносит слова на вторую строку. Так же не обрабатывает \n знак.
Поэтому нам нужен StaticLayout чтобы нарисовать текст который может переносить длинные слова на вторую линию.
StaticLayout не совсем функция рисования на canvas, но взамен врисовывает себя в canvas. Ниже пример отрисовки:
val staticLayout =
    StaticLayout.Builder.obtain(
        TEXT, 0, TEXT.length, textPaint, width
    ).build()

canvas.save()
canvas.translate(coordinateX, coordinateY)
staticLayout.draw(canvas)
canvas.restore()

14. drawPosText
drawPosText позволяет помещать знак на определенном позиции. Ниже слово fly написано на разных позициях Y.
val posArray = listOf(x1, y1, x2, y2, x3, y3 ...).toFloatArray()
canvas.drawPosText(TEXT, startIndex, endIndex, posArray, paint)
Приведенные координаты точек должны быть как минимум какие же как буквы чтобы нарисовать, иначе они упадут.

15. drawTextOnPath
Спаренные с путем, мы можем указывать наш текст вдоль приведенного пути.
x и y позиции относительно позиции данного пути.
canvas.drawTextOnPath(TEXT, path, x, y, paint)

16. drawTextRun
This is a little more complicated, as it is generally not used with English words. It only applies to language with letters that are drawn differently depending on the visibility of surrounding letters. For example, the image below has two lines of two letters. The two letters in both lines are the same. However, they are written differently. In the first line, they are part of a larger word, while the second line states the two letters individually. Image for post To understand better, refer to this blog.
Color Drawing
Coloring is useful for the foreground and background of the canvas we’re drawing on. Check it out, as there’s a fancy one…
17. drawRGB
This is just drawing a color over the canvas. This is useful for setting a background color. canvas.drawRGB(red, green, blue) // Each is between 0 and 255, where 0 is not there, and 255 is full. // When alpha is 255, it is opaque, and 0 is transparent.
18. drawARGB
Similar to drawRGB, this adds the ability to make the color semi-transparent. canvas.drawARGB(alpha, red, green, blue) // When alpha is 255, it is opaque, and 0 is transparent. This is useful to set the front color and dim the item behind. Image for post Original Image Image for post Semi transparent red dimming the image
19. drawColor
In case we’d like to use a resource’s color instead of setting our own ARGB color, we can use this API. canvas.drawColor(context.getColor(R.color.colorPrimary))
20. drawPaint
Sometimes, we like to paint fancier colors. Instead of using ARGB or a resource color, we could create a Paint object. Below is an example:
val gradientPaint by lazy {
    Paint().apply {
        shader = RadialGradient(
            width/2f,
            height/2f,
            height/2f,
            Color.GREEN,
            Color.RED,
            Shader.TileMode.MIRROR
        )
    }
canvas.drawPaint(gradientPaint)
Image for post
Image Drawing
Without the ability to load images to draw and manipulate them, canvas drawing would be incomplete. So let’s explore what we have…
21. drawBitmap
Given a bitmap, we can draw it into the canvas.
private val bitmap by lazy {
    BitmapFactory.decodeResource(resources, R.drawable.image)
}
canvas.drawBitmap(bitmap, sourceRect, destRect, paint)
The required parameters are bitmap and destRect. The bitmap can be extracted from resources. destRect is the rectangle area of the canvas to be drawn onto. The optional ones (could be null) are sourceRect and paint. sourceRect is a rectangle representing which subset of the picture to draw. When it is null, the entire picture is taken. (Note: this is very useful for some animation, when a picture of the entire animated drawing is added, and only a subset is shown at a time, as seen here.) paint could be set to null, and the Bitmap will still be drawn as usual. paint is useful if we plan to mask it out with another image. An example is shown in this StackOverflow.
22. drawPicture
If you have a combination of things to draw, and this happens multiple times, and you don’t want the processing to be slow and have to redraw them each tim, you could put your entire drawing into Picture. Below is a simple example where we store our drawing into a Picture:
private val picture by lazy {
    val picture = Picture()
    val pCanvas = picture.beginRecording(width, height)
    pCanvas.drawBitmap(bitmap, null, rect, null)
    picture.endRecording()
    picture
}
When needed, just perform this: canvas.drawPicture(picture) This would speed up your entire process of drawing for things that need to be drawn over and over again.
23. drawBitmapMesh
This is to manipulate the bitmap image drawn. Given an image, we could set coordinates within the image, and translate a point to another position, hence transforming the image of it. E.g. the below image with the center X, Y is shown in the white line cross-section. Image for post However, using drawBitmapMesh, we could shift the coordinate and transform the image accordingly. Image for post Refer to this blog for more information. You can find all these code examples of Canvas drawing here. Have fun with Android Canvas Drawing!
Kafka
Подключение Kafka к PostgreSQL
Инструкция поможет вам взять на себя отвественность без проблем и без потери эффектисновсти. Цель статьи в создании процесса экспорта данных настолько гладко, насколько это возможно.
В конце статьи вы сможете успешно подключать Kafka к PostgreSQL, плавно передавать данные потребителю по выбору, для полноценного анализа в реальном времени. В дальнейшем это повзолит пострить гибкий ETL(дословно «извлечение, преобразование, загрузка») конвеер для вашей организации. Из стати вы узнаете более глубокое понимание инструментов и техник и таким образом оно поможет вам отточить ваши умения дальше.
Требования
Для лучшего пониманиния статьи, требуется понимание следующего списка тем:
- Знания PostgreSQL.
- Знания Kafka
- Kafka и PostgreSQL установленны на хосте.
Введение в Kafka
Apache Kafka это продукт с открытым исходным кодом, который помогает публиковать и подписываться на большие по объему сообщения в распределенной системе. Kafka использует идею лидер-последователь, позволяя пользователя копировать сообщения в независимые от падения, и в дальнейшем позволядет делить и хранить сообщения в Kafka топиках в зависимости от темы сообщения. Kafka позволяет настраивать в реальном времеи потоки данных и приложения для изменения данных и потоков от источника к цели.
Ключевые особенности Kafka:
- Масштабируемость: Kafka имеет исключительную масштабируемость и может быть отмасштабированно без времени простоя.
- Изменение данных: Kafka предлагает KStream и KSQL(в случае Confluent Kafka) для изменению данных на лету.
- Отказоустойчивость: Kafka использует посредников для копирования данных и постоянства данных, для создания отказоустойчивых систем.
- Безопасность: Kafka может быть объеденина с различными метриками безопасности такими как Kerberos, для передачи информации конфиденциально.
- Производительность: Kafka распределенна, разделена и имеет очень высокую пропускную способность для публикации и подписки на сообщения.
Для более подробного описания, можно обратиться на официальный сайт разработчиков Kafka
Введение в PostgreSQL.
PostgreSQL это мощное, производственного класса, с открытым исходным кодом СУБД которая использует стандартные SQL запросы связанных данных и JSON для запросов несвязанных данных хранящихся в базе данных. PostgreSQL имеет отличную поддержку для всех операционных систем. Он поддерживает расширенные типы данных и оптимизацию операций, которые можно найти в комерческих проектах каа Oracle, SQL Server и т.д.
Ключевые особенности PostgreSQL:
- Имеет расширенную поддержку для сложных запросов.
- Предоставляет отличную поддержку для географических объектов и следовательно он может быть использован для географической информационной системы и сервисе на основе положения.
- Предоставляет поддержку для клиент-серверной сетевой технологии
- Упреждающая журнализация(write-ahead-logging (WAL)) позвляет быть базе данных отказоустойчивой.
Для большей информации по PostgreSQL, можно посмотреть официальный вебсайт.
Процесс ручной настройки Kafka и PostgreSLQ интеграции
Kafka поддерживает подключение с PostgreSQL и различными другими базами данных с помощью различных встроенных подключений. Эти коннекторы помогают передавать данные от источника в Kafka и затем передать потоком в целевой сервис с помощью выбора топиков Kafka. Так же, есть множество подключений для PostgreSQL, которые помогают установить подключение к Kafka.
1) Установка Kafka
Чтобы подключить Kafka к PostgreSQL, для начала нужно скачать и установить Kafka.
2) Старт Kafka, PostgreSQL и Debezium сервер
Confluent предоставляется пользователям с различным набором встроенных подключений которые действуют как источники и сток данных, и помогает пользователям передавать их данные через Kafka. Один из таких подключений/образов которые позволяют подключать Kafka к PostgreSQL - Debezium PostgreSQL Docker образ.
Чтобы установить Debezium Docker который поддерживает. подключение к PostgreSQL с Kafka, обратимся к официальному проекту Debezium Docker и склониурем проект на нашу локальную систему.
Как только вы склонировали проект вам нужно запустить Zookeper сервис который хранит настройки Kafka, настройки топиков, и упревление нодами Kafka. Это всё запускается следующей командой:
docker run -it --rm --name zookeeper -p 2181:2181 -p 2888:2888 -p 3888:3888 debezium/zookeeper:0.10
Теперь с работающим Zookeper, вам нужно запустить Kafka сервер. Чтобы сделать это откройте консоль и выполните следующую команду:
docker run -it --rm --name kafka -p 9092:9092 --link zookeeper:zookeeper debezium/kafka:0.10
Как только вы запустили Kafka и Zookeeper, теперь запускаем PostgreSQL сервер, его мы будем подключать к Kafka. Это можно выполнить следующей командой:
docker run — name postgres -p 5000:5432 debezium/postgres
Теперь стартуем Debezium. Для этого выполним следующую команду:
docker run -it — name connect -p 8083:8083 -e GROUP_ID=1 -e CONFIG_STORAGE_TOPIC=my-connect-configs -e OFFSET_STORAGE_TOPIC=my-connect-offsets -e ADVERTISED_HOST_NAME=$(echo $DOCKER_HOST | cut -f3 -d’/’ | cut -f1 -d’:’) — link zookeeper:zookeeper — link postgres:postgres — link kafka:kafka debezium/connect
Как только вы запустили все эти сервера, логинимся в командную оболочку PostgreSQL используя следующие команды
psql -h localhost -p 5000 -U postgres
3) Создаем базу данных в PostgreSQL
Как только вы вошли в PostgreSQL, вам необходимо создать базуданных. Для примера если вы хотите создать базуданных с именем emp, вы можете использовать следующую команду:
CREATE DATABASE emp;
В готовой базе, создадим таблицу, которая будет хранть информацию. Для этого выполним:
CREATE TABLE employee(emp_id int, emp_name VARCHAR);
Теперь нужно добавить данные или несколько записей в таблицу. Для этого выполните выполните команды как указано ниже:
INSERT INTO employee(emp_id, emp_name) VALUES(1, 'Richard')
INSERT INTO employee(emp_id, emp_name) VALUES(2, 'Alex')
INSERT INTO employee(emp_id, emp_name) VALUES(3, 'Sam')
Таким образом вы можете создать postgreSQL базу данных и вставить в неё значение, для того чтобы настроить подключение между Kafka и PostgreSQL.
4) Поднятие подключения Kafka-PostgreSQL
Как только вы настроили PostgreSQL базу данных, вам нужно поднять Kafka-Postgres подключение, которое позволить вам тянуть данные из PostgreSQL в Kafka топик. Для этого вы можете создать Kafka подключение используя следующий скрипт:
curl -X POST -H “Accept:application/json” -H “Content-Type:application/json” localhost:8083/connectors/ -d ‘
{
 “name”: “emp-connector”,
 “config”: {
 “connector.class”: “io.debezium.connector.postgresql.PostgresConnector”,
 “tasks.max”: “1”,
 “database.hostname”: “postgres”,
 “database.port”: “5432”,
 “database.user”: “postgres”,
 “database.password”: “postgres”,
 “database.dbname” : “emp”,
 “database.server.name”: “dbserver1”,
 “database.whitelist”: “emp”,
 “database.history.kafka.bootstrap.servers”: “kafka:9092”,
 “database.history.kafka.topic”: “schema-changes.emp”
 }
}’
Чтобы проверить что подключение прошло успешно воспользуйтесь командой:
curl -X GET -H “Accept:application/json” localhost:8083/connectors/emp-connector
Для того, чтобы проверить что Kafka получил данные из PostgreSQL или нет, нужно ключить Kafka Console Consumer, используя следующую команду:
docker run -it -name watcher -rm - link zookeeper:zookeeper debezium/kafka watch-topic -a -k dbserver1.emp.employee
Команда выше теперь отобразит вашу базу данных PostgreSQL в консоли. После того как убедимся что данные полученны в Kafka верно, можно воспользоваться KSQL/KStream или Spark поток для произвдения действий ETL над данными.
Потоковая передача данных PostgreSQL + Kafka + Debezium: Part 1
В этой инструкции мы будем использовать Postgres, Kafka< Kafka Connect, Debezium и Zookeeper для создание маленького api, который отслеживает магазины и крипто попуки во времени.
Введение
Платформа потоковой передачи данных, как Kafka позволяет вам строить ситемы которые обрабатывают данные в реальном времени. Эти системы имеют мириады случаем использования, проекты могут ранжироваться от простой обработки данных для ETL систем до проектов требующих высокую скорость координации микросервисов требуемое все виды Kafka как приемлимое решение.
Один из моих любимых примеров использования Kafka происходит от New Relic инженерный блог. New Relic помогает разработчикам отслеживать производительность их приложений. Их свойства работают в реальном времени, что может быть важно так как множество разработчиков полагаются на него в качестве системы опвещение, когда что-то идет не так. New Relic сереьзно использует Kafka для координирования микросервисов и связывать их в реальном времени друг с другом.
В то время как Kafka слишком сложна в качестве простого инструменка, который мы собираемся построить сегодня, эта инструкция покажет как настроить Kafka. Мы не будем делить наш API на множество сервисов, но мы будем использовать Kafka внутри нашего сервиса что того, чтобы просчитать и создать допольнительные данные доступные через API.
Что такое Kafka?
Kafka очень мощный платформа потока событий, которая позволяет обрабатывать массинвый набор данных в реальном времени. В добавок, можно сказать, kafka масштабируемы и отказоустойчива, делает её популярным выбором для проектов которые требуют скорость обработки данных.
Что такое Debezium?
Реляционная SQL база данных в сердце бесчетного количество программный проектов. Для примена, если вы хотите использовать Kafka, но часть (или всё) ваших данных существует в Postgres базе данных, Debezium - это инструмент который подключается к Postgres и потоковым образом передает данные в Kafka. Запускается на сервере с базой данных.
Что такое Zookeper?
ZooKeeper - еще один кусок програмного обеспечения от Apache, который использует Kafka для хранения и управления конфигурацией. Для базовой настройки, которую мы будем использовать не требуется глубокое понимание Zookeeper.
Если вы уже закончили установку проекта как этот в боевом окружении, вы захотите узнать гораздо больше о том, как оно работает и как его настроить. В будущем, Kafka не потребует Zookeeper.
Что такое Kafka Connect?
Kafka Connect работает как мост для входящих и исходищх потоковых данных. Вы можете подключить вашу Kafka к различным источникам баз данных. В этой иснтрукции, мы будем использовать для подключения Debezium, Postgres, но это будет не единственный источник данных для которых Connect может быть полезен. Есть бесконечное количество коннекторов написанных для того, чтобы манипулировать различными данными в Kafka.
Так же экосистема Kafka может быть полезна, вы сможете получить большую отдачу отдачу от Kafka в последствии если вложитесь в Kafka:
Использвоание Docker для настройки Postgres, Kafka и Debezium
Эта инструкция будет состоять из несколких частей. Первая, мы настроим маленкий API сервер, который позволит вам хранить записи. Затем, используя данные цен, покупок/продаж, данные будут проходить через Kafka и расчитывать различные общие метрики. Мы так же поэкспериментируем используя Debezium sink для потока данных из Kafka обратно в SQL базу даннхы.
В этой части мы поднимем и запустим Kafka и Debezium. В конце инструкции, у вас будет проект который передает потоковым образом события из таблицы в топик Kafka.
Мы будем исполльзовать Docker и docker-compose чтобы помочь нам запустить Postgres, Kafka и Debezium. Если вы не знакомы с этими инструментами, возможно будет полезно прочитать про инструменты прежде чем продолжить.
Созадим Postgres контейнера с помощь Docker
Первое, настроим базвый Postgres контейнер.
version: '3.9'

services:
  db:
    image: postgres:latest
    ports:
      - "5432:5432"
    environment:
      - POSTGRES_PASSWORD=arctype
После запуска docker-compose, мы должны иметь рабочую базу данных
db_1 | 2021-05-22 03:03:59.860 UTC [47] LOG: database system is ready to accept connections
Теперь, проеверим, что она работает.
$ psql -h 127.0.0.1 -U postgres
Password for user postgres:

postgres@postgres=#
После подключения нас приветствует psql консоль.
Добавим Debezium Kafka, Kafka Connect, и Zookeeper образы
Теперь добавим другие образы необходимые для Kafka. Debezium предлагет образы Kafka, Kafka Connect и Zookeeper, которые предназначены специально для работы с Debezuim. Поэтому использовать мы будем их.
version: '3.9'

services:
  db:
    image: postgres:latest
    ports:
      - "5432:5432"
    environment:
      - POSTGRES_PASSWORD=arctype

  zookeeper:
    image: debezium/zookeeper
    ports:
      - "2181:2181"
      - "2888:2888"
      - "3888:3888"

  kafka:
    image: debezium/kafka
    ports:
      - "9092:9092"
      - "29092:29092"
    depends_on:
      - zookeeper
    environment:
      - ZOOKEEPER_CONNECT=zookeeper:2181
      - KAFKA_ADVERTISED_LISTENERS=LISTENER_EXT://localhost:29092,LISTENER_INT://kafka:9092
      - KAFKA_LISTENER_SECURITY_PROTOCOL_MAP=LISTENER_INT:PLAINTEXT,LISTENER_EXT:PLAINTEXT
      - KAFKA_LISTENERS=LISTENER_INT://0.0.0.0:9092,LISTENER_EXT://0.0.0.0:29092
      - KAFKA_INTER_BROKER_LISTENER_NAME=LISTENER_INT

  connect:
    image: debezium/connect
    ports:
      - "8083:8083"
    environment:
      - BOOTSTRAP_SERVERS=kafka:9092
      - GROUP_ID=1
      - CONFIG_STORAGE_TOPIC=my_connect_configs
      - OFFSET_STORAGE_TOPIC=my_connect_offsets
      - STATUS_STORAGE_TOPIC=my_connect_statuses
    depends_on:
      - zookeeper
      - kafka
Настройки переменного окружения для Kafka позволяют нам указать различные сети и протоколы безопаснотсти если у вашей сети есть различные правила для внутреннего брокера подключения в отличии от внешних клиентов подключающихся к Kafka. Наша простая настройка самостоятельна с созданное сетью внутри Docker.
Kafka Connect создает топик в Kafka и использует их для хранения настроек. Вы можете указать имя, которое он будет использовать для топик с переменными окружением. Если у вас есть множетсво Kofka Connect нод, они могут выполнять работу паралельно когда они имеют одну и ту же GROUP_ID и _STORAGE_TOPIC потоковые события PostgreSQL
Создадим таблицу чтобы проверить потоковые события.
create table test (
id serial primary key,
name varchar
);
Настроим Debezium Connector для PostgreSQL.
Если мы запустим наш Docker проект, Kafka, Kafka Connect, Zookeeper и Postgres он прекрасно работает. Однако, Debezium требует конкретной настройки коннектора для запуска потоковых данных от Postgres.
Совместный SQL редактор
Прежде чем мы активируем Debezium, нам нужно подготовить Postgres сделав необольшие конфигурационные изменения. Debezium использует нечто встроенное в POstgres, под названием WAL, или упреждающую журнализацию. Postgres использует этот лог чтобы проверить целостность данных и управлять версиями ячеек и транзакций. WAL в Postgres имеет несколько режимов, которые можно настроить, и для работы Debezium WAL режим должен быть указан как replica. Давайте это настроим.
psql> alter system set wal_level to 'replica';
Возможно понадобится рестарт Postgres контейнера для применения настройки.
Есть еще один плагин Postgres не включенный в образ который мы используем, поэтому нам понадобится wal2json. Debezium может работать и с wal2json и с protobuf. Для этой инструкции, мы будем использовать wal2json. Так как он согласно имени переводит Postgres WAL лог в JSON формат.
С помощью запущенного Docker, в ручном режиме установим wal2json исполльзуя aptitude. Чтобы добраться до косноли Postgres контейнера, для начала найдем ID контейнера и выполним следующий набор команд:
$ docker ps

CONTAINER ID   IMAGE
c429f6d35017   debezium/connect
7d908378d1cf   debezium/kafka
cc3b1f05e552   debezium/zookeeper
4a10f43aad19   postgres:latest

$ docker exec -ti 4a10f43aad19 bash
Теперь, когда мы внутри контейнера давайте поставим wal2json:
$ apt-get update && apt-get install postgresql-13-wal2json
Активируем Debezium
Мы можем общаться с Debezium делая HTTP запросы. Для этого нужен POST запрос данные которого отформатированны в JSON формате. JSON определяет параметры коннектора который мы пытаемся создать. Поместим данные в файл и будем его использовать с cURL.
У нас есть несколько конфигурационных опций на данный момент. Тут можно использовать белый или черный списки если вы хотите чтобы Debezium отображал только определенные таблицы(или для избежания определенных таблиц)
$ echo '
{
    "name": "arctype-connector",
    "config": {
        "connector.class": "io.debezium.connector.postgresql.PostgresConnector",
        "tasks.max": "1",
        "plugin.name": "wal2json",
        "database.hostname": "db",
        "database.port": "5432",
        "database.user": "postgres",
        "database.password": "arctype",
        "database.dbname": "postgres",
        "database.server.name": "ARCTYPE",
        "key.converter": "org.apache.kafka.connect.json.JsonConverter",
        "value.converter": "org.apache.kafka.connect.json.JsonConverter",
        "key.converter.schemas.enable": "false",
        "value.converter.schemas.enable": "false",
        "snapshot.mode": "always"
    }
}
' > debezium.json
Теперь можно отправить эту конфигурацию в Debezium
$ curl -i -X POST \
         -H "Accept:application/json" \
         -H "Content-Type:application/json" \
         127.0.0.1:8083/connectors/ \
         --data "@debezium.json"
Ответ должен быть со следующим содержанием JSON если это уже не настроенный коннектор.
{
  "name": "arctype-connector",
  "config": {
    "connector.class": "io.debezium.connector.postgresql.PostgresConnector",
    "tasks.max": "1",
    "plugin.name": "wal2json",
    "database.hostname": "db",
    "database.port": "5432",
    "database.user": "postgres",
    "database.password": "arctype",
    "database.dbname": "postgres",
    "database.server.name": "ARCTYPE",
    "key.converter": "org.apache.kafka.connect.json.JsonConverter",
    "value.converter": "org.apache.kafka.connect.json.JsonConverter",
    "key.converter.schemas.enable": "false",
    "value.converter.schemas.enable": "false",
    "snapshot.mode": "always",
    "name": "arctype-connector"
  },
  "tasks": [],
  "type": "source"
}
Проверим настройку потоковой передачи Kafka
Теперь после вставки обновления или удаления записей мы будем использовать изменения как новое сообщение в Kafka топике связанной с таблицей. Kafka Connect создаст 1 топик для SQL таблицы. Чтобы проверить что всё работает верно, нам нужно мониторить Kafka топик.
Kafka идет с shell скриптами которые помогают вам вставлять ваши настройки Kafka. Это удобно когда вы хотите проверить вашу конфигурацию и её удобно включать в Docker образ который мы используем. Первый, который мы будем использовать список всех топиков в нашем Kafka кластере. Давайте запустим и проверим что мы видим топик для нашей test таблицы.
$ docker exec -it \
  $(docker ps | grep arctype-kafka_kafka | awk '{ print $1 }') \
  /kafka/bin/kafka-topics.sh \
    --bootstrap-server localhost:9092 --list

ARCTYPE.public.test
__consumer_offsets
my_connect_configs
my_connect_offsets
my_connect_statuses
Встроенный в инструмент Kafka требует указания --bootstrap-server. Он ссылается на bootstrap потому, что вы обычно запускаете Kafka как кластер с несколькими нодами, и вам нужно один из них, который "выставлен наружу" чтобы зайти в кластер. Kafka обрабатывает все остальное самостоятельно.
Вы можете увидеть нашу test таблицу в списке ARCTYPE.public.test. Первая часть, ARCTYPE - это префикс который мы настроили для database.server.name поле в настройках JSON. Вторая часть отражает схему Postgres таблицы в ней, в последней части название таблицы. При добавлении Kafka производителей и приложений с потоковыми данными, количество топиков будет увеличиваться, поэтому удобно указывать префиксы, чтобы проще идентифицировать какой из топиков относится к таблице в бд.
Теперь монжо использовать другой инструмент называемым консольый потребитель для слежения за топиками в реальном времени. Называется он "console consumer" потому, что это типа потребителя kafka - утилита которая постребляет сообщения из топика и что-нибудь делает с ним. Потребитель может делать что угодно с данными которые он потребяет и консоль потребителя ничего не делает кроме как выодит эти сообщения в консоль.
$ docker exec -it \
  $(docker ps | grep arctype-kafka_kafka | awk '{ print $1 }') \
  /kafka/bin/kafka-console-consumer.sh \
    --bootstrap-server localhost:9092 \
    --topic ARCTYPE.public.test
По умолчанию, консольный потребитель, потребляет только сообщения у него уже не было. Если вы хотите увидеть все сообщения в топике нужно добавить ключ --from-beginning в команду запуска .
Теперь наш потребитель следить за новыми сообщенямии в топике, а мы запустим INSERT и посмотрим вывод.
postgres=# insert into test (name) values ('Arctype Kafka Test!');
INSERT 0 1
Вернемся к нашему Kafka потребителю:
$ docker exec -it $(docker ps | grep arctype-kafka_kafka | awk '{ print $1 }') /kafka/bin/kafka-console-consumer.sh  --bootstrap-server localhost:9092 --topic ARCTYPE.public.test
...
{
  "before": null,
  "after": {
    "id": 8,
    "name": "Arctype Kafka Test!"
  },
  "source": {
    "version": "1.5.0.Final",
    "connector": "postgresql",
    "name": "ARCTYPE",
    "ts_ms": 1621913280954,
    "snapshot": "false",
    "db": "postgres",
    "sequence": "[\"22995096\",\"22995096\"]",
    "schema": "public",
    "table": "test",
    "txId": 500,
    "lsn": 22995288,
    "xmin": null
  },
  "op": "c",
  "ts_ms": 1621913280982,
  "transaction": null
}
В месте с мета данными вы можете увидеть главный ключ поля name записки которую вы добавили.
Выводы
Давайте скоординируемся, так как мы имеем Postgres для передачи данных в Kafka кластер. Во второй части, мы построим SQL схему чтобы улучшить наше приложение, для вычисления данных.
Kotlin
Веб приложение с Kotlin.js: Начало
Почему Kotlin.js?
Почему стоит использовать Kotlin для веб разработки? Вот несколько причин:
- Знакомство: Если вы пришли из компилируемого языка типа Java, Swift или C#, вы найдете Kotlin очень простым для изучения, и вы должны уже быть знакомы с ним, если вы разработчик для андроид.
- Дружелюбные инструменты: IDE может помочь вам во многом с JavaScript, так как Kotlin идет с первоклассной поддержкой в IDE, значит вы можете находить, общие ошибки при наборе кода.
- Распространение кода между платформами: С помощью Kotlin Multiplatform Project, вы можете написать бизнес логику вашего приложения один раз и распространять его на множество платформ включая бэкенд, браузер фротенд, Android и iOS клиенты.
- Совместимость: Возможность вызывать JavaScript код из Kotlin кода очень важна. Она позволяет вам использовать уже готовый JavaScript код, который был уже написан на Kotlin. Эта совместимость имеет и обратное направление. Можно вызывать Kotlin код из JavaScript.
- Проблемы JavaScript: Kotlin отличный выбор если отказались от веб разработки в связи с распространением JavaScript проблем, таких как необходимость работы с динамической типизацией, странным логическим сравнением или прототипированием.
- Требования: для этой инструкции, вам необходимо базовое знание веб-программирования и знакомство с Kotlin и IntelliJ Idea. Если вы полностью новичок в Kotlin, возможно вы захотите почитать книгу "Kotlin Apprentice" или видео курс "Программирования на Kotlin"
Начнем.
Вы собираетесь создать приложение книжный магазин. Приложение будет получать данные о книгах с вебсервиса, отображать обложки книг с названием, описанием, ценой и кнопкой открыть страничку с деталями. Вот как будет выглядеть конечный результат:

Чтобы следовать данному руководству, вам необходимо использовать IntelliJ IDEA 2018.8.7 или позднее (бесплатная Community Edition будет достаточно), и Kotlin 1.2.61 или более поздний.
Начинаем с загрузки материала для этого руководства используя кнопку "Download Materials" в верхней или нижней части окна программы. Затем запускаем IntelliJ IDEA и создаем новый проект.
В окне нового проекта, выберите Kotlin в левой части панели и Kotlin/JS в правой части. Затем нажмите "Next"
Новый проект, шаг 1
Для имени проекта используйте bookstore. Выберите место расположения проекта, или используйте по умолчанию. Затем нажмите "Finish"
Новый проект, шаг 2
Распакуйте скаченные материалы, и из начальной папки, скопируйте index.html и styles.css в вашу папку с проектом. Структура проекта должна выглядеть следующим образом:

Создание главной функции
Создайте новый Kotlin файл с именем Main.kt в папке src и добавьте в нее main() функцию как показано ниже:
fun main(args: Array<String>) {
  println("Hello world!")
}
Заметка: Функция приложения main() может быть в любом Kotlin файле с любым именем, поэтому использование Main.kt не строго обязательно, но вы должны иметь только одну функцию main() в вашем проекте.
Теперь откроем "Build" меню и нажмем "Build Project" чтобы скомпилировать ваш Kotlin код в JavaScript. IDE сгенерирует следующую папку в корне вашего проекта.
Нам нужно упомянуть 2 выходных файла в данном проекте в index.html:
- kotlin.js: это стандартная Kotlin библиотека, реализованная в JavaScript
- bookstore.js: Это JavaScript, в который был скомпилирован Kotlin. Заметка: Оба файла уже ссылаются для вас внутри скриптами на начальный index.html файл, но вам возможно нужно проверить их пути на случай если вы ввели другое название проекта.
Теперь откроем index.html в вашем браузере, и затем откроем консоль разработчика. Вы должны увидеть "Hello World!",как показано на скриншоте:

Заметка: Каждый раз меняя код kotlin, необходимо билдить ваш проект и затем обновлять HTML страницу чтобы увидеть изменения.
Вызываем JavaScript код из Kotlin
В index.html файле, внутри тега со скриптом, вы найдете JavaScript функцию названную getApiUrl(), который возвращает URL необходимый вам для получения данных магазина в формате JSON
<script>
function getApiUrl(){
  return "https://gist.githubusercontent.com/tarek360/4578e33621011e18829bad0c8d1c8cdf/raw/06d185bebc3e14a56dfa85f53288daddd4ff6a2b/books.json";
}
</script>
Есть множество путей для доступа JavaScript функции или переменно из кода Kotlin. Один из них это использование функции js(), которая позволяет передавать простой код JavaScript как строку.
Добавим следуюущую строку кода в Main.kt файл, вне main() функции.
val API_URL = js("getApiUrl()") as String
Здесь вы передаете строку getApiUrl() в js() функцию. Теперь getApiUrl() функция всегда возвращает строку, вы можете привести её безопасно к String Kotlin, и хранить как обычное значение.
Теперь, обновим main() функцию для выведения значения API_URL свойства вместо "Hello world!"
fun main(args: Array<String>) {
  println(API_URL)
}
Билдим проект и обновляем index.html в браузере. Вы дожны увидеть значение API_URL переменной, выведенной в консоль, как на скриншоте ниже

Теперь у вас есть URL сохраненный в API_URL значении, который вы используете позднее.
Очистим main() функцию, чтобы подготовить её к тому, что будет происходить дальше.
Чтобы получить данные от сервера их отобразить их в UI, необходимо создать новый Kotlin класс для отображения одной книги. Создадим файл Book.kt в src папке и поместит тут класс данных:
data class Book(val title: String,
                val price: String,
                val description: String,
                val url: String,
                val coverUrl: String)
Каждая книга имеет заголовок, цену, описание, URL для страницы с деталями на сайте и ссылку на картинку обложки.
Создаем приложение
Вы будете использовать простую архитектуру MVP в приложении. Класс отображению будет содержать всю бизнес логику, пока класс страницы работает как вью. Перед созаднием этих классов, создадим контракт между ними.
Заметка: Если вы не имеет опыта работы с MVP, то посмотрите учебное пособие Getting Started with MVP on Android.
Создадим новый Kotlin интерфейс, названный BookStoreContract (как обычно, в его собственном файле в папке src) который определяет подключение между вью и представителем. Добавим следующий код:
interface BookStoreContract {
  interface View {
    fun showBooks(books: List<Book>) // 1
    fun showLoader() // 2
    fun hideLoader() // 3
  }

  interface Presenter {
    fun attach(view: View) // 4
    fun loadBooks() // 5
  }
}
Эта вью сможет:
- Отображать список книг, предоставленных ей
- Показывать индикатор загрузки пока приложение получает данные от сервера
- Прятать индикатор загрузки.
Что касается от представителя, он может:
- Отображать результаты на любой вью которая предоставлена
- Начинать загрузку данных о книгах из источника данных, в этом случае, это удаленный сервер.
Выполнив это, вы теперь можете создать класс BookStorePage, и добавить в нее такой код:
class BookStorePage(private val presenter: BookStoreContract.Presenter) : BookStoreContract.View {
  override fun showBooks(books: List<Book>) {
  }
  override fun showLoader() {
  }
  override fun hideLoader() {
  }
}
Этот класс имеет конструктор с BookStoreContract.Presenter параметром. Он реализует BookStoreContract.View интерфейс с тремя необходимыми методами (пока пустыми)
Создадим BookStorePresenter класс и добавим следующий код:
// 1
class BookStorePresenter : BookStoreContract.Presenter {
  // 2
  private lateinit var view: BookStoreContract.View
  // 3
  override fun attach(view: BookStoreContract.View) {
    this.view = view
  }
  // 4
  override fun loadBooks() {
  }
}
В этом классе, вы:
- Реализовали
BookStoreContract.Presenterинтерфейс. - Добавили свойство для хранения сылки на вью.
- Реализовали метод
attach()изBookStoreContract.Presenterинтерфейса, и проинициализировать вью свойство из полученного параметра. - Реализовали
loadBooks()метод требуемыйBookStoreContract.Presenterинтерфейсом(пока пустым).
Получение данных с сервера
Вам нужен пут для получения данных с сервера. Чтоыб это сделать, добавьте следующий метод в BookStorePresenter класс.
// 1
private fun getAsync(url: String, callback: (String) -> Unit) {
  // 2
  val xmlHttp = XMLHttpRequest()
  // 3
  xmlHttp.open("GET", url)
  // 4
  xmlHttp.onload = {
    // 5
    if (xmlHttp.readyState == 4.toShort() && xmlHttp.status == 200.toShort()) {
      // 6
      callback.invoke(xmlHttp.responseText)
    }
  }
  // 7
  xmlHttp.send()
}
Нажмите option+return на Mac или Alt+Enter на PC, чтобы добавить в импорт класс XMLHttpRequest.
Пройдем по тому, что мы делаем, шаг за шагом.
- Создание метода который делает сетевые запросы. Он берет URL для получения, так же как и функция со
Stringпараметром, которая передать результат сетевого вызова. - Создаем объект
XMLHttpRequest. ` - Указываем этот запрос посылает
HTTP GETзапрос на заданный URL. - Указываем
callbackкоторый будет выполнен, когда запрос завершится. - Проверяем если запрос имеет состояние выполнен, и если он имеет статус код 200.
- Вызываем
callbackфункцию, принимаемую как параметр, и передаем её содержание сетевого ответа как строки. - Вызываем
send()чтобы произвести HTTP запрос настроенный ранее.
Теперь, вы можете использовать вспомогательный метод для реализации loadBooks():
override fun loadBooks() {
  //1
  view.showLoader()
  //2
  getAsync(API_URL) { response ->
    //3
    val books = JSON.parse<Array<Book>>(response)
    //4
    view.hideLoader()
    //5
    view.showBooks(books.toList())
  }
}
В этой части кода:
- Просим вью показать загрузочный индикатор прежде, чем начать загружать данные.
- Делаем асинхронный запрос чтобы получить данные о книгах
- Парсим JSON ответ полученный как массив объектов данных клласа
Book - Просим вью спрятать индикатор загрузки, так как вы закончили загрузку и парсинг
- Просим вью отобразить список книг
Вы можете пройтись по массиву книг и распечатать заголовок каждый книги в консоль, чтобы быть уверенным, что все работает правильно. Чтобы это сделать добавим следующие линии кода после того, как книги будут распарсены:
books.forEach { book ->
  println(book.title)
}
Чтобы протестировать код представителя, обновим main() функцию для чтения:
fun main(args: Array<String>) {
  val bookStorePresenter = BookStorePresenter()
  val bookStorePage = BookStorePage(bookStorePresenter)
  bookStorePresenter.attach(bookStorePage)
  bookStorePresenter.loadBooks()
}
Тут мы создаем новый объект BookStorePresenter, и затем объект BookStorePage, переданные странице от объекта представителя через его конструктор. Теперь вы добавляете страницу в представителя и вызывается loadBooks() непосредственно на представителе.
Сбилдим и запустим проект и обновим index.html. Вы должны увидеть лог как на картинке ниже:

После выполнения этого тестирования, уберите цикл forEach с выражением print внутри loadBooks()
Заметка: Если вы пытаетесь печатать саму книгу(println(book)), это нормально видеть только объект Object повторяющийся снова и снова в выходе. Это потому что вызов JSON.parce создает чистый JavaScript объект вместо вызова конструктора класса Book Kotlin.
Это значит что вы сможете читать его свойства, но любой метод ожидающий класс будет пропущен - включая автогерированную реализацию toSting(). Если вам необходим более надежный метод анализа решения который сделает это правильно, вы можете изучить подробнее kotlinx.serialization библиотеку.
Создание UI
Файл index.html содержит два div тега с ID, названный loader и content. Для начала загрузочный индикатор, который вы можете показывать пока ваше приложение загружает данные, и прячет, когда эта загрузка выполнена. Затем контейнер, в который будет добавлены все карточки книг.
Для доступа в DOM элементы в вашем Kotlin коде, добавьте следующие два новых свойства в класс BookStorePage как показано ниже.
private val loader = document.getElementById("loader") as HTMLDivElement
private val content = document.getElementById("content") as HTMLDivElement
Вы всегда можете получить элемент в DOM по его ID, используя объект документа и getElementeById() метод, так же как это делается в JavaScript.
Метод getElementById() возвращает общий Element, который вы можете привести к другому типу элемента если нужно.(похоже на то на как метод findViewById() работает в Android).
Меняем видимость загрузчика
Обновим методы showLoader() и hideLoader() в BookStorePage следующий образом.
override fun showLoader() {
  loader.style.visibility = "visible"
}
override fun hideLoader() {
  loader.style.visibility = "hidden"
}
Снова, вы используете обычную DOM модель для изменения визуальныйх свойств элементов visible и hidden, как и трубется.
Элемент загрузчик, видимый по умолчанию, поэтому вы должны видеть его, когда открываете страницу index.html.

Проверьте ваш код и спрячьте загрузчик изменим следующим образом функцию main():
fun main(args: Array<String>) {
  val bookStorePresenter = BookStorePresenter()
  val bookStorePage = BookStorePage(bookStorePresenter)
  bookStorePage.hideLoader()
}
Вы обновили main функцию вызывать hideLoader() напрямую чтобы прятать индикатор который был до этого видим.
Сбилдим проект и обновим index.html в вашем браузере. Загрузчик должен теперь исчезнуть.
Создание элементов книги.
Теперь, вы создадите карточку отображения каждой книги, как показано ниже

Создайте новый класс и назовите его CardBuilder. В этом классе вы создадите HTMLElement для представления книги, свяжите детали книги с ним, и примените CSS. Начните с класса как показано ниже:
class CardBuilder {

  fun build(book: Book): HTMLElement {
    // 1
    val containerElement = document.createElement("div") as HTMLDivElement
    val imageElement = document.createElement("img") as HTMLImageElement
    val titleElement = document.createElement("div") as HTMLDivElement
    val priceElement = document.createElement("div") as HTMLDivElement
    val descriptionElement = document.createElement("div") as HTMLDivElement
    val viewDetailsButtonElement = document.createElement("button") as HTMLButtonElement

    // 2
    bind(book = book,
        imageElement = imageElement,
        titleElement = titleElement,
        priceElement = priceElement,
        descriptionElement = descriptionElement,
        viewDetailsButtonElement = viewDetailsButtonElement)

    // 3
    applyStyle(containerElement,
        imageElement = imageElement,
        titleElement = titleElement,
        priceElement = priceElement,
        descriptionElement = descriptionElement,
        viewDetailsButtonElement = viewDetailsButtonElement)

    // 4
    containerElement
        .appendChild(
            imageElement,
            titleElement,
            descriptionElement,
            priceElement,
            viewDetailsButtonElement
        )
    // 5
    return containerElement
  }

  // 6
  private fun Element.appendChild(vararg elements: Element) {
    elements.forEach {
      this.appendChild(it)
    }
  }
}
Нужно много чего еще сделать, давайте посмотрим на шаги по очереди:
- Создать новые элементы используя
createElement()API барузера, передавая имя HTML тэга для созадния. Для примера, используейтеdivдля созданияHTMLDivElement()иimgчтобы создатьHTMLImageElement. - Свяжите класс данных
bookc созданнымHTMLэлементом. Вы скоро реализуете этот методbind() - Примените некоторые CSS классы к
HTMLэлементам. Так же реализуетеapplyStyle()метод ниже. - Добавите все отдельные
HTMLэлементы в один контейнер. - Вернете контейнер, который является корневым элементов карточек.
- Напишите расширение функции которая позволяет вам добавлять переменное количество дочерних к элементы, вместо вызова обычного
appendChild()метода множество раз.
Создание данных
Заполните элементы данными, добавьте следующий код.
Заполнените элементы данными, добавьте следующие метод в класс CardBuilder:
private fun bind(book: Book,
                 imageElement: HTMLImageElement,
                 titleElement: HTMLDivElement,
                 priceElement: HTMLDivElement,
                 descriptionElement: HTMLDivElement,
                 viewDetailsButtonElement: HTMLButtonElement) {
  // 1
  imageElement.src = book.coverUrl
  // 2
  titleElement.innerHTML = book.title
  priceElement.innerHTML = book.price
  descriptionElement.innerHTML = book.description
  viewDetailsButtonElement.innerHTML = "view details"

  // 3
  viewDetailsButtonElement.addEventListener("click", {
    window.open(book.url)
  })
}
В этом методе, вы:
- Укажите ссылку на обложку книги как источник элемента картинки в карточке.
- Укажите текстовое содержание для различных текстовых элементов.
- Добавьте слушателя события
clickк элементу кнопка, которая будет вести к URL книги если нажата кнопка.
Применение CSS
До сих пор отсутствует метод applyStyle(), который вы должны так же добавить в класс CardBuilder.
private fun applyStyle(containerElement: HTMLDivElement,
                       imageElement: HTMLImageElement,
                       titleElement: HTMLDivElement,
                       priceElement: HTMLDivElement,
                       descriptionElement: HTMLDivElement,
                       viewDetailsButtonElement: HTMLButtonElement) {
  containerElement.addClass("card", "card-shadow")
  imageElement.addClass("cover-image")
  titleElement.addClass("text-title", "float-left")
  descriptionElement.addClass("text-description", "float-left")
  priceElement.addClass("text-price", "float-left")
  viewDetailsButtonElement.addClass("view-details", "ripple", "float-right")
}
Этот метода добавляет верные CSS классы, который вам нужны для стилизации карточек книг с помощью "material design". Вы можете найти эти классы уже настроенными в style.css. Для примера, тень карточки CSS класса дает "material" тень карточке контейнера, и float-left css класс выравнивает элементы по левой стороне.
Создание карточки.
Вернемся назад в BookStorePage класс и начнем использовать код создания этой карточки. Первый, добавим свойство в класс, который будет хранить объект CardBuilder
private val cardBuilder = CardBuilder()
Теперь идем в showBooks() метод и добавялем следующий код:
books.forEach { book ->
  val card = cardBuilder.build(book)
  content.appendChild(card)
}
Этот код проходит через список книг, и для каждой книги, созадет HTML элемент, отображающий её. Теперь, это добавляет элемент к содержанию div который мы наблюдали из DOM ранее.
Отображение Страницы книжного магазина
Вы почти закончили. Добавим следующий метод в класс BookStorePage.
fun show() {
  presenter.attach(this)
  presenter.loadBooks()
}
Этот код указывает текущий BookStorePage экземпляр как представитель вью, который может получать callback от него. И затем просит представителя начать загрузку книг.
Идите в main() функцию и обновите, чтобы она вызывала show() метод в bookStorePage. Полный метод main() должен теперь выглядеть таким образом:
fun main(args: Array<String>) {
  val bookStorePresenter = BookStorePresenter()
  val bookStorePage = BookStorePage(bookStorePresenter)
  bookStorePage.show()
}
Сбилдим проект, и обновим index.html.
Вы должны увидеть загрузчик мельком, прежде чем приложение закончит загрузку книги. Затем отобразятся книжные каточки. Карточки должны иметь теперь, когда вы будете наводить на нее мышку, и кнопка "View Details" должна вас вести на нужную страницу книги.

Ура! Вы воздали ваше первое web приложение на Kotlin :]
Счастливое лицо!
Фото бот
Сегодня наша миссия - создать фото бота. который будет посылать пользователю картинку. Это просто пример, мы не будем использовать картинки онлайн, не будет поддержки груповых чатов. Просто локально картинки. Но зато мы научимся как создавать свои клавиатуры, как посылать картинки и создавать команды.
Давайте уважать сервера телеграм
И так для начала, давайте подготовит нашу картинку. Скачаем 5 незнакомых нам картинок. Смотрите: мы пошлем один и тот же файл пользователю много раз, поэтому сохраним наш трафик и место на жестком дисе серверов телеграм. Это чудесно что мы можем загрузить наши файлы на их сервера единожды и и просто пыслать файлы(картинки, аудио, документы, голосовые сообщения) с помощью их уникального id. Ну что ж, теперь давайте узнаем file_id когда мы его отправим боту. Как обычно, создаем новый проект и создаем 2 файла: Main.java и PhotoBot.java.
Добавим следующий код в первый файл, не забываем установить библиотеку телеграм бота.
import org.telegram.telegrambots.ApiContextInitializer;
import org.telegram.telegrambots.TelegramBotsApi;
import org.telegram.telegrambots.exceptions.TelegramApiException;


public class Main {
    public static void main(String[] args) {
        ApiContextInitializer.init();

        TelegramBotsApi botsApi = new TelegramBotsApi();

        try {
            botsApi.registerBot(new PhotoBot());
        } catch (TelegramApiException e) {
            e.printStackTrace();
        }
        System.out.println("PhotoBot successfully started!");
    }
}
Этот код зарегистрирует нашего бота и ответи "PhotoBot successfully started!", когда он будет успешно запущен. Затем, сохрханим и откроем PhotoBot.java. Вставляем следующий код.
Не забываем указать username и token:
import org.telegram.telegrambots.api.methods.send.SendMessage;
import org.telegram.telegrambots.api.objects.Update;
import org.telegram.telegrambots.bots.TelegramLongPollingBot;
import org.telegram.telegrambots.exceptions.TelegramApiException;

public class PhotoBot extends TelegramLongPollingBot {
    @Override
    public void onUpdateReceived(Update update) {

        // We check if the update has a message and the message has text
        if (update.hasMessage() && update.getMessage().hasText()) {
            // Set variables
            String message_text = update.getMessage().getText();
            long chat_id = update.getMessage().getChatId();
            SendMessage message = new SendMessage() // Create a message object object
                    .setChatId(chat_id)
                    .setText(message_text);
            try {
                sendMessage(message); // Sending our message object to user
            } catch (TelegramApiException e) {
                e.printStackTrace();
            }
        }
    }

    @Override
    public String getBotUsername() {
        // Return bot username
        // If bot username is @MyAmazingBot, it must return 'MyAmazingBot'
        return "PhotoBot";
    }

    @Override
    public String getBotToken() {
        // Return bot token from BotFather
        return "12345:qwertyuiopASDGFHKMK";
    }
}
Теперь обновим наш onUpdateReceived метод. Мы хотим посылать file_id картинки которая отправляется боту. Давайте проверим содержит ли сообщение объект с картинкой:
@Override
public void onUpdateReceived(Update update) {

    // We check if the update has a message and the message has text
    if (update.hasMessage() && update.getMessage().hasText()) {
        // Set variables
        String message_text = update.getMessage().getText();
        long chat_id = update.getMessage().getChatId();
        SendMessage message = new SendMessage() // Create a message object object
                    .setChatId(chat_id)
                    .setText(message_text);
        try {
            sendMessage(message); // Sending our message object to user
        } catch (TelegramApiException e) {
            e.printStackTrace();
        }
    } else if (update.hasMessage() && update.getMessage().hasPhoto()) {
        // Message contains photo
    }
}
Мы хотим чтобы наш бот отправял file_id картинки. Давайте сделаем это:
else if (update.hasMessage() && update.getMessage().hasPhoto()) {
    // Message contains photo
    // Set variables
    long chat_id = update.getMessage().getChatId();

    // Array with photo objects with different sizes
    // We will get the biggest photo from that array
    List<PhotoSize> photos = update.getMessage().getPhoto();
    // Know file_id
    String f_id = photos.stream()
                    .sorted(Comparator.comparing(PhotoSize::getFileSize).reversed())
                    .findFirst()
                    .orElse(null).getFileId();
    // Know photo width
    int f_width = photos.stream()
                    .sorted(Comparator.comparing(PhotoSize::getFileSize).reversed())
                    .findFirst()
                    .orElse(null).getWidth();
    // Know photo height
    int f_height = photos.stream()
                    .sorted(Comparator.comparing(PhotoSize::getFileSize).reversed())
                    .findFirst()
                    .orElse(null).getHeight();
    // Set photo caption
    String caption = "file_id: " + f_id + "\nwidth: " + Integer.toString(f_width) + "\nheight: " + Integer.toString(f_height);
    SendPhoto msg = new SendPhoto()
                    .setChatId(chat_id)
                    .setPhoto(f_id)
                    .setCaption(caption);
    try {
        sendPhoto(msg); // Call method to send the photo with caption
    } catch (TelegramApiException e) {
        e.printStackTrace();
    }
}
Взгляните:
Чудесно! Теперь мы знаем file_id картинки и мы можемп посылать её с помощью file_id. Давайте заставим нашего бота отвечать этой картинкой на команду /pic.
if (update.hasMessage() && update.getMessage().hasText()) {
    // Set variables
    String message_text = update.getMessage().getText();
    long chat_id = update.getMessage().getChatId();
    if (message_text.equals("/start")) {
        // User send /start
        SendMessage message = new SendMessage() // Create a message object object
                        .setChatId(chat_id)
                        .setText(message_text);
        try {
            sendMessage(message); // Sending our message object to user
        } catch (TelegramApiException e) {
            e.printStackTrace();
        }
    } else if (message_text.equals("/pic")) {
        // User sent /pic
        SendPhoto msg = new SendPhoto()
                        .setChatId(chat_id)
                        .setPhoto("AgADAgAD6qcxGwnPsUgOp7-MvnQ8GecvSw0ABGvTl7ObQNPNX7UEAAEC")
                        .setCaption("Photo");
                try {
                    sendPhoto(msg); // Call method to send the photo
                } catch (TelegramApiException e) {
                    e.printStackTrace();
                }
    } else {
        // Unknown command
        SendMessage message = new SendMessage() // Create a message object object
                        .setChatId(chat_id)
                        .setText("Unknown command");
        try {
            sendMessage(message); // Sending our message object to user
        } catch (TelegramApiException e) {
            e.printStackTrace();
        }
    }
}
Теперь бот посылает картинку так:

И даже говорить что не знает какие-то команды:

Давайте теперь вгзлянем на ReplyKeyboardMarkup. Мы создадим свою клавиатуру как показано ниже:
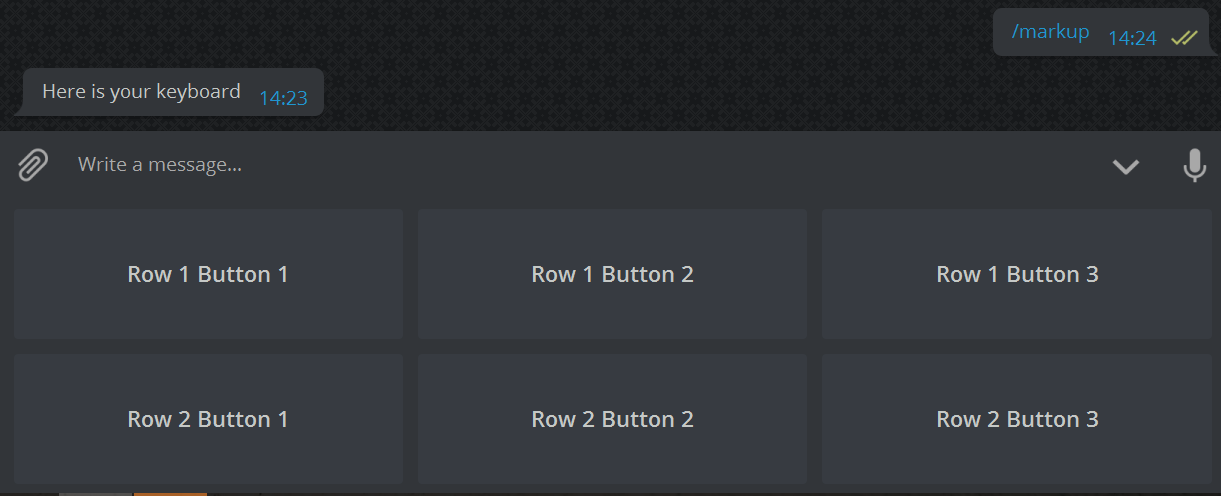
Ну чтож, туперь вы знаете как научить нашего бота распознавать команды. Давайте создадим другой if для команды /markup.
Помните! Нажатие на кнопку отправляет боту текст этой кнопки. Для примера, если мы вставим "Hello" текст в кнопку, то когда мы её нажмем, она отправит текст "Hello" боту.
else if (message_text.equals("/markup")) {
    SendMessage message = new SendMessage() // Create a message object object
                        .setChatId(chat_id)
                        .setText("Here is your keyboard");
    // Create ReplyKeyboardMarkup object
    ReplyKeyboardMarkup keyboardMarkup = new ReplyKeyboardMarkup();
    // Create the keyboard (list of keyboard rows)
    List<KeyboardRow> keyboard = new ArrayList<>();
    // Create a keyboard row
    KeyboardRow row = new KeyboardRow();
    // Set each button, you can also use KeyboardButton objects if you need something else than text
    row.add("Row 1 Button 1");
    row.add("Row 1 Button 2");
    row.add("Row 1 Button 3");
    // Add the first row to the keyboard
    keyboard.add(row);
    // Create another keyboard row
    row = new KeyboardRow();
    // Set each button for the second line
    row.add("Row 2 Button 1");
    row.add("Row 2 Button 2");
    row.add("Row 2 Button 3");
    // Add the second row to the keyboard
    keyboard.add(row);
    // Set the keyboard to the markup
    keyboardMarkup.setKeyboard(keyboard);
    // Add it to the message
    message.setReplyMarkup(keyboardMarkup);
    try {
        sendMessage(message); // Sending our message object to user
    } catch (TelegramApiException e) {
        e.printStackTrace();
    }
}
Отлично! Теперь научим бота реагировать на кнопки:
else if (message_text.equals("Row 1 Button 1")) {
    SendPhoto msg = new SendPhoto()
                .setChatId(chat_id)
                .setPhoto("AgADAgAD6qcxGwnPsUgOp7-MvnQ8GecvSw0ABGvTl7ObQNPNX7UEAAEC")
                .setCaption("Photo");
    try {
        sendPhoto(msg); // Call method to send the photo
    } catch (TelegramApiException e) {
        e.printStackTrace();
    }
}
Когда пользователь нажмет на "Row 1 Button 1", бот в ответ отправит ему file_id картинки.

Добавим функцию "Убрать клавиатуру", когда человек отправляет команду /hide боту. Это может быть с помощью ReplyMarkupRemove.
else if (message_text.equals("/hide")) {
    SendMessage msg = new SendMessage()
                        .setChatId(chat_id)
                        .setText("Keyboard hidden");
    ReplyKeyboardRemove keyboardMarkup = new ReplyKeyboardRemove();
    msg.setReplyMarkup(keyboardMarkup);
    try {
        sendMessage(msg); // Call method to send the photo
    } catch (TelegramApiException e) {
        e.printStackTrace();
    }
}
Вот код для наших файлов. вы так же можете найти все ресурсы в репе на GitHub.
src/Main.java
import org.telegram.telegrambots.ApiContextInitializer;
import org.telegram.telegrambots.TelegramBotsApi;
import org.telegram.telegrambots.exceptions.TelegramApiException;


public class Main {
    public static void main(String[] args) {
        ApiContextInitializer.init();

        TelegramBotsApi botsApi = new TelegramBotsApi();

        try {
            botsApi.registerBot(new PhotoBot());
        } catch (TelegramApiException e) {
            e.printStackTrace();
        }
        System.out.println("PhotoBot successfully started!");
    }
}
src/PhotoBot.java
import org.telegram.telegrambots.api.methods.send.SendMessage;
import org.telegram.telegrambots.api.methods.send.SendPhoto;
import org.telegram.telegrambots.api.objects.PhotoSize;
import org.telegram.telegrambots.api.objects.Update;
import org.telegram.telegrambots.api.objects.replykeyboard.ReplyKeyboardMarkup;
import org.telegram.telegrambots.api.objects.replykeyboard.ReplyKeyboardRemove;
import org.telegram.telegrambots.api.objects.replykeyboard.buttons.KeyboardRow;
import org.telegram.telegrambots.bots.TelegramLongPollingBot;
import org.telegram.telegrambots.exceptions.TelegramApiException;

import java.util.ArrayList;
import java.util.Comparator;
import java.util.List;

public class PhotoBot extends TelegramLongPollingBot {
    @Override
    public void onUpdateReceived(Update update) {

        // We check if the update has a message and the message has text
        if (update.hasMessage() && update.getMessage().hasText()) {
            // Set variables
            String message_text = update.getMessage().getText();
            long chat_id = update.getMessage().getChatId();
            if (message_text.equals("/start")) {
                SendMessage message = new SendMessage() // Create a message object object
                        .setChatId(chat_id)
                        .setText(message_text);
                try {
                    sendMessage(message); // Sending our message object to user
                } catch (TelegramApiException e) {
                    e.printStackTrace();
                }
            } else if (message_text.equals("/pic")) {
                SendPhoto msg = new SendPhoto()
                        .setChatId(chat_id)
                        .setPhoto("AgADAgAD6qcxGwnPsUgOp7-MvnQ8GecvSw0ABGvTl7ObQNPNX7UEAAEC")
                        .setCaption("Photo");
                try {
                    sendPhoto(msg); // Call method to send the photo
                } catch (TelegramApiException e) {
                    e.printStackTrace();
                }
            } else if (message_text.equals("/markup")) {
                SendMessage message = new SendMessage() // Create a message object object
                        .setChatId(chat_id)
                        .setText("Here is your keyboard");
                // Create ReplyKeyboardMarkup object
                ReplyKeyboardMarkup keyboardMarkup = new ReplyKeyboardMarkup();
                // Create the keyboard (list of keyboard rows)
                List<KeyboardRow> keyboard = new ArrayList<>();
                // Create a keyboard row
                KeyboardRow row = new KeyboardRow();
                // Set each button, you can also use KeyboardButton objects if you need something else than text
                row.add("Row 1 Button 1");
                row.add("Row 1 Button 2");
                row.add("Row 1 Button 3");
                // Add the first row to the keyboard
                keyboard.add(row);
                // Create another keyboard row
                row = new KeyboardRow();
                // Set each button for the second line
                row.add("Row 2 Button 1");
                row.add("Row 2 Button 2");
                row.add("Row 2 Button 3");
                // Add the second row to the keyboard
                keyboard.add(row);
                // Set the keyboard to the markup
                keyboardMarkup.setKeyboard(keyboard);
                // Add it to the message
                message.setReplyMarkup(keyboardMarkup);
                try {
                    sendMessage(message); // Sending our message object to user
                } catch (TelegramApiException e) {
                    e.printStackTrace();
                }
            } else if (message_text.equals("Row 1 Button 1")) {
                SendPhoto msg = new SendPhoto()
                        .setChatId(chat_id)
                        .setPhoto("AgADAgAD6qcxGwnPsUgOp7-MvnQ8GecvSw0ABGvTl7ObQNPNX7UEAAEC")
                        .setCaption("Photo");

                try {
                    sendPhoto(msg); // Call method to send the photo
                } catch (TelegramApiException e) {
                    e.printStackTrace();
                }
            } else if (message_text.equals("/hide")) {
                SendMessage msg = new SendMessage()
                        .setChatId(chat_id)
                        .setText("Keyboard hidden");
                ReplyKeyboardRemove keyboardMarkup = new ReplyKeyboardRemove();
                msg.setReplyMarkup(keyboardMarkup);
                try {
                    sendMessage(msg); // Call method to send the photo
                } catch (TelegramApiException e) {
                    e.printStackTrace();
                }
            } else {
                SendMessage message = new SendMessage() // Create a message object object
                        .setChatId(chat_id)
                        .setText("Unknown command");
                try {
                    sendMessage(message); // Sending our message object to user
                } catch (TelegramApiException e) {
                    e.printStackTrace();
                }
            }
        } else if (update.hasMessage() && update.getMessage().hasPhoto()) {
            // Message contains photo
            // Set variables
            long chat_id = update.getMessage().getChatId();

            List<PhotoSize> photos = update.getMessage().getPhoto();
            String f_id = photos.stream()
                    .sorted(Comparator.comparing(PhotoSize::getFileSize).reversed())
                    .findFirst()
                    .orElse(null).getFileId();
            int f_width = photos.stream()
                    .sorted(Comparator.comparing(PhotoSize::getFileSize).reversed())
                    .findFirst()
                    .orElse(null).getWidth();
            int f_height = photos.stream()
                    .sorted(Comparator.comparing(PhotoSize::getFileSize).reversed())
                    .findFirst()
                    .orElse(null).getHeight();
            String caption = "file_id: " + f_id + "\nwidth: " + Integer.toString(f_width) + "\nheight: " + Integer.toString(f_height);
            SendPhoto msg = new SendPhoto()
                    .setChatId(chat_id)
                    .setPhoto(f_id)
                    .setCaption(caption);
            try {
                sendPhoto(msg); // Call method to send the message
            } catch (TelegramApiException e) {
                e.printStackTrace();
            }
        }
    }

    @Override
    public String getBotUsername() {
        // Return bot username
        // If bot username is @MyAmazingBot, it must return 'MyAmazingBot'
        return "PhotoBot";
    }

    @Override
    public String getBotToken() {
        // Return bot token from BotFather
        return "12345:qwertyuiopASDGFHKMK";
    }
}
Теперь вы можете создавать и скрывать клавиатуру, создавать свои каоманды и отправлять картинки с помощью file_id.
Как я сделал RAG для своей компании
Появилась свободное время, и я решил сделать RAG (Retrieval Augmented Generation) для нашей компании. Компания небольшая, но документации технической и бизнес накопилось очень много, в основном на wiki.
Цель - подключить бота в slack, который быстро может выдать инфу по нужной теме.
Источник знаний:
- Wiki
- JIRA
- Slack
Сегодня покроем только создание RAG из Wiki + создание бота. Писалось все за 2 дня, поэтому жутко не оптимально, но бот уже работает и выполняет свою функцию, дальше будет улучшать.
Для начал чуть-чуть теории. Из чего сделана любая RAG?
- Парсинг данных из источника в текст (например в json)
- Конвертер из текстовых данных (json) в векторную базу при помощи embed модели и векторной БД
- Получение запрос пользователя (в моем случае в Slack)
- Поиск векторов схожих с запросом пользователя в векторной БД
- Отправка топ схожих векторов в generator model
- Получение ответа от generator model
- Отправка ответ пользователю (в моем случае в Slack)
Векторная база — это хранилище, где данные представлены в виде векторов, позволяющих быстро находить похожие объекты с помощью поиска ближайших соседей.
Пример схожести текстов в векторе: 1️⃣«Как работает векторная база данных?» 2️⃣ «Что такое векторный поиск в базах данных?»
Векторное представление (условное, для примера):
import numpy as np

vector1 = np.array([0.12, 0.85, 0.64, 0.33, 0.92])  # Вектор для первого текста
vector2 = np.array([0.14, 0.83, 0.67, 0.35, 0.91])  # Вектор для второго текста

# Вычисляем косинусное сходство (показывает, насколько тексты похожи)
cosine_similarity = np.dot(vector1, vector2) / (np.linalg.norm(vector1) * np.linalg.norm(vector2))

print(f"Косинусное сходство: {cosine_similarity:.3f}")  # Близко к 1 → тексты похожи
Вывод: Векторы близки, потому что тексты имеют схожий смысл. Векторная база позволяет быстро находить такие похожие тексты по запросу пользователя.
Начнем с парсинга данных С wiki можно получить список страниц.
# URL to get the list of pages in the SQA space
wiki_url = "https://company.atlassian.net/wiki/rest/api/content"

# Request parameters to get pages from the SQA space
params = {
    'spaceKey': 'SQA',  # space Name
    'limit': 100,       # Limit the number of pages
    'expand': 'space',  # Expand the space information
    'type': 'page',     # Only pages
    'format': 'json'    # JSON response format
}

username = os.getenv('WIKI_USERNAME')
apikey = os.getenv('WIKI_APIKEY')

# Headers
headers = {
    'Accept': 'application/json'
}

# Perform the request with basic authorization to get the list of pages
response = requests.get(wiki_url, headers=headers, params=params, auth=(username, apikey))
А затем сами страницы.
# Check the response
if response.status_code == 200:
    print("Successful request to get the list of pages.")
    pages = response.json()['results']  # Extract pages from the response

    # Open the file for writing
    with open('./Data/wiki_pages.json', 'w', encoding='utf-8') as f:
        # Write the list of pages to the file
        json.dump(pages, f, ensure_ascii=False, indent=4)

    print(f"The list of pages has been written to 'wiki_pages.json'. Starting to load page content...")

    # Load the content of each page
    for page in pages:
        page_id = page['id']
        page_url = f"https://company.atlassian.net/wiki/rest/api/content/{page_id}"

        # Request parameters to get the page content
        content_params = {
            'expand': 'body.storage',  # Get the HTML content of the page
            'format': 'json'
        }

        # Perform the request to get the page content
        content_response = requests.get(page_url, headers=headers, params=content_params, auth=(username, apikey))

        # Check the response
        if content_response.status_code == 200:
            content = content_response.json()
            page_title = page['title']
            page_body = content['body']['storage']['value']

            # Clean the HTML content
            cleaned_title = clean_html(page_title)
            cleaned_body = clean_html(page_body)

            # Save the content to a separate file
            with open(f"./Data/wiki_page_{page_id}.json", 'w', encoding='utf-8') as page_file:
                json.dump({'title': cleaned_title, 'content': cleaned_body}, page_file, ensure_ascii=False, indent=4)

            print(f"Page content '{page_title}' saved to './Data/wiki_page_{page_id}.json'.")
        else:
            print(f"Error loading content for page {page_id}: {content_response.status_code}")

else:
    print(f"Error requesting the list of pages: {response.status_code}")
    print(response.text)
Функция очистки html страницы.
def clean_html(content: str) -> str:
    """
    Cleans HTML content by removing tags, scripts, styles, and unnecessary spaces.
    """
    # Parse HTML with BeautifulSoup
    soup = BeautifulSoup(content, 'html.parser')

    # Remove all script and style tags
    for script_or_style in soup(['script', 'style']):
        script_or_style.decompose()

    # Add spaces after block-level elements
    for tag in soup.find_all(['p', 'div', 'br', 'li', 'td', 'th', 'tr', 'h1', 'h2', 'h3', 'h4', 'h5', 'h6']):
        tag.insert_after(' ')

    # Get clean text
    clean_text = soup.get_text()

    # Remove multiple spaces and line breaks
    clean_text = re.sub(r'\s+', ' ', clean_text)  # Replace multiple spaces with one
    clean_text = clean_text.strip()  # Remove extra spaces at the beginning and end

    return clean_text
Конвертер в векторную БД Инициализируем ChromaDB (векторная БД) и embed модель. Создаем коллекцию в БД.
# Initialize the model for text vectorization
model = SentenceTransformer("all-MiniLM-L6-v2")

# Initialize ChromaDB
client = chromadb.PersistentClient(path="./chroma_db")

# Create collection
collection = client.get_or_create_collection(name="wiki_embeddings")
Embed-модель — это нейросеть, которая преобразует текст, изображение или другой тип данных в векторное представление (эмбеддинг). Эти векторы помогают находить похожие объекты с помощью поиска ближайших соседей.
По идее качество RAG системы будет зависеть в том числе и от выбранной RAG модели, но пока я этого не заметил. Использовал самую простую, но обязательно испытаю разные.
Функция обработки файлов json.
def process_files():
    """Processes JSON files, extracts data, and adds it to ChromaDB."""
    for filename in os.listdir(DATA_DIR):
        if filename.endswith(".json"):
            file_path = os.path.join(DATA_DIR, filename)
            with open(file_path, "r", encoding="utf-8") as file:
                data = json.load(file)

                if isinstance(data, list):
                    for idx, item in enumerate(data):
                        process_entry(item, f"{filename}_{idx}")
                else:
                    process_entry(data, filename)
Функция создание одной записи в БД.
def process_entry(data, doc_id):
    """Processes a single JSON entry."""
    title = data.get("title", "Untitled")
    content = data.get("content", "")

    if content.strip():  # Skip empty content
        full_text = f"{title}\n{content}"  # Combine title and content
        embedding = model.encode(full_text).tolist()

        collection.add(
            ids=[doc_id],
            embeddings=[embedding],
            documents=[full_text],
            metadatas=[{"title": title, "filename": doc_id}]
        )
        print(f"Document added: {doc_id}")
        print(f"TITLE >>>>>>", full_text.splitlines()[0])
Внимание: здесь я сознательно добавил title из wiki в content и создаю вектор на основе title + content. Иначе в RAG не хватало данных для ответа на вопросы по title.
Локальный генератор Качаем модель huggingface, и пробуем использовать ее локально.
from huggingface_hub import hf_hub_download

hf_hub_download(repo_id="TheBloke/Mistral-7B-Instruct-v0.1-GGUF",
                filename="mistral-7b-instruct-v0.1.Q4_K_M.gguf",
                local_dir="models/")
Я выбрал скомпилированную модель на C++ из-за скорости. Не уверен, что эта модель поддерживает русский язык, у меня wiki на английском.
Делаем цикл вопрос-ответ в command line.
def main():
    model_path = "models/mistral-7b-instruct-v0.1.Q4_K_M.gguf"  # Path to the model
    chroma_client = chromadb.PersistentClient(path="./chroma_db")
    llm = load_llm(model_path)

    while True:
        query = input("Query: ")
        if query.lower() in ["exit", "quit"]:
            break

        context_docs = query_chroma(chroma_client, query)
        context = "\n".join(context_docs) if context_docs else "Info not found."
        response = generate_response(llm, query, context)
        print("Answer:", response.strip())
Запрос в ChromaDB. Просим вернуть топ 5 (top_k=5) совпадающих векторов. Функция ниже выдаст Similarity score (% совпадения вектора с запросом), по котором можно отлаживать ответы модели.
def query_chroma(chroma_client, query_text, top_k=5):
    collection = chroma_client.get_collection("wiki_embeddings")  # Collection name
    results = collection.query(query_texts=[query_text], n_results=top_k)

    if results["documents"]:
        for doc, score in zip(results["documents"][0], results["distances"][0]):
            print(f"Similarity Score: {score:.4f}, Document: {doc}")
            print(".")
        return results["documents"][0]
    return []
Генерация ответа. Это важный код, тут идет вызов модели Генератора.
Мы передаем модели prompt, скармливая топ полученных векторов, схожих с запросом, в виде Context. Здесь достаточно безопасно применять внешние модели, не боясь, что они получат все ваши данные, потому что получат они только топ-векторы по конкретному запросу.
Важный параметр temperature=0. Ноль, потому что я хочу, чтобы модель не фантазировала, а работала как справочник. Если поставить 1, то модель будет максимально креативной, что не есть хорошо для RAG.
def generate_response(llm, query, context):
    prompt = f"""
    Use the following context to answer the question:
    {context}\n\nQuestion: {query}\nAnswer:\n"""
    return llm(prompt, max_tokens=512, temperature=0)["choices"][0]["text"]
Загрузка LLM. Грузим с максимальный context window (n_ctx=8196), чтобы вошло 5 векторов.
def load_llm(model_path):
    return Llama(model_path=model_path, n_ctx=8196, n_threads=8, log_level="OFF")
Локальный генератор работает достаточно медленно на MacBook Pro M3. Качества ответов на 3 из 5. Можно подобрать и скачать более подходящую модель. Можно любую модель потюнить параметрами.
Удаленный генератор Пробуем Gemini от Google. ChromaDB здесь инициализируем как persistent client, иначе могут быть тонкости с получением того, что в кэше, вместо реального вектора.
import google.generativeai as genai

# Load Gemini API Key from environment variables
GEMINI_API_KEY = os.getenv("GEMINI_API_KEY")

# Initialize Gemini client
genai.configure(api_key=GEMINI_API_KEY)

# Initialize ChromaDB
chroma_client = chromadb.PersistentClient(path="./chroma_db")
Генератор ответа. Я использовал gemini-2.0-flash. Она быстрая, точная и имеет большой лимит бесплатных токенов. Ответы на 5 из 5.
def generate_response(query, context):
    """Generate a response using Google's Gemini model."""
    prompt = f"""
    Use the following context to answer the question:
    {context}

    Question: {query}
    Answer:
    """

    model = genai.GenerativeModel("gemini-2.0-flash")
    response = model.generate_content(prompt)

    return response.text.strip()
Тот же самый генератор ответа с OpenAPI. Модель chatGPT-3.5-turbo. Работает медленнее, чем Gemini, и отвечает на 4 из 5. И бесплатных токенов мало. Но хотим купить токены для chatGPT-4.0. По качеству ответов отпишусь.
def generate_response(query, context):
    """Generate a response using OpenAI's GPT-4 model (OpenAI v1.0+ API)."""
    prompt = f"""
    Use the following context to answer the question:
    {context}

    Question: {query}
    Answer:
    """

    response = client.chat.completions.create(
        model="gpt-4o-mini",  # Change to "gpt-3.5-turbo" if needed
        messages=[
            {"role": "system", "content": "You are a helpful AI assistant."},
            {"role": "user", "content": prompt}
        ],
        temperature=0.7
    )

    return response.choices[0].message.content.strip()
Потом прикручиваем Slack. Или любой другой чат, который нужен, и где есть API.
Как оно работает? Первичное тестирование показало отличные результаты на Gemini. Быстро и точно отвечает. Если информации нет, так и говорит, что информация не найдена.
Бота в Slack назвали R2D2 🙂. Когда я у него спросил: "Напиши список сотрудников", он написал всех и добавил себя в конце. Я не мог понять, откуда он себя взял?! Оказалось, на wiki был описан некий R2D2, тоже бот 🙂.
Wiki можно парсить overnight, для обновления векторной БД новыми знаниями.
Что еще нужно сделать? Roadmap Roadmap Добавить знания из Slack
Добавить парсинг PDF
Попробовать дообучить модель на наших данных вместо подачи контекста модели-генератора (долго, дорого и не факт, что будет лучше)
Поробовать Grok-3 от Elon Musk
Попробовать embed+generator модель одного производителя (не факт, что будет лучше)
Что пока не будем делать? Подключать фреймворк Langchain. Пока не понял всех его преимуществ.
Langchain — это фреймворк для разработки приложений с использованием языковых моделей, таких как GPT или другие, который предоставляет удобные инструменты для интеграции различных компонентов.
tracim - Unified platform for seamless collaboration.
https://github.com/tracim/tracim
docker run -e DATABASE_TYPE=sqlite -e TRACIM_WEBSITE__BASE_URL=http://192.168.1.125:808 -p 808:80 -v ~/tracim/etc:/etc/tracim -v ~/tracim/var:/var/tracim algoo/tracim:latest
Tinode Instant Messaging Server
https://github.com/tinode/chat
по быстрому развернуть:
# Reference configuration for a simple Tinode server.
# Includes:
# * Mysql database
# * Tinode server
# * Tinode exporters

version: '3.8'

# Base Tinode template.
x-tinode:
  &tinode-base
  depends_on:
    - db
  image: tinode/tinode:latest
  restart: always

x-tinode-env-vars: &tinode-env-vars
  "STORE_USE_ADAPTER": "mysql"
  "PPROF_URL": "/pprof"
  # You can provide your own tinode config by setting EXT_CONFIG env var and binding your configuration file to
  # "EXT_CONFIG": "/etc/tinode/tinode.conf"
  "WAIT_FOR": "mysql:3306"
  # Push notifications.
  # Modify as appropriate.
  # Tinode Push Gateway configuration.
  "TNPG_PUSH_ENABLED": "false"
  # "TNPG_USER": "<user name>"
  # "TNPG_AUTH_TOKEN": "<token>"
  # FCM specific server configuration.
  "FCM_PUSH_ENABLED": "false"
  # "FCM_CRED_FILE": "<path to FCM credentials file>"
  # "FCM_INCLUDE_ANDROID_NOTIFICATION": false
  #
  # FCM Web client configuration.
  "FCM_API_KEY": "AIzaSyD6X4ULR-RUsobvs1zZ2bHdJuPz39q2tbQ"
  "FCM_APP_ID": "1:114126160546:web:aca6ea2981feb81fb44dfb"
  "FCM_PROJECT_ID": "tinode-1000"
  "FCM_SENDER_ID": 114126160546
  "FCM_VAPID_KEY": "BOgQVPOMzIMXUpsYGpbVkZoEBc0ifKY_f2kSU5DNDGYI6i6CoKqqxDd7w7PJ3FaGRBgVGJffldETumOx831jl58"
  "FCM_MEASUREMENT_ID": "G-WNJDQR34L3"
  # iOS app universal links configuration.
  # "IOS_UNIV_LINKS_APP_ID": "<ios universal links app id>"
  # Video calls
  "WEBRTC_ENABLED": "false"
  # "ICE_SERVERS_FILE": "<path to ICE servers config>"

x-exporter-env-vars: &exporter-env-vars
  "TINODE_ADDR": "http://tinode.host:6060/stats/expvar/"
  # InfluxDB configation:
  "SERVE_FOR": "influxdb"
  "INFLUXDB_VERSION": 1.7
  "INFLUXDB_ORGANIZATION": "<your organization>"
  "INFLUXDB_PUSH_INTERVAL": 30
  "INFLUXDB_PUSH_ADDRESS": "https://mon.tinode.co/intake"
  "INFLUXDB_AUTH_TOKEN": "<auth token>"
  # Prometheus configuration:
  # "SERVE_FOR": "prometheus"
  # "PROM_NAMESPACE": "tinode"
  # "PROM_METRICS_PATH": "/metrics"

services:
  db:
    image: mysql:8.0
    container_name: mysql
    restart: always
    # Use your own volume.
    # volumes:
    #   - <mysql directory in your file system>:/var/lib/mysql
    environment:
      - MYSQL_ALLOW_EMPTY_PASSWORD=yes
    healthcheck:
      test: ["CMD", "mysqladmin" ,"ping", "-h", "localhost"]
      timeout: 5s
      retries: 10
    security_opt:
      - seccomp=unconfined

  # Tinode.
  tinode-0:
    << : *tinode-base
    container_name: tinode-0
    hostname: tinode-0
    # You can mount your volumes as necessary:
    # volumes:
    #   # E.g. external config (assuming EXT_CONFIG is set).
    #   - <path to your tinode.conf>:/etc/tinode/tinode.conf
    #   # Logs directory.
    #   - <path to your tinode-0 logs directory>:/var/log
    ports:
      - "6060:6060"
    environment:
      << : *tinode-env-vars
      "RESET_DB": ${RESET_DB:-false}
      "UPGRADE_DB": ${UPGRADE_DB:-false}

  # Monitoring.
  # Exporters are paired with tinode instances.
  exporter-0:
    container_name: exporter-0
    hostname: exporter-0
    depends_on:
      - tinode-0
    image: tinode/exporter:latest
    restart: always
    ports:
      - "6222:6222"
    links:
      - tinode-0:tinode.host
    environment:
      << : *exporter-env-vars
      "WAIT_FOR": "tinode-0:6060"