Kubernetes Rolling Update Configuration
Deployment controllers are a type of Pod controller in Kubernetes. They provide fine-grained control over how its pods are configured, how updates are performed, how many pods should run, and when pods should be terminated. There are many resources available for how to configure basic deployments, but it can be difficult to understand how each option impacts how rolling updates are performed. In this blog post we will cover the following topics to prepare you to become an expert with Kubernetes deployments:
Kubernetes Deployment Overview
Kubernetes deployments are essentially just a wrapper around ReplicaSets. The ReplicaSet manages the number of running pods, and the Deployment implements features on top of that to allow rolling updates, health checks on pods, and easy roll-back of updates.
During normal operations, the Deployment will just manage a single ReplicaSet which ensures that desired number of pods are running:
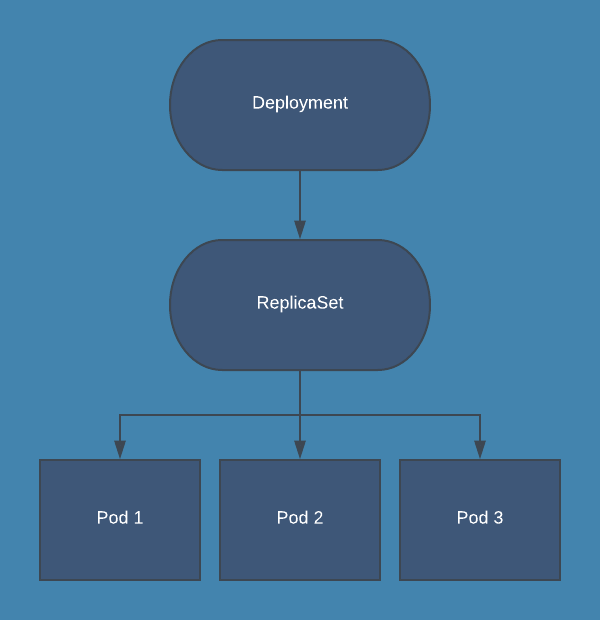
When using Deployments, you should not directly manage the ReplicaSet that is created by the Deployment. All operations that you would perform on a ReplicaSet should be performed on the Deployment instead, which then manages the process for updating the ReplicaSet. Here are some example kubectl commands for commonly performed operations on a Deployment:
# List deployments:
kubectl get deploy

# Update a deployment with a manifest file:
kubectl apply -f test.yaml

# Scale a deployment “test” to 3 replicas:
kubectl scale deploy/test --replicas=3

# Watch update status for deployment “test”:
kubectl rollout status deploy/test

# Pause deployment on “test”:
kubectl rollout pause deploy/test

# Resume deployment on “test”:
kubectl rollout resume deploy/test

# View rollout history on “test”:
kubectl rollout history deploy/test

# Undo most recent update on “test”:
kubectl rollout undo deploy/test

# Rollback to specific revision on “test”:
kubectl rollout undo deploy/test --to-revision=1
Kubernetes Rolling Updates
One of the primary benefits of using a Deployment to control your pods is the ability to perform rolling updates. Rolling updates allow you to update the configuration of your pods gradually, and Deployments offer many options to control this process.
The most important option to configure rolling updates is the update strategy. In your Deployment manifest, spec.strategy.type has two possible values:
- RollingUpdate: New pods are added gradually, and old pods are terminated gradually
- Recreate: All old pods are terminated before any new pods are added In most cases, RollingUpdate is the preferable update strategy for Deployments. Recreate can be useful if you are running a pod as a singleton, and having a duplicate pod for even a few seconds is not acceptable.
When using the RollingUpdate strategy, there are two more options that let you fine-tune the update process:
-
maxSurge: The number of pods that can be created above the desired amount of pods during an update
-
maxUnavailable: The number of pods that can be unavailable during the update process Both maxSurge and maxUnavailable can be specified as either an integer (e.g. 2) or a percentage (e.g. 50%), and they cannot both be zero. When specified as an integer, it represents the actual number of pods; when specifying a percentage, that percentage of the desired number of pods is used, rounded down. For example, If you were using the default values of 25% for both maxSurge and maxUnavailable, and applied an update to a Deployment with 8 pods, then maxSurge would be 2 pods, and maxUnavailable would also be 2 pods. That means that during the update process, the following conditions will be met:
-
At most 10 pods (8 desired pods + 2 maxSurge pods) will be Ready during the update
-
At least 6 pods (8 desired pods - 2 maxUnavailable pods) will always be Ready during the update It is important to note that when considering the number of pods a Deployment should run during an update, it will be using the number of replicas specified in the updated version of the deployment, not the existing version.
Another way of understanding these options is: maxSurge is the maximum number of new pods that will be created at a time, and maxUnavailable is the maximum number of old pods that will be deleted at a time. Let’s step through the process for updating a Deployment with 3 replicas from “v1” to “v2” using the following update strategy:
replicas: 3
strategy:
    type: RollingUpdate
    rollingUpdate:
      maxSurge: 1
      maxUnavailable: 0
This strategy says that we want to add pods one at a time, and that there must always be 3 pods ready in the deployment. The following gif will illustrate what happens in every step of the rolling update. Pods are marked as Ready if the Deployment sees them as fully deployed, NotReady if they are being created, and Terminating if they are being removed.
Kubernetes Rolling Update Configuration
Ready Pods in Kubernetes
Deployments implement the concept of ready pods to aide rolling updates. Readiness probes allow the deployment to gradually update pods while giving you the control to determine when the rolling update can proceed; it is also used by Services to determine which pods should be included in a service’s endpoints. Readiness probes are similar to, but not the same as liveness probes. Liveness probes allow the kubelet to determine which pods need to be restarted according to their Restart Policy, and they are configured separate from readiness probes. They do not impact the update process for Deployments.
A Ready pod is one that is considered successfully updated by the Deployment and will no longer count towards the surge count for deployment. A pod will be considered ready if its readiness probe is successful and spec.minReadySeconds have passed since the pod was created. The default for these options will result in a pod that is ready as soon as its containers start.
Here are several reasons why you would not want a pod to be ready as soon as the containers start:
- You want a health check endpoint to pass before serving traffic
- The application needs to warm up before serving traffic
- You want to slow down the deploy to reduce the impact on the running system Requiring a passing health check is very common for web applications, and is essential to performing updates with minimal disruption. Here is an example readiness probe for a web application to perform a health check:
readinessProbe:
          periodSeconds: 15
          timeoutSeconds: 2
          successThreshold: 2
          failureThreshold: 2
          httpGet:
            path: /health
            port: 80
This probe requires that calls to /health on port 80 succeed within 2 seconds, are performed every 15 seconds, and that 2 successful calls are required before the pod is ready. This means that in the best case scenario, the pod would be ready in ~30 seconds. Many applications will not be able to immediately service even simple requests within 2 seconds upon startup, so you should be prepared for the first 1 or 2 checks to fail, resulting in an actual ready time of ~60 seconds.
You can also configure a readiness probe that executes a command on the container. This allows you to write custom scripts that can be executed and determine if a pod is ready and the deployment can continue updating:
readinessProbe:
          exec:
            command:
              - /startup.sh
          initialDelaySeconds: 5
          periodSeconds: 15
          successThreshold: 1
In this configuration, the Deployment will wait 5 seconds and then execute the command every 15 seconds. An exit code of 0 is considered successful. The flexibility of using a command allows you to do things like load data into a cache or warmup the JVM, or do health checks on downstream services without modifying application code.
The last scenario we will cover here is slowing down the update process on purpose to minimize the impact on your system. While this may not seem like something you need at first glance, it can be very useful in several situations. This includes event processing systems, monitoring tools, and pods that have a long warmup time. This goal is easily accomplished by specifying minReadySeconds in your deployment spec. When minReadySeconds is specified, a pod must run for that many seconds without any of its containers crashing to be considered ready by the deployment.
For example, say you had a deployment running 5 pods that read from an event stream, process events, and save them to a database. It takes each pod about 60 seconds to warm up and process events at full speed. In the default configuration, the pods would be replaced and immediately become ready, but they would be slow to process events for the first minute. Immediately after your update is finished, this event processing system will have fallen behind and will need to catch up since all of the pods had to warm up at the same time. Instead, you can set your maxSurge to 1, maxUnavailable to 0, and minReadySeconds to 60. This would ensure new pods would be created one at a time, a minute would pass between pods being added, and old pods would only be removed once new pods have already warmed up. This way you update all your pods over the course of ~5 minutes, and your processing times remain stable.
Kubernetes Pod Affinity and Anti-Affinity
Affinity and anti-affinity allow you to control on which nodes the pods in your deployment can be scheduled. While this feature is not specific to deployments, it can be very useful for many applications.
When configuring affinity or anti-affinity, you will have to choose how you want your preferences to apply to new pods in different circumstances. There are two options:
- requiredDuringSchedulingIgnoredDuringExecution: the pod cannot be scheduled on a node unless it matches the affinity configuration, even if there are no nodes that match
- preferredDuringSchedulingIgnoredDuringExecution: the scheduler will attempt to schedule the pod on a node matching the affinity configuration, but if it is unable to do so the pod will still be scheduled on another node Pod affinity is used to schedule pods onto certain nodes. You would normally want to do this if you know that a pod has a specific resource requirement that can be met by a specific set of nodes e.g. nodes with a GPU, a node in a certain zone, or if you want the pods co-located with other pods that they will interact with e.g. running a web server on the same node as a cache to avoid making calls across the network. Here is an example of an affinity configuration in the pod spec of a deployment for running co-located pods:
affinity:
    podAffinity:
      requiredDuringSchedulingIgnoredDuringExecution:
      - labelSelector:
          matchExpressions:
          - key: app
            operator: In
            values:
            - cache
        topologyKey: "kubernetes.io/hostname"
Pod anti-affinity is useful for ensuring that pods in a Deployment are not scheduled all on one node, on nodes that have specialized resources needed elsewhere, or co-located with other pods. Here is an example anti-affinity configuration that prefers pods in the app “web” to not be scheduled on nodes that already have “web” pods, so that it is more likely that a single node is not running the entire deployment by itself.
podAntiAffinity:
      preferredDuringSchedulingIgnoredDuringExecution:
      - weight: 100
        podAffinityTerm:
          labelSelector:
            matchExpressions:
            - key: app
              operator: In
              values:
              - web
          topologyKey: kubernetes.io/hostname
The important thing to realize when configuring affinity and anti-affinity, is that the affinity rules are evaluated as pods are scheduled, and the scheduler is not able to foresee where pods will be scheduled. This means that in reality, affinity rules may not have the effect you desire. Consider a cluster with 3 nodes, and a deployment with 3 pods using the above anti-affinity configuration and a rollout config with a maxSurge of 1. Your goal may be to run one pod per node, but the scheduler can only try and schedule one pod at a time during the rollout. This means that over time, you will likely end up with nodes that do not have any of these pods after one update, and then all or most of the pods will move to that node on the following update. The scheduler does not know that you are going to terminate the old pods and still considers them in the anti-affinity scheduling. If you do have a goal to specifically run exactly one copy of a pod on each node, you should use DaemonSets. Another option, if your application can tolerate it, is to change your update strategy to Recreate. This way, when the scheduler evaluates your affinity rules no old pods will be running.
Affinity and anti-affinity have a plethora of options that can influence how pods are scheduled, but there are generally no guarantees when doing a rolling update. It is a very useful feature in certain circumstances, but unless you really need to control where pods run, you should defer to the kubernetes scheduler to make these decisions. The full Kubernetes documentation for pod affinity and anti-affinity can be found here.
Conclusion
We’ve gone over the basic usage of deployments, how rolling updates work, and many configuration options for fine-tuning updates and pod scheduling. At this point you should be able to confidently create and modify your deployments using update strategy, readiness probes, and pod affinity to get the desired state for your application. For a detailed reference on all of the options supported by deployments, check out the Kubernetes documentation.
If you are interested in a fully-managed solution to monitoring Kubernetes deployments and other resources, check out Blue Matador. Blue Matador automatically does event detection and classification for dozens of Kubernetes events and metrics, all with very little set up on your part. We also have Linux, Windows, and AWS integrations to meet all of your monitoring needs.